How to make a fuchsia bud from beads. How to weave fuchsia from beads? Fuchsia Flower Beading Materials
Beaded fuchsia: a technique for weaving a delightful flowerBeaded fuchsia: a technique for weaving a delightful flower
An exotic wonder: fuchsia made of beads is simple and beautiful!
Narcissus, violet, and rose have been blooming in botanical gardens and flower beds for centuries. But fuchsia, whose homeland is in the tropics of the New World (Central and South America, Tahiti and the New Zealand Islands), appeared in ornamental gardening only at the end of the nineteenth century.
Since then, these magnificent plants have gained immense popularity: evergreen shrubs, fast growth, bright colors of chic brushes of delicate flowers, in the spectrum of which there are all shades of the rainbow. But they don’t grow where it’s cold, preferring a warm, humid climate or special greenhouse care. And yet such exotic beauty is just right to write poems and erect monuments. And these monuments should look as natural as the flower itself. And it is quite possible to do this with your own hands if you weave fuchsia from beads. 


Master class on weaving fuchsia beads according to the pattern
Fuchsia made from beads is a beautiful and original flower that even beginner needlewomen can do.
Beading is a fun activity. The variety of colors of the material and the imagination of the craftswoman can perfectly replicate the shape and unusual harmony of an overseas flower. All you need is desire and patience. This master class offers a simple and accessible diagram and step-by-step instructions that can be followed even by novice needlewomen. In this version, the fuchsia flower is in contrasting red and white tones, but you can easily replace them with your own color.
So, beaded fuchsia is a master class.
To work you will need:
- fishing line, thread, wire;
- red beads (or your choice of color);
- white beads (or other beads of your choice);
- green beads for leaves and stem;
- beading needle;
- scissors.
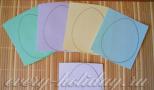
Before you make a delicate, but such a bright flower, you need to weave its base - in accordance with the option indicated in this diagram. 


There is no need to cut the thread or thin fishing line from which the base is made, it is still in work - we find, guided by the diagram, the 37th and 38th beads, and between them we begin to weave the first graceful petal. Once we’ve finished, we decorate the edge, go through it with a fishing line or thread, pulling the petal together, then, either on our own or holding the diagram before our eyes, we find the 39th and 40th bead and in this interval we begin weaving another petal. Then the next one.
The petal should be woven according to the pattern shown in this photo: 

Fuchsia is a “multi-level” flower: petals of two different colors, pistils (by the way, there are also five of them, like the petals, and stamens). The second, in our case the white level, we start with weaving the pestles - fig. 1a and fix it as in Fig. 1b. And only then - from the last, fifth in a row, we weave contrasting petals in full size. 
Then, through a large white bead, we put 18 red and one white beads on a thread or fishing line - stamens, there should also be five of them, as shown in the diagram. And we collect the whole flower together. 
Between its white and red parts there should be six small beads and one large one. 
Stem weaving is the usual stringing of beads on a thread or fishing line. At the base of the flower there is a large bead, followed by small beads. This will make the stem more expressive.
By combining several of these bright flowers created with your own hands into an inflorescence, you can make not only a beautiful bouquet, but also a brooch or pendant, attaching the fuchsia, for example, to a large decorative pin.
Beading is a great way to forever preserve the unfading beauty of exotic fuchsia. There are other options for creating fuchsia from beads. Watch the video for a detailed master class on creating fuchsia flowers using the parallel weaving technique. You can safely choose your own colors of beads, and then the beauty made by your own hands will become even more beautiful.
Dare, fantasize, and you will succeed!
Video: How to weave fuchsia from beads
Comments
Related posts:
 Beaded jasmine: do-it-yourself weaving pattern (video)
 Beaded flowers, manufacturing patterns and weaving techniques (photo)
 Beaded clover: weaving a flower and a shamrock
Dear beadwork masters! We present to your attention a step-by-step master class and a diagram for weaving fuchsia from beads. Fuchsia is an amazingly beautiful, but very whimsical flower. And if you were unable to grow this beauty on your window, do not despair - you can always create it from beads using our instructions containing step-by-step photos.
Tools and materials Time: 3 hours Difficulty: 4/10
- red transparent beads;
- white matte beads;
- green beads;
- a thread to match the beads used or transparent fishing line;
- bead needle.
Step-by-step instruction
There is nothing complicated in weaving this flower, especially since we will further describe in detail and show in diagrams and photos how to make fuchsia from beads.
Note! In our work we will use two main weaving techniques: brick and mosaic weaving.

Step 1: braiding a braid for the base

We begin to weave a small flagellum using the mosaic weaving technique. To do this, take 4 red beads and then proceed according to the scheme.

Step 2: Braiding Red Petals
After the flagellum is ready, you can start weaving the outer red fuchsia petals from beads. This is where we need brick weaving. In fact, there is nothing complicated about it.
At the very beginning of the first row, you need to put two beads on the needle, and then pass it through the first loop of the previous row, after which we guide it through the second bead put on. This is how a cute petal is formed. There should be 5 of them in total.

After the petal is ready, it needs to be given volume. To do this, we pass the thread through the outer beads and tighten. The petal will be slightly concave.

Step 3: Beading White Petals
The white inner petals are woven similarly to the red ones; in the step-by-step photo of weaving fuchsia from beads, all the nuances of the work are clearly visible. After all 5 white petals are ready, they must be processed in the same way as the red ones to add volume and collected together.

Step 4: Creating Fuchsia Stamens
And now the last stage is the creation of stamens. There should be 6 of them in total.

Step 5: Assembling a fuchsia flower from beads
At the assembly stage, do not forget that our red petals began with a hollow rope, which means that a certain number of red beads must be put on the thread, according to the number of rows of the rope. Add some green beads to form a rope and that’s it. The beaded fuchsia flower is ready, and it looks just like the real thing!

We really hope that the fuchsia beads, the master class and weaving pattern for which we provided you with in this article, turned out as beautiful as in our photos!
Beads:
— dark red No. 10- 10 g
— red No. 10- 10 g
— dark pink No. 10 - 5 g
— pink No. 10 — 8 g
— raspberry No. 10-8 g
- red No. 5 or beads with a diameter of 4-5 mm - 2 pcs.
— green No. 9 — 25 g
— Green beads with a diameter of 4-5 mm — 3 pcs.
- Gold or copper wire for petals and green wire for buds and leaves
The amount of beads is given for a fuchsia branch consisting of 3 buds (1 small and 2 larger), 2 open flowers and 10 leaves of different sizes.
A fuchsia flower consists of 4 long, pointed red petals, interconnected at the base and turning into a dark red tube. In the center of the flower, around a long pistil and 8 stamens, there are 4 rounded pink petals.

POINTED PETALS. Weave red and dark red beads using the parallel weaving technique according to the pattern (Fig. 96) 4 pointed petals for one flower, 8 in total. Wire length 80 cm. When weaving the second and subsequent petals, interlock the bases of the petals with each other, starting from the row , marked with an asterisk (*). Last. fourth, connect the petal with the third and first at the same time. At the base of the petals, weave 3 rows of green beads, also connecting the petals to each other after completing each row. Make the second flower in the same way.
ROUND PETALS. Using the circular weaving technique of dark pink and pink beads according to the pattern: 4 beads - 9 rows, weave rounded petals. Weave the first 5 rows of each petal from pink beads (the central part of the petal), and the next 4 rows from dark pink beads (the outer contour of the petal). The last 4 rows can be made two-color: the base of the petal is a darker color, and the upper part, as well as the center of the petal, is lighter (Fig. 97). For each flower, weave 4 petals. The length of the wire for one petal is 60 cm.
PESTLE. On a wire 20 cm long, string a red bead with a diameter of 4-5 mm and twist a wire leg 4-5 cm long under it. For greater strength, you can use 2-3 wires of the appropriate length.
Wrap strips of pink crepe paper about 20 cm long and 3-4 mm wide around the twisted wires. Make a slight thickening under the bead at the end of the pestle. Make one pistil for each flower.
Stamens. On the middle of a wire about 80 cm long, string 6 crimson beads and pass back through 4 beads, excluding the last and first of the collected ones. Pass the wire through the first bead so that the wires inside it pass towards each other. In this case, the column of beads will be held by the first bead, preventing it from sliding down the wire leg. Twist the ends of the wire under the stamen by 3 cm. Place the next 6 beads on either end of the wire and make another stamen. To ensure that the wire legs under the stamens are the same length, bend the wire with the beads collected at a distance of 4 cm from the base of the previous stamen.
The topmost sixth bead should be in this bend of the wire when passing the wire back through the 4 middle and bottommost beads. In the same way, on both sides of the pair of stamens, make 3 more - a total of 8 on one wire. Twist the ends of the wire several times.
Wrap strips of pink crepe paper around the wire legs under the beaded stamens. Lightly coat the wire or strips of paper with PVA glue and lay the turns in a tight spiral so that each subsequent turn partially overlaps the previous one. The work is quite painstaking and will require great care, but the stamens and pistil wrapped in pink paper look much more impressive than just twisted wires.
BUDS. Fuchsia buds consist of 4 petals, made using the technique of parallel weaving from red and dark red beads. The weaving pattern of the petal of the smallest bud is shown in Fig. 98. Pattern of the petal of a larger bud: 1 green bead -2-4-6-7 (2 times) - 6 (2 times) - 5 - from red beads and -5-4-3-2 from dark red beads . Wire length 50-60 cm for one petal. Weave 4 small and 8 larger petals to make 3 buds. Connect the petals not along their entire length, but only twice: in the upper part at the beginning of weaving the next petal between the two top rows and at the very bottom of the petal - between the last and penultimate rows.
Divide the wires at the base of the bud into pairs and string 3 to 5 dark red beads onto each of them. Connect all the wires together and string 1 green bead with a diameter of 4-5 mm. If the bead hole is too small and does not allow you to thread all 8 wires, select one shorter wire from each pair of wires above the bead columns and cut them off. Thread the remaining 4 longer wires into the hole of the bead. To prevent the bead from slipping off the wire leg, divide the wires into two, string a green bead onto one pair of wires, and pass the ends of the second pair of wires through the bead using the parallel weaving technique. That is, the bead will be held by a bead through which the ends of the wires pass towards each other. Twist wire petioles under the buds: 3 cm long for small ones and 4-5 cm long for larger buds.
LEAVES. Fuchsia leaves are made of green matte beads of a fairly large size - No. 9, so if you use smaller beads, the number of rows and the number of beads in a row will need to be increased.
Weave small leaves using the parallel weaving technique according to the pattern: 1 -2-4-4-3-2-1. The length of the wire for each of the three leaves is 50 cm.
Medium-sized leaves consist of two parts and are made on separate wires using the parallel weaving technique according to the pattern: 1 (2 times) - 2 (2 times) - 4 (2 times) - 5 (4 times) -4 - 3 - 2 - 1 When weaving the second half of the sheet, interlock it with the first after completing each row. Weave 3-4 medium sized sheets. The wire length for each part of the sheet is 80 cm.
Large leaves also consist of two parts, performed sequentially according to the following scheme: 1 (2 times) -2-3 (2 times) - 4- 5- 6- 7- 8-9 - 10 (5 times) - 9- 7- 5 - 3- 2-1. Weave 4 to 7 large leaves. The length of the wire for each part of the sheet is 90-100 cm.
FLOWER ASSEMBLY. Align the bases of the pistil and stamens and twist the wires under them several times. Evenly distribute pink petals made using the circular weaving technique around the center and twist the wires 1-1.5 cm. Select the 4 longest wires and twist them another 1 cm, and cut off the remaining wires. Thread the wires of the assembled part of the flower through the middle of the corolla of red petals joined together. Twist a wire petiole about 4 cm long under the flower. Collect the second flower in the same way.
ASSEMBLY OF THE BRANCH. Connect 3 small green fuchsia leaves together and twist the wire under them 2 cm. Attach the smallest bud and 2 medium sized leaves and twist the stem 3 cm. Attach the next bud, 1 flower and 2 medium sized leaves or 1 large and 1 medium sized leaves . Twist the wires 3-4 cm. Attach 1 more bud, 1 flower and 2 large leaves. At a distance of 3-4 cm below them, place two more pairs of large leaves. For greater stability of the branch, insert additional wires into the base of the lower pairs of leaves and twist the wire stem to the end.
Cut green crepe paper into strips about 20 cm long and 3-5 mm wide. Lightly coat strips of paper with PVA glue and wrap the branch along its entire length, laying the turns in a tight spiral. To make the stem even, wrap it several times.
Winter is now in full swing, so I really want to make a product reminiscent of summer. So today we will make fuchsia - an evergreen shrub.
We will need:
- beads No. 11 red-burgundy (I will further call these beads simply red) and white - for flowers;
- beads No. 8 green - for leaves;
- wire with a diameter of 0.2 mm for flowers and a diameter of 0.3 mm for leaves;
- aluminum or copper wire with a diameter of 1.5-2 mm - for stems;
- green threads for winding the stems.
First we make the outer petals of the flower. For one flower you need 4 outer petals, for each of which we take a wire 80 cm long.
We weave the first petal using the parallel weaving technique according to the following pattern:
1st row: 1 red bead;
2nd row: 2 red beads;
3rd row: 3 red beads;
4th row: 5 red beads;
5th row: 7 red beads;
6th row: 8 red beads;
7th row: 10 red beads;
8th row: 10 red beads;
9th row: 10 red beads;
10 row: 10 red beads;
11th row: 10 red beads;
12 row: 9 red beads;
13th row: 8 red beads;
14 row: 7 red beads;
15 row: 6 red beads;
16th row: 5 red beads;
17th row: 4 red beads;
18th row: 3 red beads;
Row 19: 2 red beads;
Row 20: 2 red beads;
21 row: 2 red beads;
22 row: 2 red beads;
23 row: 2 red beads;
24 row: 2 green beads;
25 row: 2 green beads;
Row 26: 2 green beads.
For now, leave the ends of the wire free and do not twist them!

We begin to weave the remaining outer petals in the same way, but we make only the first 16 rows in each of them, since we will add the remaining rows by weaving these petals to the resulting bud during the weaving process.

In this way we weave 3 incomplete petals, in each of which we make only 16 first rows.

We have already used this weaving technique, when the petals are woven together, many times before, for example, in a master class on bell flowers and in a master class on weaving Christmas bells.
After we have woven the first 16 rows in the second petal, we begin to weave this petal to the first petal. To do this, we pass one of the ends of the wire of the second petal between the sixteenth and seventeenth rows of the first petal

And then we continue to weave the rows on the second petal according to the same pattern in which we weaved the first petal, only before each new row we weave a wire from the second petal to the first petal. Since the number of beads in the corresponding row in all petals is the same, completing the second petal, we collect the following number of beads:
17th row: 4 red beads;
18th row: 3 red beads;
Row 19: 2 red beads;
Row 20: 2 red beads;
21 row: 2 red beads;
22 row: 2 red beads;
23 row: 2 red beads;
24 row: 2 green beads;
25 row: 2 green beads;
Row 26: 2 green beads.
The ends of the wire from the second petal are again left free and not twisted.

Next, we weave the third petal to the second petal in the same way. We do not twist its ends again yet.

We have the last - the fourth - outer petal left, in which 16 rows have so far been woven. This petal must be woven simultaneously to the first and third petals. To make it more convenient for us to do this, we can now give the resulting flower the shape of a bud. After this, we pass one of the ends of the wire of the fourth petal between the sixteenth and seventeenth rows on the free side of the first petal, and the second end of the wire - between the sixteenth and seventeenth rows on the free side of the third petal.

We continue weaving the next rows of the fourth petal according to the same pattern in which all the previous petals were made, not forgetting to braid both ends of the wire to the adjacent petals before each new row.

After we have completed the fourth petal, on each of the petals we separately add one more row, consisting of one green bead, and then under each petal we twist together both ends of the wire coming from this petal.

We put the resulting bud aside for a while and begin weaving the inner petals of the flower. We weave the inner petals from white beads using a circular technique. We have also repeatedly used this technique in our products; it is described in most detail in the master class on making gladiolus.
We take a wire 50 cm long, fold it in half so that one end is approximately 15 cm long and the other 35 cm, after which we twist the long end of the wire two or three turns in the middle of the short end of the wire. We have a loop from which two ends of the wire come out.

For the middle of the petal we collect 3 white beads on the short end of the wire, and for the first half of the first circle we collect 6 white beads on the long end of the wire.

Next, using the circular technique, with the long end of the wire we go around the middle of 4 circles, using the following number of white beads for them:
1 round: 6+6;
2 round: 11+11;
3rd circle: 16+16;
4th circle: 20+20.

Petal weaving is completed. We bend the rest of the short end of the wire into the petal and secure it, and twist the rest of the long end of the wire together with the original loop.

For each flower, you need to make 4 of these inner petals.

We put these petals aside for a while and move on to weaving the stamens. We make them using a needle technique on a 60 cm long wire.
First, we collect 21 red and 1 white beads onto the wire. We place the set in such a way that on the side of the red beads there is a free end of the wire approximately 10 cm long.

We hold the white bead with our hand and pass the long end of the wire coming out of it through all the other beads in the opposite direction.

We tighten the wire, making sure that the short end of the wire remains approximately 10 cm long. We have the first needle.

Next, we weave exactly the same needle at the long end of the wire: collect 21 red and 1 white beads

and, holding the last collected white bead, pass this end of the wire in the opposite direction through the remaining beads.

We move the beads close to the first needle and tighten the wire.

At the same end of the wire, close to each other, one after another, we make 4 more of the same needles, so that there are 6 needles in total on the wire.

We collect all the needles together and twist the ends of the wire - the stamens are ready.

Let's start assembling the flower. First of all, we screw the white inner petals to the stamens. First we screw on one petal,

and then - one after another, the remaining 3 petals, placing them in a circle directly below the stamens.


Next, we take the resulting core of the flower and insert it inside the bud from the outer petals.

Pull out the wire coming from the core until it stops,

then we twist together all the ends of the wire from the bottom of the bud. The flower is ready.

Next you need to weave the leaves. I made them from larger beads than the flowers, and on thicker wire so that they would not sag too much under their own weight. We weave each leaf from green beads using the parallel weaving technique on a 70 cm long wire according to the following pattern:
1st row: 1 bead;
2nd row: 2 beads;
3rd row: 3 beads;
4th row: 4 beads;
5th row: 5 beads;
6th row: 6 beads;
rows from 7 to 15 are the same: 7 beads each;
16th row: 6 beads;
17th row: 5 beads;
18th row: 4 beads;
19th row: 3 beads;
20 row: 2 beads;
Row 21: 1 bead.