Quilling for beginners: diagrams with a detailed description. Fairy-tale firebird in quilling technique Video: Firebird quilling master class
We offer a detailed master class of the firebird in quilling technique for everyone who wants to master the art of creating crafts from twisted paper spirals. Form your own hands fairy tale hero in the quilling technique it will be interesting for adults and children. A painting or panel depicting a firebird will harmoniously fit into the style of any interior.


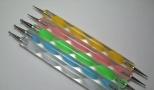
Tools and materials for quilling Firebird
First, a sketch and color scheme for the future composition is selected. You can draw a diagram yourself or find a ready-made magic bird template on the Internet and print it on a sheet that will serve as the background of the picture.


Paper for the base is taken white and color. Considering that the firebird will be bright and multi-colored, it is better to choose the base in darker and more restrained colors. Well, the firebird will stand out against a black or blue background.
The next step will be the manufacture of the main elements of the composition.
To create a bird, we need the following figures:
- spiral (tight and loose);
- crescent;
- a drop;
- rhombus;
- triangle;
- curl;
- eye.

To perform the above elements, you will need the following tools and materials:
- colored cardboard for the base;
- quilling paper (red, pink, orange, yellow, blue, light blue, green);
- a tool for twisting rolls;
- sample;
- glue.
Having made the required number of blanks, we proceed to design the composition by gluing the details along the outline of the sketch. You can stack the elements in tiers, so the picture will acquire additional volume. Give the craft uniqueness such natural materials like feathers, leaves and shells. By adding them, you will make the composition alive.
Create a quilling bird of happiness
We suggest you also consider this option for creating a firebird.  Step by step photo description of the process:

Video: Firebird quilling master class
Happy Bird Patterns


Psychologists say that nothing soothes the nervous system as monotonous manual labor. For the purpose of your own peace of mind and, in general, for the soul, you can do such a common type of needlework as quilling. This type of needlework has a rather rich history. It is very popular among beginners (children, schoolchildren and youth), as well as among already established masters.
Using the paper rolling technique, you can create beautiful pictures, postcards, photo frames or decorate a gift to a loved one. This lesson is not very difficult, but it requires perseverance and patience, since in order to create a full-fledged product, it is necessary to make a large number of constituent elements and perform all the work step by step.
Necessary materials

For this type of creativity, you need to stock up on the following materials:
- thick colored paper (preferably double-sided), which is cut into strips. A ready-made set of special colored paper for quilling is also suitable;
- a thin rod specially designed for paper rolling;
- cardboard;
- stencil with round holes and various diameters;
- compass;
- ruler;
- simple pencil;
- eraser;
- PVA glue;
- paper scissors + manicure;
- tweezers, preferably surgical with a clove at the end.

Attention! You can read more about all this in the article "".
Experienced quilling masters use special paper cutting machines, a glue gun to create three-dimensional figures and cork boards. But for a beginner, it is quite possible to get by with improvised materials that are in every home. A thin paper rolling rod can be replaced with an awl, toothpick or manicure stick. When buying finished paper, you should pay attention to the length of the strips. It is desirable that it be much longer than the length of an A4 sheet. Many manufacturers manage to sell plain paper under the guise of special quilling paper.

Before you begin to study the scheme of how to make animals or birds using the quilling technique, you need to learn how to make basic elements. There are several main types:
- spiral;
- eye;
- drop;
- leaf;
- crescent;
- arrow;
- wing;
- foot;
- oval;
- rhombus;
- triangle and square.

Photos of finished elements can be found in a quilling book or on the pages of online publications. The production of each element is based on the creation of a basic element - a roll. In order to make the right roll, you must:
- take a strip of paper 0.2-0.9 cm wide and up to 25 cm long;
- one edge of it must be clamped between the forked end of the rod or a split toothpick;
- for the entire length of the strip we twist a tight roll;
- when the entire strip of paper has been used, a little glue is applied to its open end and fastened. This is done with a toothpick;
- it remains to remove the finished roll from the rod.
Remember! When making any crafts with your own hands, novice craftsmen must strictly follow the instructions.
Other elements are made according to the same scheme, only after removal they are given the desired shape. For example, when squeezing one edge of the roll with our fingers, we get a drop, when squeezing from both sides, we get a leaflet or an eye. In general, everything in quilling is quite simple, you just need to arm yourself with patience and imagination. As practice shows, it takes up to 60 minutes for beginner craftswomen to make one flower, while 15-20 minutes is enough for an experienced master.
Master class: do it yourself

According to experienced quilling masters, after studying the schemes of basic floral motifs, you can safely proceed to “studying” master classes on making quilling birds. Most often, using quilling technology, a fire bird or a peacock is made, which look very beautiful against the plain background of the picture. You can also make a rooster, parrot and other birds and animals.

Step-by-step guide to making a fabulous quilling peacock:
- Before proceeding with the manufacture of the bird, it is recommended to download from the Internet or draw by hand a sketch of the future picture.
- Under the basis, you need to take cardboard of the required format, which is covered with a coating with tinting or a thin fabric of the desired color.
- In the picture, by twisting brown paper, branches of a tree are formed, the very one on which the peacock will flaunt.
- So that the tree does not look “naked”, the required number of green leaves made using the quilling technique is harvested.
- Pale pink petals, which are made from paper fringe, will complement the picture.
- Next, we proceed to the manufacture of the constituent elements of the peacock, for which we need stripes of purple, yellow, green and blue, as well as a fringe (10 cm long and 0.8 cm wide).
- We attach a purple strip, 15 cm long, to the rod, which we twist with a tight roll. Then glue a blue strip to the tip of the purple, then yellow and green.
- We squeeze the twisted multi-colored roll at one edge to give the shape of a droplet.
- Thus, the required number of multi-colored elements is harvested to create a peacock tail.
- When all the elements are ready, you need to glue them with a bright green or light green fringe.
- From a monochromatic material we make droplets of blue and green, from which we will later lay out the torso and head of the bird.
- For the crown, we make 5 small rolls on the leg.
- When all the blanks are ready, you can proceed to the "assembly" of the bird.
- To do this, we apply glue to the drawn contour, after which we lay out the head, crown, torso, wing and tail of the bird in turn, carefully fastening all the elements with glue.
- To complete the picture, we attach the flowers to the branches, let the picture dry, and place it in a frame.

This instruction will help you make not only a peacock, but also a rooster or other bright bird. The main thing in this business is patience, perseverance and imagination. The above step-by-step algorithm is only a basic basis, to which you can add your own details and elements, depending on your imagination. Such a picture can be presented to relatives or friends, because a peacock or a fire bird are symbols of success and prosperity. And finally, you can decorate your home with it, giving it new colors and comfort.
Enlarge the picture (interesting ideas):
Nomination "Wonders of Applied Art"
Quilling is the art of making flat or voluminous compositions from long and narrow strips of paper twisted into spirals.
The finished spirals are given various shapes and thus paper rolling elements, also called modules, are obtained. Already they are the "building" material in the creation of works - paintings, postcards, albums, photo frames, various figures, watches, jewelry, hairpins, etc.
The art of paper rolling came to Russia from Korea, but is also developed in a number of European countries.
I have a lot of crafts in my piggy bank, which I put up for competitions, give to relatives, teachers, friends. I am grateful to my teacher - Natalya Anatolyevna Perevodchikova.
Dear friends! Today for you, the picture: "Heat - a bird."
Work progress
I created a sketch of a bird, a composition.
Head and body of a bird :
1. I cut short feathers out of paper.
2. Glued to the base.
Tuft and beak:
1. I made 4 spiral parts of the same type, glued them to the head.
Wings:
1. I cut a small, narrow fringe, glued it to the base of the wings / created volume /, used 2 colors of paper.
2. Created spirals, used 4 colors of paper.
3. I tried on all the details of the bird on a pre-drawn sketch, glued it.
twig :
1. Made according to the application technology.
2. I cut the leaves out of paper and corrugated them.
bulk apples :
1. I twisted the strips into “balls”, glued them.
2. I used 3 colors of ready-made quilling paper strips.
Material and tools for crafts:
- quilling paper strips
- leaf paper, twigs; for feathers
- PVA glue, glue gun, glue brush, scissors (small), awl
- faux fur pieces
- frame.
Internet resources: Material from Wikipedia - the free encyclopedia. “Paper rolling. Story".
Kolosova Alesya, 12 years old, student of the 6th grade, secondary school No. 37, Komsomolsk-on-Amur, Khabarovsk Territory. She enjoys going to the theater club. Favorite hobby - quilling! Laureate of the All-Russian competition of decorative and applied arts "Golden Needlework" - 2011, 2012. Winner of many other All-Russian, city, school competitions. Supervisor: Natalya Anatolyevna Perevodchikova, quilling teacher, 1 qualification category, 32 years of teaching experience.
One of the most popular and unusual types of needlework at the moment is quilling. Its essence lies in the creation of various volumetric figures, panels and other crafts from twisted strips of paper. Quilling for beginners has become widespread both among children and among experienced craftsmen.
Paper rolling allows you to realize a variety of ideas. Since “quilling” comes from the English word “quill”, which means “feather of a bird”, in this master class we will take a step-by-step look at the process of creating a feathered creature from Russian fairy tales - the Firebird.


Quilling materials
First you need to decide if you have everything you need to work in this style.
Quilling fire bird will consist entirely of paper, so you will need the following materials:
- Strips for twisting (you can buy a special set in red shades in a craft store, or you can cut it yourself from double-sided colored paper);
- Colored paper of different shades (yellow, red, golden paper will look unusual);
- Cardboard and beautiful paper for the background (instead of using paper, the base can be painted);
- Pencil, eraser, white sheet of paper;
- Scissors;
- Toothpick or special quilling tool.
In the event that you decide to make quilling strips yourself, you will need a long ruler and a cutter.
The process of the formation of the Firebird
Having prepared all the materials and tools, you can start making the Firebird using the quilling technique. In fact, it is not difficult to make such a voluminous panel with your own hands if you follow the instructions. Even a novice master will cope with it.
- We prepare the background for the panel. It can be pasted over with beautiful paper or an abstract image of clouds, fields, etc. can be drawn. In this tutorial, the cardboard base was simply tinted with color.
- In order not to get confused while connecting all the finished parts of the bird, we draw a sketch with the Firebird on a separate sheet. It does not have to be very even and beautiful, its task is to resemble the approximate arrangement of bird details on the panel.
- We begin to make the basic details of quilling. For beginners, it will be convenient to first slightly twist the strips with scissors, and then wind them on a toothpick (quilling tool). From yellow and orange stripes we make the head, beak of the Firebird and details for its body.
- We try on all the details on the sketch and glue together along the edges. If there are voids somewhere, you can make a few more details, or leave it as it is and add them at the very end.
- We cut out the bases for the Firebird feathers from yellow and golden sheets of colored paper. To do this, you can prepare templates of different sizes, and cut them out. Then the feathers are neatly folded in half (lengthwise) and cut into fringes, as in the photo below.
- In the same way, we cut out the feathers for the tail of the Firebird, without folding them in half.
- Then, from the quilling strips, we twist the rest of the details for the wings of the bird, as in the picture. For the upper part of the wings, you need to glue three strips of the desired size - they should be quite rigid, but at the same time it is good to take the shape of the Firebird's wing.
- On the basis, we begin to gradually collect our Firebird. First, we glue the body, to it the base for the wings (the strips must immediately be given the desired shape), feathers under it, and, according to the sketch, feathers for the tail. A fringe of golden paper was still glued under the neck of the Firebird.
- Quilling details are glued on top of the feathers. At the same time, it is necessary to try to give the wings a more realistic shape. The remaining voids are quite simply filled with details prepared according to their shape from small quilling strips. Here you can add more details inside the body of the Firebird.
- How to make tail feathers more voluminous:
To do this, we glue a tightly twisted quilling part of a dark color in three layers with an orange stripe. Then we glue the resulting part to the center of the long strip and adjust its length according to our sketch. - The same dark circles can be added to small feathers. We make the rest of the tail of the Firebird from quilling strips, twisting them to varying degrees and firmly gluing them to the base. It is not necessary that the entire strip is tightly adjacent to the base - the gaps will give a deeper and more interesting shadow in the end. Between the stripes, add some more golden feathers, giving the tail extra volume.
- We make a crest of the Firebird from a piece of golden paper cut into fringes. From below, you need to leave a part equal to the height of the bird's head and glue a crest along its edge.
- Something like this should look like a finished Firebird using the quilling technique.
As you can see, following the detailed diagrams and descriptions, it is quite easy to make such an MK yourself. By the same principle, you can make a picture with a bird of happiness, using different color schemes and combining it with other paper craft techniques. The finished panel will look beautiful in a frame, it can be supplemented with dried herbs and artificial paper flowers. You can learn how to make flowers using the quilling technique from various video and photo tutorials in the desired category.