Ideas for interesting birthday cards. How to make a postcard with your own hands with the text of congratulations for the holiday? Making a postcard with your own hands for the holiday: templates. Original postcard with flowers embroidered with lace
Author's postcards self made are gaining more and more popularity. They are original, beautiful and very decorative look. In this master class, we will tell you how to make a beautiful postcard with your own hands in just a few minutes.
Tools and materials Time: 30 minutes Difficulty: 3/10
- several sheets of scrapbooking paper;
- pieces of white thick cardboard or half-cardboard measuring 9x11 cm;
- mounting tape;
- confetti (you can use glitter instead of confetti);
- decorative paper tape;
- PVA glue;
- scissors;
- stickers (stickers).
Why overpay for a decorated piece of paper if you can make an original author's postcard yourself? A beautiful do-it-yourself postcard will definitely please loved ones on the occasion of the holidays and will be a pleasant surprise!

Tools and materials:

Step by step instructions with photo
Our unusual beautiful do-it-yourself postcard is made, one might say, from improvised materials.
Step 1: make the base
Place a piece of cardboard in front of you. Take scissors and mounting tape. Cut the ribbon in half lengthwise for thin strips. Glue white cardboard around the edges with strips of mounting tape. Remove the protective paper from the foam.


Step 2: Glue the Confetti
Using PVA glue, glue multi-colored confetti into the middle of the cardboard (or glue glitter over the cardboard). Gently tape the edges of the cardboard with decorative paper tape. Fold the edges of the decorative paper tape over to the wrong side of the cardboard.


Step 3: Attach Stickers
In the middle of the cardboard on the front side, attach stickers with the words that you want to say to a loved one.


Step 4: use scrap paper
Glue the cardboard onto the scrapbooking paper. Cardboard can be glued straight, or slightly diagonally - in both cases it will turn out beautifully. Handmade postcard with confetti is ready!

Romantic, love cards are always the presence of hearts and love confessions on the cards. Such cards are given with or without occasion: for Valentine's Day, birthday, anniversary of the relationship, on the occasion of reconciliation, as a token of gratitude, etc.
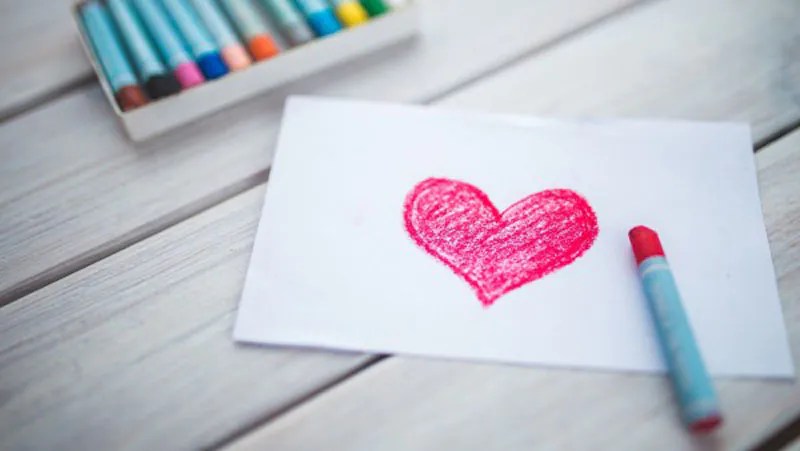 The news portal "site" on the eve of the celebration of Valentine's Day, has prepared for you an excellent selection of postcards for your loved ones, which you can easily make with your own hands in a matter of minutes.
 DIY postcards
Postcards to your beloved
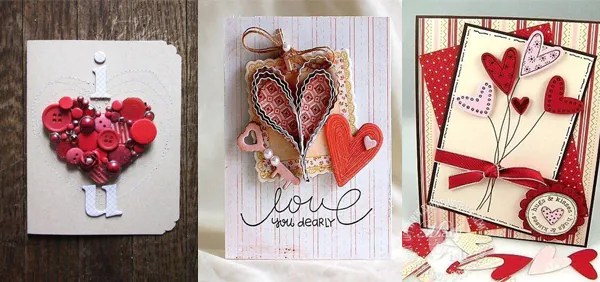
Do-it-yourself postcard with a voluminous heart
 Such a luxurious voluminous heart will be a wonderful touching decoration for your homemade postcard. It's very easy to do. For manufacturing, you will need: colored paper, a sheet of thick colored paper (it is preferable to choose red or its shades) for the base of the postcard, PVA glue and scissors.
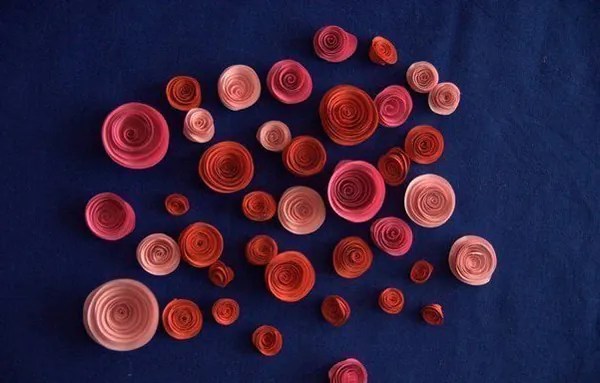 From colored paper, cut out a large number of multi-colored circles. Try to choose paper colors of the same color, but different shades.
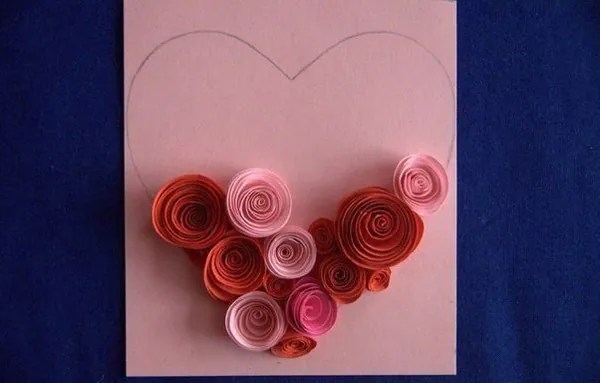 Then, using a pencil, draw a neat spiral on each circle and cut it out. Then form a small rose from the finished paper spiral, fix it with PVA glue. From the resulting large variety of paper roses, form a voluminous heart on the front side of a greeting romantic homemade card. Glue roses with PVA glue or double-sided tape.
Postcard tree of love do it yourself
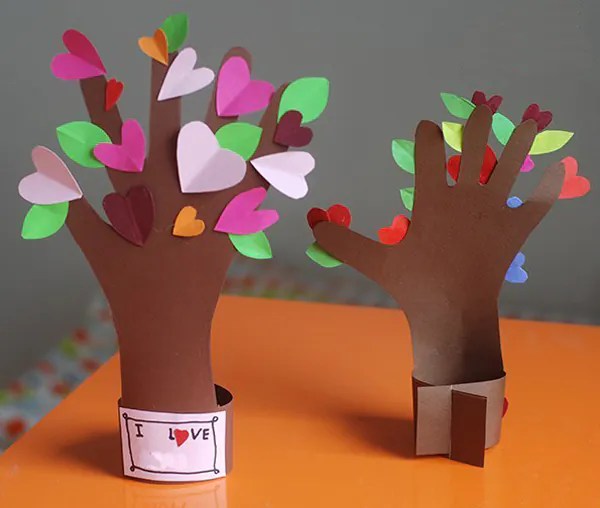 A very cute and bright postcard that you can easily make with your own hands from colored paper.
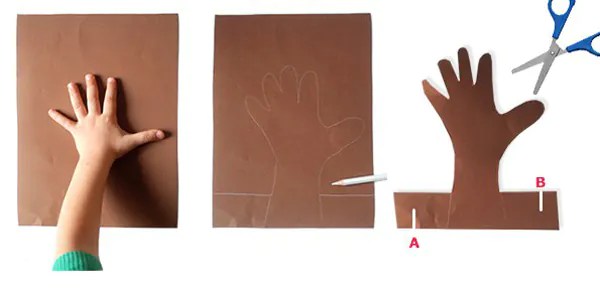
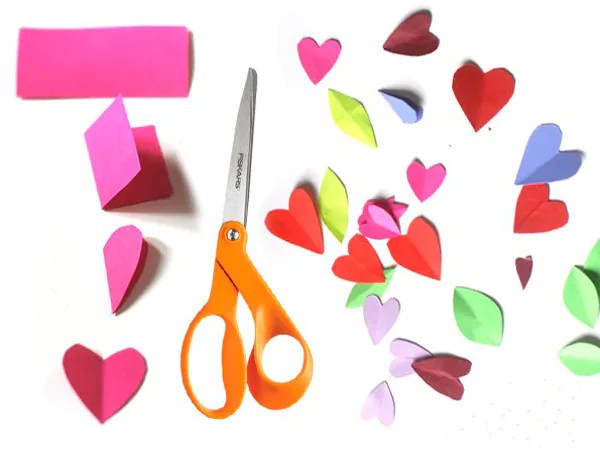 Trace your palm on colored brown paper. Cut it out carefully. You should have a small tree with a trunk and branches. Since it is frosty February outside the window, and you want the speedy approach of spring and warm sunshine, decorate the tree with multi-colored hearts.
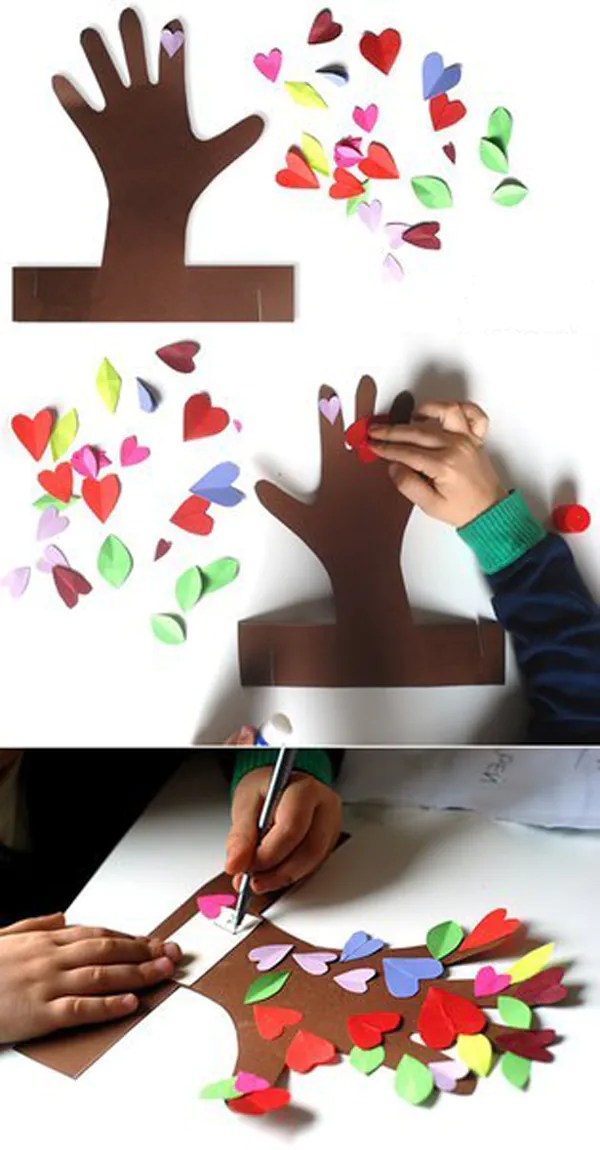

 On each heart, you can write declarations of love, make compliments or write to your lover why you love him.
Postcard to a loved one with a heart
 Unusual, but very easy to make postcard. Cut out strips of the same width but different lengths from decorative paper (see template).


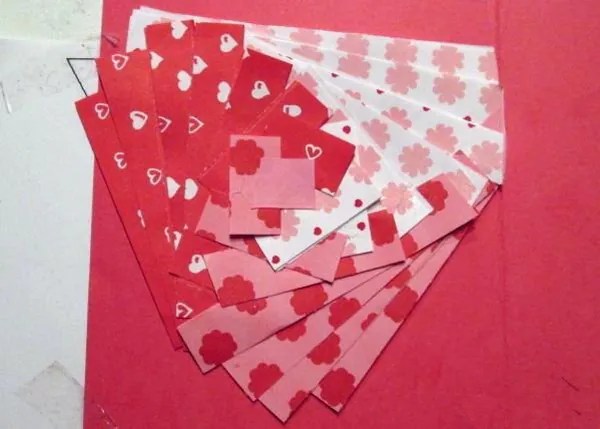 Glue pieces of decorative paper in the shape of a template and glue it inside the card. On the front of the card, cut out a neat big heart.
DIY 3D heart card
 This version of a romantic card for a loved one is for the most patient and careful people in love.

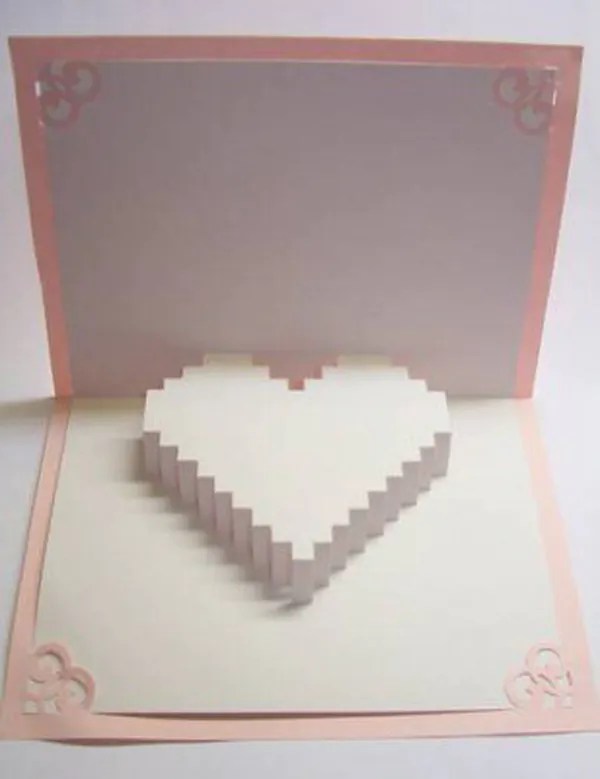
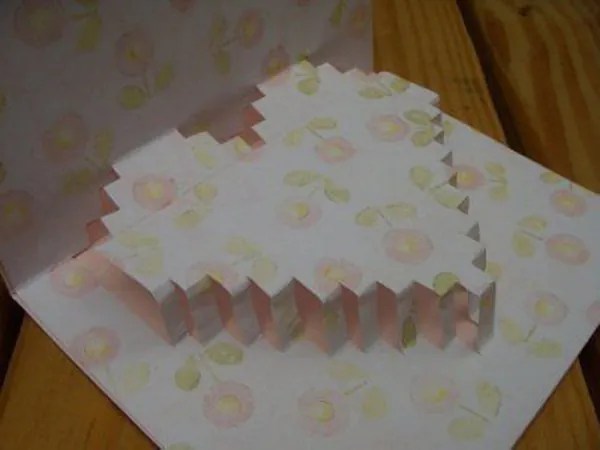 Accuracy and impeccable accuracy are very important in the manufacture of this postcard.
The news portal "site" wishes you to love, be loved and try to make each other's life much brighter and warmer.
Guys, we put our soul into the site. Thanks for that
for discovering this beauty. Thanks for the inspiration and goosebumps.
Join us at Facebook And In contact with
In stores today you can find New Year's cards for every taste. But the editorial website believes that homemade ones are much warmer. After all, when we make a thing for someone with our own hands, we put our love into it.
Below we have collected ideas of beautiful, original and, most importantly, “fast” New Year's cards, for the creation of which no rare materials are required - beautiful paper, cardboard, and colorful ribbons and buttons lying around the house.
Volumetric Christmas trees
Volumetric Christmas trees made of white and colored paper are so simple to make that you can make them at the last moment. Read more on the Bog&ide blog.
Make 3D Christmas trees even faster. All you need is a ruler, sharp scissors and cardboard. This blog shows how to cut them.
Penguin
We really liked this penguin, well thought out. You will need black and white cardboard (or white paper), an orange paper triangle, and 2 miniature snowflakes that we all know how to cut out. The eyes are, of course, the highlight of the postcard, and you will have to look into the hobby store for them (or tear them off an unnecessary children's toy, with the consent of the children, of course).
gifts
For this cute and simple postcard, you need 2 sheets of cardboard, a ruler, scissors and glue. As well as pieces of wrapping paper that you have left over from gift wrapping, ribbons and ribbons. The manufacturing principle is very simple, but for those who want more details, we advise you to look at this blog.
Santa Claus
A friendly Santa Claus (or Santa Claus) can be made in just half an hour. The red hat and pink face are strips of paper pasted onto a card or gift bag. Fur hats and beards are obtained as follows: you need to take drawing paper and simply tear off the strips of the desired shape to get jagged edges. Stick on a postcard over the red and pink stripes. And then draw two squiggles - a mouth and a nose - and two dots - eyes.
simple drawings
Irresistible in its elegance, the idea is to draw Christmas balls with patterns with a black gel pen. The main thing here is to draw the correct circles and mark the lines for the patterns. Everything else will not be difficult - the stripes and squiggles that you draw when you are bored.
The same principle that underlies the postcard with black and white balloons. Simple silhouettes, painted with simple patterns, this time in color - this is best done with felt-tip pens. Warm and very nice.
Lots and lots of different trees
A couple more ideas from the Bog&ide blog. For the first, you will need decorative tape or colored cardboard (with or without glitter - now you can easily buy these at the stationery store or hobby stores). For the second - elegant straws for drinks and good glue.
Here you can use paper or cardboard with a pattern left over from children's crafts, or wrapping paper for gifts. Christmas trees are sewn in the center - this is not necessary at all, you can glue them. But if you really want to, then you must first make holes with a thick needle along the ruler, and then sew with a thread in 2 rows - up and down, so that there are no gaps. Draw a snowball with white gouache.
A laconic and stylish idea is a grove of Christmas trees, one of which is glued to double-sided foam tape (and therefore rises above the rest) and decorated with a star.
For this card, you need 4 or 3 layers of cardboard (you can do without red). As a color layer, you can use not cardboard, but paper. In the upper, white one, cut out a Christmas tree (a clerical knife will do well) and glue it on double-sided tape for volume.
A round dance of Christmas trees from various remnants of cardboard, scrapbooking paper, wrapping paper is tied with a simple ribbon and decorated with a button. Try playing with colors and textures - there are an incredible number of options here, using different colors of ribbons, paper and even fabric.
Wonderful watercolor so in the spirit of the New Year and Christmas! A simple watercolor sketch is within the power of everyone, even those who last painted with paints in their school years. First you need to outline the patterns with a pencil, color them in, and when it dries, gently wipe the pencil sketches and supplement the patterns with a felt-tip pen.
Winter landscape
For this postcard, it is better to use structured cardboard, or you can get by with plain, smooth cardboard - it will still turn out spectacularly. Cut out the snow landscape and moon with sharp scissors and paste onto a black or navy blue background.
Another white and green variant of the winter landscape that will take a little more time. If you find velvety cardboard (remember, crafts were made from this at school), it will be great, if not, you can just paint the Christmas trees with a felt-tip pen. Snow - Styrofoam disassembled into peas. You can also make circles out of cardboard with a hole punch and glue them to the postcard.
hugging snowman
The author of the My kid craft blog made this snowman with her children. The snowman throws up his hands happily when the card is opened. Wishes can be written inside. It will be interesting for children to make an application (and paint their hands and a hat), but for those who want everything to be fast, the blog has ready-made parts that can be printed on a color printer and simply glued together.
More snowmen
Snowmen, inquisitively peering into the starry sky, will look more advantageous if they can find a bright ribbon for a scarf.
For the postcard on the left you need unpainted cardboard, white drawing paper and foam tape with which you will stick the snowman. Snowdrifts are made simply: you need to tear off the drawing paper so that you get a ragged wavy edge. Fill it in with a blue pencil and blend it with anything, even with a finger or a piece of paper. Also tint the edges of the snowman for volume. For the second you will need buttons, a piece of fabric, eyes, glue and colored markers.
You will want to keep such a postcard for a long time. And all you need is circles of cardboard, a nose and twigs of colored paper. All this must be collected using double-sided bulk tape. Draw eyes and buttons with black paint, and a snowball with white gouache or watercolor.
Balloons
Balls are one of the main symbols of the New Year and Christmas. These are made from velvety colored paper and ribbons. But balls are such a win-win option that you can afford to fantasize here: make balls from patterned paper, wrapping paper, fabric, lace, cut out from a newspaper or a glossy magazine. And the strings can simply be drawn.
Another option is to stick paper with a pattern on the inside of the card, and cut out circles on the outside with a sharp stationery knife.
Volume balls
For each of these balls, you will need 3-4 identical circles of different colors. Fold each in half and glue the halves to each other, and the two extreme halves to the paper. Another option is colored stars or Christmas trees.
colorful balls
Wonderful translucent balls are obtained using a regular pencil eraser. It is worth to begin with to outline the outlines of the ball with a pencil. Then dip the eraser into the paint and leave marks on the paper. Fun and beautiful.
Postcards with buttons
Bright buttons will add volume to postcards, as well as evoke subtle associations with childhood.
The main thing is to find buttons of interesting colors, but otherwise it’s up to you to “hang” them on a Christmas tree, on a branch with cute owls or on newspaper clouds.
Original ideas are in the air. Catch and make paper art with your own hands that will delight your loved ones. The most important thing is that all your works will really appear in a single copy, which means that an exclusive hand-made postcard will be expensive not only in terms of high spiritual criteria, but also financially.

Scrapbooking
The most fashionable technique of working with paper today (scrapbooking) was invented and began its circulation around the world as one of the ways to design photo albums. But why not use it to create beautiful postcards.
It has already become common that demand, sticking out its tongue, is trying its best to keep up with the offer, and therefore the store has everything so that you and I can safely do our favorite hobby - making DIY birthday cards using the scrapbooking technique.

You will need:
- white paper for watercolor - sheet A4;
- colored paper (lilac, purple);
- lace wide ribbon - 12 cm;
- beautiful ribbons or braid - 30 cm;
- three whites artificial flower, which can be cut off from hair ties;
- three small interesting buttons to match the paper;
- scissors, ruler;
- glue "Moment";
- a felt-tip pen or a purple gel pen.
How to make a scrapbooking card
- At the beginning of work, you can make paper blanks. Our greeting card "Happy Birthday!" when folded, it will have a size of 10x16 cm. Therefore, we fold a white sheet of paper measuring 20x16 cm in half. Then we cut out four blanks of colored paper with our own hands (two purple and two lilac), as shown in the photo.
- Carefully glue the lilac blanks onto the purple blanks so that equal fields of the same width remain on each side. Write the words of congratulations "Happy Birthday!" and circle the frame with a pen or felt-tip pen.
- Now you can stick all the rectangles on the workpiece, stepping back from the edge by 10-5 mm. Glue the lace and 12 cm of ribbon on it, tucking and securing the edges of the textile on the back of the scrapbooking card.
- Glue a colored postcard onto a piece of paper folded in half. Now you can make a bow out of the remaining tape, and glue it, voluminous flowers and beautiful buttons with Moment glue.
- The final touch in the design of a birthday card in the style of scrapbooking with your own hands will be drawing a picture. With a felt-tip pen or pen, draw a monogram and dots along the edge of the frame. Unfold the card and write congratulatory words.

Volumetric cards for mom on her birthday
They do not require any additional material investments, any schoolchild can do it with his own hands, at the same time, these beautiful simple voluminous works made of colored paper are very interesting and original.

You will need:
- colored paper;
- scissors, compasses;
- Double-sided tape;
- PVA glue;
- wooden stick;
- beads;
- beautiful ribbon.
The order of implementation of the idea
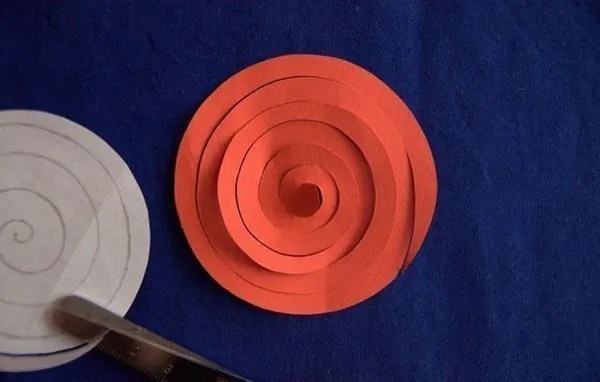
- Draw circles of different diameters on colored paper with a compass and cut them out. Directing the scissors from the edge to the center, make a spiral from each circle. If you use curly scissors, the edges of flowers in 3D can be made terry or carved.
- Twist each spiral with a wooden stick from the edge to the center, fixing the resulting flower with a drop of glue on the center of the spiral circle. Try not to make very dense buds so that the bouquet is lush.
- Fold the pretty cardboard rectangle for the base of your birthday gift in half and try it on for the first time.
- Cut out a flower pot from brown paper and stick double-sided tape to its wrong side.
- Glue green paper 1-2 cm smaller on the background of the card. Now you can make a composition of a pot and flowers for your birthday.
- Tie a bow and attach it to the pot. Glue the inscription "Happy Birthday!" and you can give a handmade card to your loved one.


Postcard folding bed "chicken"
- To implement this idea, you will need two sheets of cardboard or thick paper. Bend one sheet measuring 12x12 cm, retreating 3 cm from the edge.
- The second sheet of cardboard measuring 15x18 cm must be folded in half. This will be the base of the postcard. Therefore, you can decorate it by pasting it with beautiful paper on both sides.
- Cut 6 lines on the fold of the first workpiece. Step back from each edge by 3 cm. The side 4 lines should be 3 cm long and symmetrical to the fold. The middle strip is cut 1.5 cm high from the fold axis, 2.5 cm down. The width of the resulting strips should be 1 cm. Bend them in the opposite direction to get three steps of the same height, but of different lengths. They will serve as stands for paper figures.
- Cut out two brown eggs from colored paper, decorate them with appliqués and glue them to the outer steps.
- Draw a chick in egg pattern on paper. On it, you must first cut out a newborn chick with paws and a scallop from yellow paper, and then a shell from white paper. Glue them together, draw a beak, eyes and glue to the middle step. Drape the backdrop with pretty appliqué and chicken feathers.
Postcard in quilling technique
Elegant, voluminous decorations on a postcard do not look at all like paper ones, but are made very simply. You just need to cut narrow strips of colored paper and fold them into spirals in a certain way.

The quilling technique is well described in many sources. You can learn the simplest tricks quickly. For such a picture, you need to make 4 “closed spirals” of green paper, 4 “non-central spirals” yellow color and 8 pink, as well as 14 green leaves in the shape of an "eye".
Start decorating with a large flower. Its center is also made from a strip of paper folded into a spiral, previously cut to the middle of the width into a fringe. Then glue the petals and leaves.

Attach the butterfly details in the upper left corner. Without gluing, lay out the details of the picture with a congratulation and a ladybug on a postcard, observing the proportions. It remains only to add "twigs" and fix the still life.
Gift Ideas
In order to make the voluminous postcard even more voluminous, you can make not a flat pot, but a bag with a bow. Fold an accordion fan out of pink paper or, as in the photo, a bag. Fix the edges of the fan on paper and glue the bottom of it with a corner. To prevent the fan from opening, limit its volume with a white ribbon with a bow.

To the inscription "Happy Birthday!" looked original on the postcard, it can be made with silicone. Next, you need to paint the background with a brush with dry paint, and then carefully remove the silicone film from the paper. There will be a white inscription on a colorful background.

There is no simpler and more original idea than an “endless” postcard. Write congratulatory texts, torn and connected in the process of folding, prepare applications, drawings. Decorate this postcard made by yourself according to the master class shown in the video.
Use natural material: leaves, dried flowers, flattened straws, ears of corn. This will enliven the gifts and give them natural living warmth.
At the end of the 19th century, postcards were called artistic cards. It meant that on all the forms there was something depicted, often people. Called postcards and open letters. The first samples were not folded and sealed in, it was only necessary to glue the stamps and send them by mail.
The first mention of such a shipment dates back to 1777. An entry in the Postal Almanac of Paris speaks of congratulations sent over distances in the form of engraved cards. They were invented by a certain Demizon. However, the author of the postcard, as a phenomenon, is not considered him. Who, then, created congratulatory forms? About this, as well as how to make modern versions of postcards, we will tell further.
greeting card Happy Valentine's Day
The British Museum has a Valentine dated 1415. It's on the message. The author of the postcard is the Duke of Orleans. It is he who is the author of congratulatory cards, as a phenomenon. True, there was no mail under Charles of Orleans. He sent a valentine by messenger. To make a postcard to the Duke was prompted by the conclusion.
After the battle of Agincourt, the nobleman ended up in the Tower. Karl was oppressed not so much by prison as by separation from his beloved wife. So the man began to write letters to her in verse, and on Valentine's Day he came up with a special gift.
The duke wrote to his wife more than once that his heart was given only to her. This symbol of love can be reflected in a congratulatory letterhead. We invite you to watch the video how to make a greeting card for the day Saint Valentine's".
Volumetric postcards do it yourself can be called surprise cards. The figure hidden inside surprises, gives the gift a special charm. But, this does not beg the merits of planar versions. We offer you to view a photo selection of both of them, choosing the option to your liking.


happy birthday card
DIY postcards allow you to follow the old tradition of signing cards. This does not mean a personal congratulation, but the author's autograph. It was put on greeting cards 30 years ago. Although most of the postcards were mass-produced, the design of each series had its own author. His name was marked on the back of the product.
With the beginning of the use of computer office equipment, artists lost orders, and congratulatory cards - autographs. But, you make a postcard yourself and have every right to confirm this with a stroke. The birthday boy will be pleased.
This handmade birthday card It is universal, suitable for both men and women. If the girl has a holiday, you can make the model in pink, choose prints with hearts,. By the way, prints can be imitated manually without special equipment. In general, do not be afraid to fantasize. You can find inspiration in the following photo selection:


DIY Happy Birthday Cards can be addressed to a woman, or a man, or a girl. Greeting cards from February 23rd are intended exclusively for gentlemen. The date is not random. On this day in 1918, the Red Army defeated the Austro-German detachments near Psovsk and Narva.
The army of the new Soviet state had just begun to take shape. What they were able to win up became the starting point for the history of the military forces of the country of the Soviets. At first, February 23rd was called the day of the Red Army, then, the day of the Soviet army and navy. After the collapse of the USSR, they focused on the date.
Some defend the point of view that only military personnel should be congratulated, given the history of the holiday. But, most perceive February 23 simply as the day of all men. Therefore, postcards are preferred universal.
For example, forms in the form of stylized uniforms or jackets will suit all gentlemen. Let's learn how to make these do-it-yourself postcards from paper.
So, the master class is mastered. It remains to make sure that the choice is correct. Below are variously designed cards for February 23rd. Perhaps some of them will overshadow the impression of a uniform uniform and inspire you to be creative. Each of the submitted works can become do-it-yourself postcard for dad, beloved, or grandfather.


It is interesting that the feast of femininity, like the postcards associated with it, has a socialist history. The socialists were activists who annually gathered international conferences and defended the right of women to a salary equal to that of a man and an 8-hour working day. There were also demonstrations.
The first took place in the USA in 1857. The women were dispersed by dousing them with icy, dirty water. This only rallied the speakers. They began to organize demonstrations every year, setting a fixed date - March 8th.
In Russia, however, demonstrations took place on February 23rd. They began in 1913, when the Julian calendar had not yet been abolished. After its cancellation, they began to celebrate in a new style, like the whole world, on March 8th.
No matter how militant the ladies are, no matter what political views they hold, they remain women. And all women, as you know, love. Therefore, most postcards for the celebration are decorated with buds. So let's figure it out how to make a postcard with your own hands for International Women's Day.
Beautiful postcards do it yourself by March 8, in addition to flowers, other women's flowers may also be contained. Do not interfere with pretty hearts, beads, lace, bows. How to combine them with greeting cards? We offer to stock up on ideas from the pictures below. There are samples from the headings " do-it-yourself postcard for mom”,“ beloved wife ”,“ grandmother ”.


Among the greeting cards for March 8, many are also suitable as postcards on mother's day. DIY a present of the one that gave life, it is pleasant to do and give. By the way, Mother's Day is celebrated not in spring, but in autumn - on the last Sunday of November.
The importance of peace and the role of wars in the history of states is evidenced by the first printed postcard in history. Not flowers, not a landscape, but an artilleryman with a cannon were chosen as the decoration of the letterhead. The postcard was issued in 1870. Before the beginning of the Great Patriotic War, 70 years remained.
It has passed more since the end of the war. But, the Russians continue to remember and honor the heroes of the battle against the Nazis. One way to show respect to veterans is to give gifts. do-it-yourself postcard to 9 May. How to make it? Instructions in the video below.
It's not the only option handmade postcards. Victory expressed through red carnations, images of military equipment, triangle letters, marching people, melodies of the war years, eternal. Artillery salute is also a symbol of the holiday. All this can be reflected in DIY postcard in May.


Do-it-yourself postcard to a veteran may become history, like the May 9th holiday itself. Even now some museums display greeting cards from the post-war years dated back to the 1940s and 1950s. These postcards are over half a century old. They, like letters from the front, reflect the mores of the era, the aspirations of the Soviet people.
Happy New Year greeting card
On the Internet you can find postcard templates.DIY it remains only to cut out the printed details of the composition and put it together. If you want to make drawings, patterns yourself, a master class will help. We offer a lesson from Miroslava Kostrikina. She will show you how to make a three-dimensional card with a snowman, a snow-covered house and a green spruce nearby.


The photo collection includes do-it-yourself baby cards, and options for adult masters. Samples can be made in large format, or in miniature, similar to business cards. By the way, business cards are considered the progenitors of greeting forms. This is the Chinese version of the origin of postcards. The culture of business cards has been developed in China since ancient times.
Local etiquette obliges you to leave your card at the door of the house, if you did not find the one you wanted to congratulate. Not everyone wanted to leave a standard business card. Some Chinese began to paint on and stick additional elements to their letterheads.Someone began to change the size of representative cards. This is how postcards were born. As you can see, each country has its own view of their origin.