Corrugated paper crafts: do-it-yourself paper sunflower. Paper sunflowers. Master class Volumetric paper sunflower flower
Now we will try to make very beautiful flowers that decorate the rooms. I will create paper sunflowers with my own hands, the master class is quite long and very interesting. If you have a beautiful vase, then putting a bouquet of sunflowers in it, you can decorate absolutely any interior. Sunflowers will be mostly made of cardboard, but you will also need plain paper with a newspaper, as well as some other materials that I will list later. I make the legs from twigs, you need to break even, but not very thick.
Sunflower petals can be yellow, orange, or slightly whitish, so we'll make them different too for variety. I advise you to do several pieces at once, not one at a time, so you will save a lot of time and effort.
DIY material for sunflowers:
— Cardboard.
- Newspaper.
- Paper.
– Gouache paints (yellow, orange).
- Branches from a tree.
- Wineglass.
- Scissors.
- Pencil.
- Glue.
- A brush.
- Dry poppy (sold in stores).
Let's start crafting. We take two colors of gouache paints, yellow and orange, as well as a newspaper. We paint over the entire area with paints on one side. Don't be afraid to mix these two colors or paint over each other.

This is how we get it, let the already multi-colored newspaper dry a little.


We take a cardboard and a glass, turn it over, circle the neck with a pencil. We are doing the middle of the sunflower.

I decided to make 5 and accordingly cut out five midpoints (circles) from cardboard.

While we were making circles, the colored newspaper dried up. We make an accordion out of it, fold it and several times to cut out the petals later.

We take such an accordion folded several times and cut out the petals, this method is very convenient since you will immediately create several pieces, and not each petal will be done.

This is how it turns out, you can create different sizes.

We lay them out and take the glue. On the one hand, the petals are colored, on the other they are not, but this is so conceived on purpose, for beauty and variety.

Glue the petals on the made circle, 10-12 pieces each.

That's what we got, the sunflowers are almost ready.

Again we take a glass and already ordinary paper, exactly the same circles need to be outlined.

Draw five pieces and cut them out.

And now we glue a twig from the back of the sunflower, it will be a stem, and also cover the entire area behind with glue.

Glue the newly made white circles.

Here is the intermediate result of creating sunflowers, the last step remains.

On the front side of the circle, grease with PVA glue and take a dry poppy in a bag.

Gently pour poppy seeds onto the glue.

Completely fill the entire area of \u200b\u200bthe circle with poppy seeds.

Naturally, not all grains will stick, so after a while you just need to chicken out the poppy and that's it, the craft is ready.

Here we have such wonderful paper sunflowers.

Put them in a vase and decorate the room.

for decoration, you can also create or. Create with me.
What kind of paper does not exist - white, colored, watercolor, pastel, corrugated, cardstock, cardboard, scrap paper ... You can list indefinitely. It differs in texture, density, scope. The same product made from different materials looks different. Corrugated paper is suitable somewhere, but somewhere it is better to use colored coated paper. There are also many techniques for performing work from it. And for each technique, certain types of paper are suitable. For example, we will make a sunflower from different types of paper with our own hands.
Simple application
For this craft, it is better to take plain colored paper. One-sided or two-sided, coated or velvet, or maybe you need to add corrugated - it all depends on the specific idea and the desired result.
For an application with an element of weaving technique, we will use simple one-sided colored paper. In addition to it, we need cardboard, glue, scissors, a pencil and a ruler.
First, cut out the templates from cardboard, as in the photo:

They are very convenient to use when working with children, as well as when you need a lot of the same elements.
Having cut out these details from colored paper, we prepare stripes for weaving the core. It is recommended to use 2 colors. For a sunflower, you can take shades of black, brown, gray, or you can experiment with colors. The length of each strip is slightly more than the middle, and the width is about 0.5 cm.
We glue the strips to the round blank from the inside. There should be no glue between the front side and the workpiece, otherwise it will not work.
Carefully weave, inserting a strip of a different color through one. It should turn out like this:

The ends of these strips are also bent back and glued to the inside of the workpiece.

From yellow and green paper, cut out the rest of the details according to the templates.

We glue the details. The work is very simple, for kids. Teach them to distinguish color, shape, arrangement of details. Such crafts can be attached to the refrigerator with a magnet or make a postcard out of it.
The core could have been done a little differently. First, make weaving from the stripes, and then cut it out and glue it. Do what is comfortable and easier for the baby.
Several options for this application in the photo:


More difficult option
Let's make the application more difficult. To do this, we will make a sunflower using the quilling technique. The material here is a special paper for quilling, which has a certain density. It comes in all sorts of colors, matte, shiny, metallic, etc. Choose color scheme to your liking. The main thing is that the density fits.
A detailed master class for the application "Sunflowers" using the quilling technique.

For work you will need:
- quilling paper yellow and black;
- pattern with circles;
- quilling tool;
- pins;
- cardboard;
- colored paper;
- PVA glue;
- green floral tape;
- wire;
- base paper;
- picture frame optional.
Let's make the petals first. Here we use about 15 pcs. in every row. Rows of 2 per flower.
Wind a strip of yellow quilling paper 60 cm long onto the tool in the form of a roll. Dissolve it in a template with circles up to 3 cm. Fasten the roll with glue, shape it into a drop, holding one side between your fingers and shifting the other in the opposite direction.
In the middle of the roll, drop a drop of glue, secure with pins until dry. Sharpen the edge so that the workpiece looks like a petal. Make enough of these petals for all flowers.

Let's start making the middle. Cut out a circle with a diameter of 2-3 cm from black paper. Make each "seed" as follows. Make a tight roll out of black colored paper by gluing the edge. Using a tool, slightly push the middle up, giving the shape of a pyramid. Drop glue inside.
Seal the entire circle with “seeds” without empty spaces.

For each stem, take a wire about 20 cm long and wrap it with floral tape. The latter can be replaced with paper of a suitable color.
Flower assembly. Cut a circle with a diameter of 3-4 cm and cut it along the radius. Glue in the form of a funnel. Attach the stem. Glue one row of petals to the edges of the funnel, then the middle and the second row of petals. Glue a green paper sepal on the other side of the funnel.

Leaves cut out of green colored paper symmetrical, round shape. You can draw veins. For the picture you need 5-6 leaves of slightly different sizes. Glue them to the stem.

Having glued all the details to the background, you can arrange it in a frame.


Summer piece
Beautiful works are obtained from crepe paper. The materials are readily available, they do not require special tools, the complexity of the work is different, both a beginner can handle it, and an experienced master will find an interesting idea more difficult.

We look at the video for creating a sunflower from corrugated paper:
Video on the topic of the article
Some interesting ideas on video:
How to make crafts (application) a sunflower with your own hands from sunflower seeds. Three options: paper, natural material(leaves), plasticine. Master Class.
DIY sunflower craft
A sunflower is a bright sunny flower, so crafts with it turn out the same. This plant has long inspired the work of artists and sculptors. Application with sunflowers can serve as an ordinary craft, decorate greeting card or a room, if you arrange the work in a frame. sunflower crafts you can do different ways and from a variety of materials.
In this article I will talk about how to make applications with a sunflower from paper, natural material (autumn leaves) and crafts with a sunflower from plasticine with my own hands.
All these works have real sunflower seeds glued to the central part of the flower. If the work is planned to be framed under glass, they will interfere. In this case, you can not glue them, but draw lines instead of them in the form of a grid.
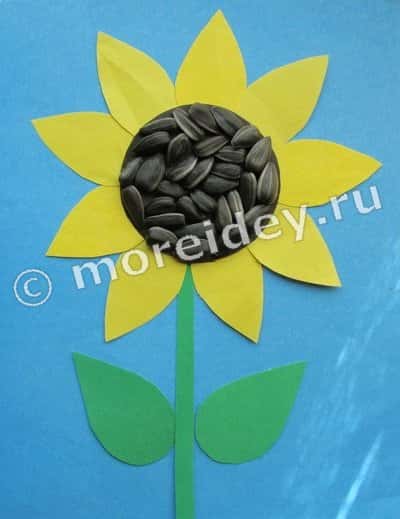
Sunflower - paper application. Option 1

Sunflower - paper application. Option 2
This option differs from the previous one only in that instead of a circle of yellow colored paper, you need to cut out a strip, bend it with an accordion, and then cut out several petals at once. Glue the petals on the back of the black circle along the very edge.

Sunflower - application from natural material (seeds and autumn leaves)
Similarly, you can make an application with a sunflower from natural material - from seeds and dried yellow or orange autumn leaves from shrubs or trees. For the work that is presented in the photo in this article, leaves of fragrant honeysuckle honeysuckle were used (despite the middle of September, it is still hot here and there are no other yellow leaves, even these were found with difficulty - they hid in the middle of the bush).
If all the leaves are about the same size, they need to be glued to the base in a circle, leaving a little free space in the center. It will be more beautiful if you glue them in two layers, and glue the second layer in a checkerboard pattern.

If the leaves are of different lengths, you need to fold them together, aligning them with the upper corners, and cut off the lower part.

Glue the resulting petals in a circle overlapping or in two layers, leaving free space in the middle.

Glue a circle of black paper in the middle.

On a circle, draw a grid or glue sunflower seeds.

If desired, you can glue the stem and leaves from the stem of a blade of grass and dried green leaves.
Sunflower - craft from seeds and plasticine
My daughter made this craft at school in a technology lesson. It was necessary to bring plasticine, seeds and a modeling board to the lesson. Children made a sunflower according to the model and glued it directly to the board on which they sculpted the details. I would recommend using colored cardboard as the basis or background for this craft - the board will still come in handy in the next lessons, and then this craft will have to be broken.
Stages of work

These are the different works that the children got from the same model.
In this photo, plasticine sunflowers Nika, Sasha and Anya.

And on this - the work of Arina, Vitya and Dasha.

© Julia Sherstyuk, https: // site
All the best! If the article was useful to you, please help the development of the site, share a link to it on social networks.
Placing site materials (images and text) on other resources without the written permission of the author is prohibited and punishable by law.
- Crafts for Easter: master class "Chickens and ...
Craft sunflowers with their own hands will certainly captivate every child. Sunflowers are bright, expressive flowers that retain their attractiveness even after fruits appear in them - seeds loved by children and adults.
It is not surprising that these plants attract attention and arouse interest in children, who are happy to try to convey their images in their work.
This craft will be relevant for kindergarten- a sunflower can be made using various techniques, including one that does not require constant supervision and help from an adult. Children in a small group will be able to repeat the actions of the teacher. For pupils of older groups, you can organize a master class on the topic of how to make sunflowers with your own hands, and reveal in it several ideas for creating unusual images.
A very bright and beautiful sunflower can be made from plasticine. In order to mold sunflower petals, we need to mix three colors of plasticine - yellow, brown and orange. Do not mix them into one mass. Let the veins of each color be preserved, then the sunflower petals will look very impressive.

We decorate a brown plasticine cake with small cuts - this is the middle of a sunflower.

Glue the petals to the middle. We supplement the craft with a green leaf. Plasticine sunflower is ready!

Sunflower pattern
Drawing its core, you can use various round-shaped objects at hand - even a cardboard roll from toilet paper or disposable paper towels. And if you bend this roll on both sides, you get an excellent stamp for drawing petals: just dip it in yellow paint and apply prints around the core. Look what a wonderful sunflower you can draw using this technique! We covered the center of the sunflower with glue and sprinkled with real black pepper. The drawing turned out to be voluminous and very natural!

Depicting flower petals, you can also give freedom to your imagination. For example, you can draw petals with a toothbrush. If at the same time the core is made from a circle of black colored paper, it will turn out to be quite simple, accessible to children younger age but an interesting piece.

The leaves on the stem can also be drawn in an unusual way. For example, the original leaves are obtained from the prints of children's hands made with green paint. You can also draw the flower itself with handprints, using yellow paint for this.

Application "sunflower"
Sunflower seeds glued to the core will decorate such a pattern. There are also different methods for working with the application. For example, you can take a disposable white paper plate as a basis for creating a three-dimensional flower. We glue a cardboard green stem and leaf to it, and inside we distribute yellow pointed petals in a circle. Pour the seeds into the center of the plate - you're done! The kids will be happy to enjoy a treat from such crafts.

Seeds can not only be poured, but glued to the center of the flower. If at the same time to make its petals voluminous, bending each of them in half, you get a spectacular appliqué.

Application "sunflower" from pieces of paper
You can also make the whole flower voluminous using pieces of colored napkins or corrugated paper for wrapping flowers or scrapbooking. We cut a napkin or paper into small squares, crumple each of them into a ball and paste it into a pre-drawn outline of a sunflower.

Like a mosaic, lay out the whole pattern in lumps.


If you want to complicate the work a little, you can lay out the middle of the sunflower with pieces of paper.

A very spectacular sunflower can be made from a disposable plate and pieces of newspaper. To do this, cover the bottom of the plate with brown paint and let it dry.

We cut out oblong leaves from the newspaper and color them in yellow. We decorate the brown center with black beads. Glue a green stem with a leaf.

Another version of the sunflower, make it in the form of a picture of buttons.

Picture from buttons "sunflower"
After watching the master class, the children will be able to choose which work technique they like best, and if they wish, they will combine several techniques in one craft. Having created such a rich ground for creativity, educators will only have to organize a place in order to place the fruits in the most profitable way.
A sunflower made of candy and corrugated paper is a wonderful gift:
What can be made from paper? For example, here is a picture-application of a sunflower.
The sunflower looks like the sun and turns its "head" after it. It is grown for its seeds, which are used to make sunflower oil and sweets, such as halva and gozinaki.
You will need:
colored cardboard sheet,
Yellow, black and green paper
Scissors,
Tassel.
Progress:
Progress:
1. From yellow paper, cut out one square with a side of 16 centimeters, the other with a side of 14 centimeters and a circle with a diameter of 5 centimeters.
2. Fold each square diagonally 4 times.
.jpg)
3. Cut out the petals from the resulting triangles. Round them off with scissors.
.jpg)
4. Apply glue to the center of each petal and assemble the flower. Glue the circle in its middle.
.jpg)
5. We will make the seeds using the trimming technique. From black double-sided paper, cut out 25 squares with a side of 1 centimeter.
6. Put the end of the pencil in the middle of the square and wrap the edges of the square with a rotational movement.

7. Holding the edge of the resulting workpiece with your finger, dip its end in glue and glue it in the middle of the flower on a circle. Fill in this way the entire middle of the sunflower.