DIY cardboard steering wheel. DIY candy steering wheel: creating an original gift. How to make a ship's "rudder" using a template
If you are a car owner or just dream of becoming one, then you will definitely be pleased with such an original gift as a DIY candy steering wheel. This sweet souvenir will definitely lift your spirits and remain in your memory as one of the most unusual souvenirs. If you ever get bored with it, then a pleasant tea party with such an addition will come in very handy.
The technique of creating objects from candies began to gradually spread not so long ago and is now very popular. The weaving technique is mastered gradually; if there are photos from which you can trace the steps step by step, then the task becomes even easier. To create a steering wheel from candies, we will use the master class proposed below.
Sweet gift
Before we start manufacturing, let's prepare all the components:
- candies. Here you can completely rely on your taste, or on the taste of the person to whom such a gift is intended. It’s great when candy wrappers are bright and colorful. Approximately 900 grams;
- thick cardboard;
- image of the steering wheel, it is quite easy to find it on the Internet, and then print it out in full size.
- Don’t be lazy to find out your favorite car brand, because this logo will be displayed in the very center of the steering wheel. It can be Audi, Toyota, BMW and so on, we chose Volkswagen for the master class. Also print the icon in full size, suitable for the selected steering wheel;
- backing for laminate;
- scissors, tape, glue gun;
- colored paper for background.
To begin with, we cut out the steering wheel that we printed and get a ready-made template. We place it on cardboard and make two such blanks. Thick cardboard is needed so that the steering wheel does not deform from the weight of the candies.


Now let's take the prepared substrate. She needs to wrap the workpiece tightly, so it will become soft and feel like a real steering wheel. The strips with which we wrap in thickness should not be more than three centimeters. In several places, so that the backing does not move, we attach it to the cardboard with tape. When the steering wheel is completely wrapped, the edge of the backing is secured anywhere.


When the entire steering wheel is wrapped, you should move to the central part. Let's cut out a separate part and stick it in the center.


When the base is completely ready, let's start fixing the background. For example, metallized paper of any color is suitable for it. This is easy to do; cut out a square piece of paper, score the folds and wrap it around.


All joints are carefully sealed with tape, since the entire steering wheel will be covered with candies on top, the tape will not be visible at all and will not spoil the overall appearance.


We take the candy by the tail and twist it tightly. Let's place the candies all over the steering wheel to imagine what the overall picture will look like. We determine where our front side is. Take turns at her, candy after candy? glue them on with glue.
Don't forget that the glue is hot and it can melt the chocolate with its temperature, so work very carefully.
Attach the selected logo to the very center, also with glue.


We get such a cool steering wheel!

We have described only one of the possible ways to make such a steering wheel. The principle itself is always the same - sweets are attached to the template using glue. But it is not necessary to strictly follow all the other points one by one. You can change the materials for others that you may have at home, at hand. For example, a laminate backing can easily be replaced by padding polyester, paper with a metallic sheen, or any other type of paper. To create a background, you can even use a satin ribbon; it is sold in completely different widths, meaning you don’t have to cut it.

Don’t think that car enthusiasts are only men; approximately the same proportion of the female population enjoy driving a car; the steering wheel is very close to them. So such an interesting souvenir is a wonderful gift for them too. Women will prefer more delicate and soft colors - pink, red, blue, unobtrusively ask the lady's favorite color in advance.

To please your child, you can make the steering wheel in the center with the image of his favorite fairy tale or cartoon character. You will be surprised how delighted your child will be with such a gift.
Candy ideas
You can make not only a steering wheel from candies, but also an entire car. Moreover, the topics range from the most childish to the real adult.


Animals created from sweets will not leave anyone indifferent. Fish, birds - they can be certain symbols for each holiday.


If you decide to make a pleasant and boring gift, but at the same time an amazing one, then you can, without even thinking about it, make figures from candies. Look for ideas on the Internet or come up with and create your own.
Video on the topic of the article
In order to better master the technique of creating candy products, check out the selection of videos.
Good time to all, dear friends! In today's article I would like to show you a rather interesting homemade idea for entertainment. This homemade product is made from a very popular material at the moment for making homemade products. I think many people know that now many craftsmen make various devices, toys, tools, and so on from cardboard. Some DIYers even make car models out of cardboard and I think it looks very cool. In principle, this is understandable; corrugated cardboard is not only a very versatile material, but also very affordable.
In general, today we’ll look at how you can make a full-size gaming steering wheel for a smartphone from corrugated cardboard. With this steering wheel, you can play racing games on your phone or tablet without any problems.
Well, let's not delay with a long preface, let's go!
So, for this homemade product you will need:
-corrugated cardboard
-wire (not very thick)
- ice cream sticks
-toothpicks or barbecue skewers
- stationery eraser
- cardboard tube made from foil, paper or film
Tools you will also need:
- a screwdriver or mini electric drill and a drill of the required size (the drill should be the same diameter as the diameter of the barbecue skewers)
-stationery knife
- hot-melt adhesive
-scissors
The first step is to cut out many identical rectangles from corrugated cardboard, slightly larger in area than the smartphone for which the steering wheel is made.
Place the phone exactly in the center of the corrugated cardboard rectangles and trace with a pencil, marker or pen. Then we cut it out. You should get a cardboard frame.
Then we add hot glue to the frame and glue it to a regular rectangle.
Now you need to make many copies of the first frame and start gluing them on top of the first one so that you get many layers of cardboard, best glued with hot glue:


We take the phone and put it in the recess in this blank, if it lies tightly there and does not fall out, then everything is done correctly and you can continue:

On the back side of this workpiece, exactly in the center (this is important), glue a regular small ball bearing:

We take an electric drill or screwdriver and drill 4 holes in the workpiece, that is, one on each side exactly in the center. The smoother you do this, the better.
Then insert one piece of barbecue sticks or toothpicks into the resulting holes. Then you need to secure them with super glue:


Now you need to take a whole cardboard box, which is glued along all the edges. Then we make markings using a felt-tip pen or gel pen. The marking must be done as shown in the photo below.
After you make the markings, you need to cut this piece out of the box:


From the same corrugated cardboard we cut out an isosceles triangle with cut off pieces of the edges. In the upper part of the triangle we make a small through hole using a Phillips screwdriver.
Now we roll a small tube out of paper, which should contain many layers of paper. We cut off the required piece of the tube (by the way, to make this part much stronger, you can soak it a little with super glue or PVA glue) and insert it into the hole made earlier, after which, naturally, we glue it there. Everything must be done as shown in the photo below:


We install and glue the cardboard blank using hot glue exactly on top of the cardboard box from which we previously cut a piece. Also, under the paper tube, you need to cut an oval hole in the cardboard box, as shown in the photo below.
A few centimeters behind the first triangle, we install the second one, after which we combine and glue them at an equal angle, making something similar to a pyramid.
Then we glue a cardboard wall on each side, but of course they must first be drawn and cut out:


We take the previous blank, which is needed to hold the phone. We put this blank with a hole in the center of the bearing onto a paper tube, and then add a little glue to fix it.

Testing:
The workpiece must rotate freely around its axis. It is very important that no glue gets inside the ball bearing, otherwise it may either rotate poorly or stop altogether:

Draw a large ring on a large sheet of corrugated cardboard; its size should be close to the size of the steering wheel you want to make. Then we cut out this ring using a stationery knife or a special “scalpel”, which is designed specifically for these purposes. It is necessary to cut very carefully and evenly. It should look like what is shown in the photo:


On top of the first steering wheel ring we glue the second one with hot glue, then the third, fourth and so on. Each subsequent ring should be thinner than the previous one. We do everything the same way as shown in the photo below:


We turn the workpiece over and repeat the steps we did earlier. After gluing the last layer, it should look like a rounded steering wheel; reducing the thickness of the ring was done specifically for this. By the way, the edges of the gaming steering wheel can be sanded using sandpaper, so it will be smoother and rounder, but this must be done very carefully, without damaging the cardboard:


From corrugated cardboard we cut out the same part as shown in the photo below.

In the places where the “rays” of the part are folded, it is necessary to make non-through cuts in the top layer of cardboard. This is necessary so that the cardboard bends better.
We bend the “rays” of the part and glue them together using hot glue.
Now we cut out a flat part from the same cardboard, shaped like the bottom of the workpiece that we made earlier. In this part you need to make a round hole in the center and insert a cardboard tube there. Then we glue this part to the bottom of the workpiece. The cardboard tube also needs to be glued to the part with hot glue, but before that you need to make two even grooves in its upper part, symmetrical to each other:


We wrap and glue another cardboard piece around the blank with cuts in the top layer of cardboard, and then glue another bottom at the back. Everything needs to be done as shown in the photo below:


We install this blank in the center of the gaming steering wheel and align it using a ruler.
After that, using two identical ones and another lower one, we connected both blanks and turned them into a full-fledged steering wheel. It is best to glue using thermal glue. Everything should turn out as shown in the photo:


We take an ordinary ice cream stick and drill one through thin hole along its edges. Then we glue this blank into the grooves in the cardboard tube that we made earlier:

We install a partition in the cardboard box with a slot in the center for the cardboard tube. Then glue it with hot glue. We do everything as in the photo:

Apply a little hot glue to the edges of a long ice cream stick and glue it under the hole in the cardboard box. There should be empty space on the sides of the stick:


We take a rubber band and put it on the central section of the barbecue skewer, then we pass it under the ice cream stick and we also put the opposite end on the same section of the skewer, the rubber bands need to be fixed in this position. The phone holder must lock into place in a level, horizontal position.
On the sides of the large hole we make two more small ones.
Now we take the wire and screw one end of it to one of the side sections of the skewer, after which we pass the other end through the hole under the section of the skewer to which it is connected. We do the same with the opposite side.
The correct steering wheel is never round. And it is never subtle. And even more so without wooden or carbon overlays and anatomical bumps covered with perforated leather. Many owners of tuned cars think so. And on my own behalf, I’ll add that it’s useful for a good steering wheel to have a certified design with an airbag. This means that the correct steering wheel can be obtained by tuning the factory steering wheel.
Different specialists practice different methods of making inserts and anatomy on the steering wheel. I suggest using matrix technology based on a plasticine model. The advantage of plasticine is the ease of finding the shape of the model. The advantage of the matrix is the possibility of reuse in the manufacture of the same steering wheel or fragments of crusts for steering wheels of other sizes.
The middle part of the steering wheel does not require the intervention of a tuner; the airbag should work properly. Only the rim and partially the spokes can be modernized.

01. You can simply try to copy the rim design from an existing steering wheel, but you can get creative with the shape yourself. The easiest way to imagine the desired steering wheel is to draw your contours on the image of the donor steering wheel. But, in my opinion, you shouldn’t linger on paper for too long, because ergonomic requirements and the design of the steering wheel can destroy your unbridled fantasies.
02. It’s especially nice to improve the expensive steering wheel of a prestigious car, although you should try your hand at something simpler.

03. Most steering wheels of modern cars are covered with leather, which is the first thing I remove. Beneath the skin, the soft rubber shell of the rim is revealed.
04. If we plan to change the outer contour of the steering wheel, then we will have to cut off the excess rubber from the rim frame. But you shouldn’t get carried away with cleaning the frame from rubber; it’s better to leave it in places where it doesn’t interfere with the change in shape.

05. And now, in a free manner, we try to look for the correct proportions and hand-friendly shape configurations on the plasticine steering wheel. Let's compare the ergonomic cast of a hand obtained from plasticine with the original drawing of the steering wheel. We transfer the characteristic bumps, dents and connectors from the drawing to the plasticine and again “pump” the comfort of the steering wheel in the hand.

06. We begin to work out the approximately molded shape of the steering wheel in detail on one of the sides. At the same time, I resolve the eternal debate about whether plasticine or putty is more important in favor of putty. This means that I will not polish the plasticine to a mirror shine to remove an almost finished matrix, but will finish off the unevenness left on the plasticine on the finished steering wheel with putty. But on plasticine we need to mark the cracks for sealing the skin with lines, and the fractures of the plastic form with pointed ribs. From the finished plasticine of one half of the steering wheel, we remove templates made of thick cardboard.
07. Transfer the contours, slot lines and edges of the shape through the templates to the plasticine on the other side of the steering wheel. The lateral thickness of the steering wheel can be controlled with a caliper, comparing the corresponding places on the right and left.

08. And now the form is built, but do not rush to throw away the outline templates. With their help, we need to make formwork for molding the connector flanges of the matrix halves.
Like any closed volume, a solid steering wheel can be obtained by gluing together the upper and lower crusts of the mold. To make these halves from fiberglass, we must first make a matrix-cast from a plasticine model. The flange connector will divide the steering wheel matrix into two separate halves, in which it is easy to make the upper and lower crusts of the steering wheel parts themselves.
09. The flange formwork must be installed strictly in the plane of the widest longitudinal section of the rudder. I usually fix the cardboard formwork plate with pieces of plasticine on the back side.

10. Working with fiberglass, and in particular contact molding of glass fiber impregnated with polyester resin, presents almost limitless possibilities for the production of three-dimensional forms. The material in a liquid state freely envelops surfaces of any curvature and configuration. And the hardened composite can be fully used for its intended purpose. When molding rough matrices, I usually do not use gelcoats (a special thick resin for the working surface) or expensive matrix resins. But I admit that sometimes I “abuse” the thickener Aerosil (glass powder). My relatively thick resin covers up the model's unevenness well and fills sharp corners on the mold. But the quality of molding is also affected by the reinforcing material. I cover the first couple of layers, especially on a complex surface, with glass mat grade 150 or 300. I do not recommend applying many layers at once - this will inevitably lead to deformation of the fiberglass. After just an hour or an hour and a half, the resin becomes solid, but the polymerization process is still ongoing.
11. While the first mold is polymerizing, I turn the steering wheel over and remove the cardboard formwork. To prevent the resin from sticking to the formwork, I first coated it with a wax-based release agent (Teflon auto-plyrol).

12. When I don’t have a separator at hand and time is pressing, I cover the contact surface with masking tape. It can be easily removed from hardened polyester. So this time I closed the flange.

13.The underside of the model is also covered with one layer of fiberglass. After the resin has “stood up,” that is, first from a liquid to a jelly-like and then a solid state, I turn the steering wheel over again. On the front side of the model I apply a layer of thick 600 grade glass mat, having previously sanded the previous layer of plastic with sandpaper. So, by alternately applying layers, I increase the thickness of the matrix crust to 2-2.5 mm (which corresponds to 1 layer of glass mat grade 300 and 2 layers of grade 600).

14. A fully glued matrix is maintained for approximately 24 hours, although in conditions of constant rush in the evening, the molded matrix goes to work the next morning.
15. Pliable and soft in a liquid state, fiberglass, when hardened, reveals its insidiousness. Looking at its candy-like surface, you want to run your hand over it. But invisible, protruding glass needles can seriously injure your hand. Therefore, first of all, I lightly clean the surface of the matrix with sandpaper. The shaggy, prickly edge of the matrix must be trimmed, leaving a flange 25-30 mm wide. At a distance of 10 mm from the edge of the model, it is necessary to drill mounting holes for self-tapping screws in the flanges. In this form, the matrix is ready for removal.

16. Using a knife blade or a thin steel ruler, separate the flanges along the entire contour. Then we widen the resulting gap between the flanges and separate the matrix halves. A thin layer of model plasticine is destroyed during the removal of the matrix, partially remaining in the mold halves.
17. Plasticine residues can be easily removed from the matrix. Then the inner surface can be wiped with kerosene. I clean the contours of the flanges with sandpaper. On the working surface of the cleaned matrix, defects in the plasticine model are clearly visible, which I correct with the same sandpaper.
Even using this rough matrix, several dozen rudders can be made. But who will give you so many identical steering wheels for tuning? But exclusive works with plasticine and fiberglass are in great demand.
Part two:
A rough matrix made using conventional polyester resin (as opposed to a finished matrix resin) has significant shrinkage and stretching, leading to distortion of the original shape. Moreover, the smaller and more complex the part, the more noticeable the deformation. Particularly strong displacements occur in the corners, as in our case along the entire arc of the cross-section of the half-mold.
So that in the steering wheel parts themselves, by the time they are completely polymerized, visible discrepancies of one half-form relative to the other along the contour accumulate. But that’s why it’s a rough matrix, just to help us translate a plasticine idea into a fiberglass blank of a future shape, or to serve as temporary (inexpensive) equipment for studying the demand for a new product.

01. Before I start making the steering wheel halves, I prepare the steering wheel itself for pasting. Gradually cutting off excess rubber from the rim and spokes, I place the steering wheel into the matrix halves. At the same time, I try to leave as little space as possible between the rim and the surface of the matrix for gluing.

02. You can glue the steering wheel skins in one go, immediately laying two layers of glass mat grade 300. The main thing is to try to mold “dry”, i.e. remove excess resin with a wrung-out brush. Before gluing, the working surface of the matrix must be covered with a separator.
03. A part with a thickness of two layers of thin glass mat turns out to be fragile, so it must be removed from the matrix with care. I press the fiberglass edges sticking out at the edges of the matrix towards each other and carefully pull out the crust.

04.The uneven edges of the removed parts must be trimmed according to the imprint left on the part by the edges of the matrix. For trimming, you can use a power tool, or you can cut it off with a hacksaw blade.
05. I try the treated peels on the steering wheel while cutting the steering wheel rubber, if necessary. For a better fit of the parts, the inner surface of the fiberglass should be cleaned with coarse sandpaper, removing protruding fiberglass needles and resin deposits.

06. Gradually modifying the edges of the parts and the rim, I adjust the halves to each other on the steering wheel. Well-aligned and loosely fitting crusts on the steering wheel are ready for gluing.
07. There are two ways to glue the half-forms. Typically, the parts to be glued are inserted into a matrix, which, when assembled, aligns them and presses them against the rim. But I decided to assemble the steering wheel without using a die. I wanted to check the accuracy of the alignment of the parts and the quality of filling with adhesive material the entire space inside the steering wheel and at the seams. For gluing, I use a mixture of polyester resin, Aerosil (glass powder) and fiberglass. The result is a porridge similar to glass-filled putty, only its hardening time is much longer. I fill the steering wheel halves with this mixture and press them onto the rim. I remove the excess porridge squeezed out of the seams and fix the half-forms with masking tape. I correct severely deformed areas of the crusts using clamps.

08. Heating of the part indicates an intense polymerization reaction. One and a half to two hours after gluing begins, I remove the tape and remove the remaining resin. After this, the surface of the steering wheel can be processed.
09. Traces of the separating layer remain on any part removed from the matrix. Therefore, the first thing I do is clean all the fiberglass from the remnants of the separator with sandpaper.

10. Traditionally, a tuned steering wheel is lined with carbon fiber (carbon), wood veneer and genuine leather. Solid materials with a varnished surface are placed on the upper and lower sectors of the rim, and the side parts of the steering wheel with spokes are covered with leather. This is what we initially planned to do on our steering wheel. But after we held the almost finished steering wheel in our hands, it became clear to us that the extreme design of the shape requires an unusual finish. And it was decided to do everything the other way around, i.e. leather on top and bottom, veneer on the sides.

11. For greater comfort, a thin layer of porous rubber can be glued under the skin (which greatly increases the cost of the work). We glue an approximate piece of a slightly larger size than necessary onto the fiberglass rim of the steering wheel.
12. The rubber fits tightly around the rim. In places where there are leather inserts under the palms, rubber spots cut out according to the same template are also glued. All fragments of rubber are leveled with sandpaper, and defects are sealed with rubber crumbs mixed with glue. The contours are trimmed according to templates.

13. When we plan the finishing of the steering wheel, it is necessary to set the correct ratio of the rim sizes at the junctions of different materials. For example, the thickness of veneer with varnish (up to 2 mm) is equal to the thickness of leather with glue. This means that the rim of our steering wheel must have the same cross-section at the joints. And the rubber glued under the skin formed a 2 mm high step on the rim. Therefore, you will have to level the rim at the joints with putty. In order not to spoil the edges of the rubber stickers with putty, they must be masked with masking tape. For the same purpose, I glue a thin plasticine strip along the contour of the rubber, which will become a gap for sealing the skin.
14. “Hairy” putty is an indispensable material in the work of a layout designer. This putty is made from polyester resin and bonds well with our polyester fiberglass. I also know that many craftsmen make steering wheel tuning entirely from putty. Gradually applying and sanding the putty, the steering wheel is given the desired shape.

15. On the finally constructed surface of the steering wheel, I mark lines of cracks for sealing the skin. It is most convenient to make cuts on the rim using a hacksaw blade for metal. The depth of the gap should be at least 3-4 mm, and the width up to 2 mm. I smooth out the cuts made with the blade using sandpaper. The slots of the inserts under the palms were marked with plasticine strips. After removing the plasticine, the grooves are leveled with putty and sandpaper. It is very convenient to lay out the cracks using a machine.
16. The final touch is installing and adjusting the airbag cover. The main thing is to calculate the gaps correctly. The point is that the movable cover should not rub against the edges of the spokes. In addition, you need to leave room for the thickness of the leather or Alcantara that will cover the airbag cover. To ensure an accurate fit, I insert pieces of leather into the gap and “pump” the desired area. To adjust the gaps, the same means are used - putty and sandpaper. I pour a primer over the finished fiberglass so that the entire shape appears, because it is difficult to see defects on a surface stained with putty.
This is where the layout designer’s work ends and the product is sent to other specialists. First, one craftsman will glue the veneer and cover it with varnish, then another craftsman will cover it with leather. The final result will depend on the qualifications of the finishers, but the foundation - the form itself with its ergonomics, plasticity, and proportions - is laid by the layout master. That is why the basic specialization in the manufacture of non-standard products has always been breadboard production.
How to make a steering wheel out of candysweets in blue wrapper – 800 gr.,
steering wheel in the picture or photo for example,
car brand logo (photo printing),
cardboard box,
PVA glue,
underlay for laminate (insulation),
regular and double-sided tape,
metallized blue foil,
glue gun,
wrapping paper.
How to make a steering wheel out of candy:
1. First of all, about candies: they should be tasty, the wrapper should be bright and of the desired color. The nephew simply adores cars and especially “Daddy’s blue one.” Therefore, the initial color was chosen blue, and the steering wheel of the brand of the desired car was found on the Internet. It’s better to print out the picture as a sample - after all, each model has its own shape, and you can’t just “schematically” fool children. It is also advisable to print the logo of the corresponding car brand. On cardboard we schematically lay out the steering wheel from candies and trace it with a pencil - this must be done before cutting out the layout from cardboard so that the candies fit exactly on the workpiece.
2. Draw the contours of the intended steering wheel and cut out two blanks from cardboard.
3. Coat with glue and firmly glue to each other.
4. For volume and softness, we use a substrate for the laminate (floor insulation). Having cut a long ribbon about 3 cm wide, glue its tip with tape to the cardboard.
5. We wrap the free parts of the steering wheel overlapping, occasionally securing with tape.
6. Having done this procedure in a circle, we get this blank for the steering wheel made of candies.
7. In the middle, you need to cut a suitable piece of insulation with a hem allowance.
8. We stick it on both sides of the steering wheel.
9. Carefully glue the folds with tape, smoothing out the shape.
10. Now you need to put the steering wheel in a cover: place it on the selected metallized paper and cut out a square of the desired shape.
11. Cut the side of the package near the crossbar on both sides.
12. Bend it over to the reverse side and secure it with tape.
13. We wrap the steering wheel arches with strips of the same paper.
14. Cover the free areas with suitable sized pieces of paper.
15. This is what our future candy steering wheel looks like.
16. Now you need to prepare the candies: twist their tails more tightly and glue them with a drop of hot glue.
17. Place double-sided tape on the back side of the logo.
18. Glue it to the center of the steering wheel.
19. Once again we try to place all the candies on the steering wheel, making adjustments if necessary.
20. Apply a little hot glue to each candy using a glue gun. Try not to use too much glue
use so that the candy does not melt - it is very hot!
21. Glue the candies into place. The candy steering wheel is ready!
22. For beauty candy steering wheel must be placed in elegant packaging. Now you can surprise and delight the little birthday boy!
DIY candy steering wheel
Master class on creating a steering wheel from candies. Photo
Today you will see a master class on creating a steering wheel from candies, which can be an excellent gift for a driver. .
To create a candy steering wheel you will need:
About 800 gr. sweets in bright wrappers;
- photo of the steering wheel for example (template);
- printed logo of the car brand;
- insulation-substrate under the laminate,
Cardboard to create a base;
- blue metallized foil of a suitable color/ribbon;
Double-sided and regular tape;
PVA glue, glue gun.
Candy steering wheel step by step:
An important point is the choice of the best candies for a sweet gift, not only the taste, but also the color scheme of the wrapper. Then find a photo of the steering wheel of the desired brand of car on the Internet and print it out as a sample. Take cardboard and lay out a steering wheel made of candies on it, trace it with a pencil - this will need to be done before cutting out the layout from cardboard so that the candies can fit exactly on the workpiece.

Cut out two base blanks from cardboard (Figure 1). Apply glue and firmly glue them together (Fig. 2).

The laminate underlay is used to create volume and softness. Cut a long strip 3 cm wide and glue its end to the cardboard with tape (Figure 3). Begin to overlap the free surface of the cardboard steering wheel, occasionally securing it with tape (Figure 4).
Having done this action in a circle, you will receive a blank for the steering wheel made of candies, as in Fig. 5. For the middle, you need to cut out a suitable piece of insulation with an allowance for hemming (Fig. 6). Stick it on both sides on the central surface of the steering wheel (Figure 7). The folds must be carefully glued with tape, smoothing the shape (Fig. 8).

Next, you will need to put the steering wheel in a case, for which you can use completely different materials, for example, you can wrap it with ribbons, threads, or fabric of a suitable color. In this case, metallized paper was used for these purposes. So, attach the steering wheel to the paper and cut out a square of the required shape (Fig. 9).
Cut the packaging on the sides near the crossbar (Figure 10). Fold it over to the reverse side and secure it with tape (Fig. 11). Wrap the steering wheel arches with strips of the same paper (Fig. 12).
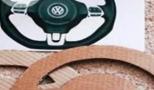
Free areas must be covered with pieces of paper of suitable size (Fig. 13). As a result, you will get a steering wheel made of candies, as in Fig. 14.

Glue the car brand logo to the center of the steering wheel (Figure 17). Try again to place all the candies on the finished wheel, make adjustments if necessary (Figure 18).

Then drop just a little bit of hot glue onto each candy (so that the candy does not melt) (Fig. 19). Glue the candies to pre-designed places.
Your DIY candy steering wheel is ready! Such a wonderful gift will undoubtedly delight your loved ones.
Idea and photo: jeunefille.ru