Knit a baby beret using knitting patterns. Warm beret with knitting needles. Below is a diagram and description of the openwork beret
Let's talk about knitted berets for women.
- If you have never knitted, then you may have a question, why do you need to knit a beret if you can easily and simply buy it in a store? We will answer - you can knit a beret with your own hands from expensive and high-quality yarn. This, however, will not take much time, but you will have a soft, warm, beautiful beret for little money. For example, threads that include silk, cashmere, expensive wool for a beret will cost 500 rubles. But try to buy a high-quality one for 500 rubles beret!? You won't succeed. How to find a form that suits you? Yes, even more difficult. Therefore, knitted hats are very popular among our readers.
- You have been knitting for a long time, the knitting needles are simply “burning” in your hands, then it will not be difficult for you to take any suitable pattern and knit a new beautiful beret for your beloved. Moreover, you only need a little thread for the beret: 1 or 2 skeins. Our selection of knitted berets for women is just for you.
- If you are just learning to knit, you most likely think that tying a beret is very difficult. But you are wrong. There are very simple patterns for knitting berets, both in the round and on two knitting needles.
- Choose a video lesson on knitting a beret that is understandable to you.
- Make sure that when knitting, you use thicker knitting needles (No. 5-6), as well as yarn. Thick knitting needles knit faster and are easy to unravel and redo in case of a mistake.
- Take the threads well twisted so that they do not fall apart.
- Knit in the simplest patterns: rib stitch, stockinette stitch or purl stitch.
- Be patient! The simplest berets are knitted in 1 day!
Now look at our selection and choose a new beret for the woman you love.
Takes with knitting needles for women, models from our website
Beautiful, warm, openwork and soft berets are knitted by our readers.
interesting selection for the site 20 children's beretsHello girls! I got Lydia PS color Pervanche. The color, in my opinion, is neither here nor there.. well, nothing came to mind. And the color doesn't suit me. I also don’t like to knit with unattractive threads. I thought and wondered, and knitted my daughter two snoods and two berets - one warm, the other thin. They fit very well with the jackets and the weather, and my daughter liked them too, and I subsequently stopped paying attention to the color, which I initially didn’t like so much.
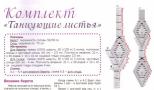
I knit snoods narrow, but with two turns I like them better and don’t look narrow. This is how the “Dancing Leaves” set and the “Myra” set were born.
By the way, if I am knitting a beret NOT from the top of the head, I crochet a chain with the main threads and measure the circumference of the head with it, then I calculate the pattern based on the given number of loops and lift the loops from the braid onto the knitting needle. Honestly, it’s more convenient for me. I don’t even look at the description where they write “cast on 225 stitches”, this doesn’t mean anything to me personally, since I never knit from the yarn indicated in the description))) Work by Irene IVAS.
Description and pattern of knitting a beret for women

Knitted beret and scarf for women


Works by Elena Vladimirovna. The set is very warm, the wool is soft and not scratchy at all, knitted with needles No. 2 in one thread.
“Double” beret for women with lining.
Description of a knitted beret for women
Cast on 120 stitches (10 repeats) and knit according to the pattern in turning rows on circular knitting needles.
Purl r. – purl loop. When the pattern is completed, there will be 60 stitches left in the pattern.
Option 2: on the remaining 60 loops in the river. knit all loops 2 stitches together. Knit the next row. Then knit 2 stitches together again. = 15 p. Break the thread, pull it through the remaining loops and fasten. Cast on 110 loops, distributing them evenly on the base of the beret and knit the lining with stockinette stitch (knit rows - knit stitches; purl rows - purl loops), first adding and then subtracting the approximate number of loops in the pattern. Join the seams of the beret and lining separately. Crochet the edge of the beret to create a “rim”.
Description of the scarf:
Cast on 64 stitches and knit according to the pattern. Diagram showing All rows are in the pattern on the front side. On each side at the beginning and end of the work, knit 4 stitches in stockinette stitch. Knit half, repeating the pattern 3-4 times. Set aside the work and begin knitting the second part in the same way. Connect both finished parts in the middle. See the description of the scarf for more details.
Scarf knitting pattern:
Knitted beret for women

Hello girls! Hats are always a problem for me. No matter what hat I knit, it doesn’t seem to fit. I’ve already put on about ten of them, but I don’t wear them. No matter what I wear, it doesn’t seem to be mine. I knitted a couple more and again something was wrong. Maybe I’m not used to it yet... The beret is knitted from “Excellence” yarn (50% wool, 50% acrylic). It took one skein (220m in 100g), knitting needles No. 2.5. Knitting needles No. 2.5. Work by Marina Efimenko.
Description of a knitted beret for women
Size: S/M – M/L.
The length of the beret is approximately 24 cm.
You will need: 100 - 150 g of DROPS NEPAL yarn from Garnstudio (75 m / 50 g, 65% wool, 35% alpaca), color 0100 eco; bidirectional and circular knitting needles (40 cm) 5 mm; circular knitting needles (40 cm) 3.5 mm - for elastic.
Beret knitting density: 17 p x 22 r with stockinette stitch = 10 x 10 cm, with a braid pattern 26 r = 10 cm
Knit in the round from bottom to top. Cast on 84 – 96 sts using Nepal thread on 3.5 mm circular needles. Knit 10 rounds in rib, p3/k3, start with p3. Track. round: * p3, k1, 1 yo, k1, 1 yo, k2, p1, k2, 1 yo, k1, 1 yo, k1 *, repeat. from * -* to the end = 112 – 128 p.
Switch to 5 mm knitting needles.
Continue next. way: * 3 purl, pattern M.2 (knit yarn over from the previous round behind the back wall) *, repeat. from * – * to the end (= 7-8 rapports).
Switch to bidirectional knitting needles when the number of stitches does not allow knitting in the circular. After pattern M.2 on knitting needles 42 - 48 sts.
Next round: knit all 3 purls together with one purl = 28 – 32 sts. Next round: knit 2 together to the end = 14-16 sts.
Cut the thread and pull it through the remaining loops twice, pull tight and fasten.
Beret for women, knitted

Good afternoon to all knitting lovers! My name is Elena, I live in the city of Irkutsk, I work in a large energy company, in my free time I enjoy knitting, it’s not just a hobby, it’s a flight of the soul. I really like to knit and crochet

The beret and scarf of a delicate color are decorated with braids, and the fringe on the scarf is made of stripes knitted with stockinette stitch. To knit a beret and a scarf you will need: 350 g for a scarf and 100 g for a beret of gray Cora yarn
Knitting with “heart” motifs, for women

Beret size: head circumference 56 cm. To knit a beret you will need: 100 g of yarn (55% merino wool, 10% cashmere, 35% microfiber, 130 m/50 g) type “Kashmir Baby” Louisa Harding; knitting needles No. 3.25 and 3.75. Knitting density
Blue beret for women made from “grass”

To knit a beret you will need: 100 g of wool and 100 g of grass-type yarn; knitting needles No. 4,5 and No. 6. Description of the beret Cast on 60 stitches with wool yarn on knitting needles No. 4.5 and knit 4 cm with a 1x1 elastic band. Connect 2 types

Beret size: 56-58. The beret is made by knitting and crocheting. You will need: 100 g of mud (40 m x 50 g, 88% wool, 12% polyamide) olive color; knitting needles No. 12; hook number 9. Attention! The knitting calculation is given for the density of the sample:

The double-layer beret and scarf with pockets are knitted with English rib from thick melange yarn. Spectacular set for winter! You will need: 150 g for a scarf and 100 g for a beret of Mondial COLORADO melange yarn (58% merino wool, 42%
How to knit a beret for women, ideas from the Internet
Interesting and unusual berets can be knitted for women with your own hands. Look how many beautiful models we found for you!
Bright red beret for women
Size: single.
Head circumference: approx. 56/58 cm.
Materials: DROPS LACE yarn from Garnstudio 50 g color 3620, red; yarn DROPS KID-SILK from Garnstudio 25 g color 14, red; stocking and circular needles (40 cm) No. 3 mm.
Knitting density – 24 p. x 32 p. stockinette stitch in 2 threads = 10 cm x 10 cm.
Garter stitch (when knitting in turning rows): 1 garter row (r.) = 2 r. facial loops.
Garter stitch (for circular knitting): 1 garter stitch. = 2 circular r.: 1 r. persons and 1 rub. purl loops
Pattern diagram for the beret: see diagrams A.1 and A.13-A.15.
How to knit a beret for women
Knit in the round, starting from the center of the square, on stocking and short circular needles, from top to bottom.
Cast on 12 sts on 3mm needles with 1 strand of Lace yarn and 1 strand of Kid-Silk (= 2 strands). * K1, 1 yarn over, k1, p1. *, knit from *-* a total of 4 times (in the next row, knit yarn overs with crossed loops) = 16 sts. Knit in the round according to pattern A.1 (4 horizontal repeats). When you knit a full vertical repeat of pattern A.1, you will have 128 stitches.
Next row: * pattern A.13 (= 3 sts), pattern A.14 (= 14 sts) and A.15 (= 15 sts) *, knit from *-* 4 times in total. When you knit in full vertical pattern repeat, you will have 168 stitches.
Next row: knit all stitches according to pattern A.14 (= 12 repeats of 14 sts). Knit 1 repeat in height, then knit 1 row, evenly decreasing 46 sts = 122 sts. Knit 3 scarf rows and loosely bind off the stitches. Cap height – approx. 24 cm.
Beret diagram
Knitting a beret with knitting pattern “broken elastic”
Béret Gaufre by Véronik Avery, translated by Irishecka
The beret is designed for head volume = 52 cm.
On knitting needles No. 2.5 we cast on 132 stitches, knit with an elastic band 1*1. Then we switch to knitting needles No. 4, evenly increase stitches up to 177.
Pattern report = 25 stitches - this means that we will get 7 reports.
Let's start... 1st row (r.) – 1 edge, 2 purl. p., *22 persons. p., 3 p. p* (report between asterisks, repeat 7 times) finish p. 1 purl. p., 1 edge p. Thus we knit 8 r.
9 rubles - 1 chrome. p., 2 p. p., *remove on extra. knitting needle 5p. at work, we knit 6 faces. n., 5 persons. p. with additional knitting needles, remove for extra. knitting needle 6 sts before work, knit 5. p., 6 persons. p. with additional knitting needles, 3 p. p.* (report of the pattern between the asterisks) finish p. 1 purl. p., 1 chrome. n. all out. R. knit according to the pattern.
Next 20 r. we knit as well as 1 p. 31 rub. - like 9 rub. 33 rub. – 1 chrome. p., 2 vm. purl,* knit 22 p., 2 vm. purl, purl 1 p. *(report of the pattern between the stars) finish p. 1 purl. p., 1 chrome. item 35 rub. – 1 chrome. p., 1 p. p., * 1 p. remove as knit., 1 knit. p. and pull through the removed loop, k18. p., 2 vm. faces., 2 out. p.*... finish p. 1 purl. p., 1 chrome. p. 37 r. – 1 chrome. p., 1 p. p., * 1 p. remove as knit., 1 knit. p. and pull through the removed loop, k16. p., 2 vm. persons., 2 vm. purl*...finish p. 2 vm. purl 39 rub. – 1 chrome. p., 1 p. p., * 1 p. remove as knit., 1 knit. p. and pull through the removed loop, k14. p., 2 vm. faces., 1 p. p.*... finish p. 1 chrome P.
Continue knitting until 16 stitches remain on the knitting needle. Pull all the loops together and sew.
The beret is knitted in simple garter stitch, the description says to decrease the stitches, but I will try with partial knitting...
All rows are knitted with knit stitches only (garter stitch).
Beret for women, description
* We cast on 66 loops on the knitting needles. In every second row we decrease two loops 17 times from the left edge of the fabric. We do not reduce the right edge of the canvas. After the 22nd row, we begin to decrease on the right: in every second row 6 times, 3 loops. After 22+14=36 rows there should be 14 stitches left on the needles.*
Again we select 34 loops from the edge loops of the fabric on the left, and 18 loops on the right. There should again be 66 stitches on the knitting needles. We repeat knitting from * to * 9 times (We knit 9 such wedges - it all depends on the circumference of the head).
The article provides descriptions and patterns for knitting berets.
With the onset of cold, cloudy and windy days, you want to wear warm knitted items. If you know how to knit, you will always find something to keep yourself busy in the evenings: for each season, needlewomen have a whole list of must-have knitted items, which is constantly updated. After all, already familiar models are being replaced by new ones, using fashionable and beautiful patterns.
From this article you will learn how to knit one of the constant companions of elegant women during the cold season - a beret. You can knit both a simple model, knitted with regular stocking stitch, and an openwork one.
If your knitting skills are at the highest level, then for you - a pattern of a beret knitted with a braid or braid pattern. Follow the step-by-step descriptions and you will get an original headdress that cannot be found in stores.
How to knit a voluminous beret for a woman?
Voluminous berets, it seems, are not losing their positions this season: in addition to being very warm, they look better and more interesting than small hats and berets knitted with garter stitch.
With the help of such a beret it is easy to create both a classic and shocking image. An experienced knitter will master the presented pattern of knitting a voluminous beret on straight knitting needles, because there are quite complex elements here.
What you need to prepare for knitting a voluminous beret:
- 100% mohair yarn (150 g)
- straight needles No. 7 and an additional needle
- cut out cardboard circles for making pompoms
- scissors and needle (darning)


Volumetric knitted headdress
We will knit in several stages. Let's start by knitting the top of the beret. Then we will tie the binding. Let's make a pompom and put everything together into a stylish headdress.
- As we have already said, we will knit from the top of the headdress. We put 91 loops on the knitting needles and knit the fabric with a regular 1/2 elastic band.
- The elastic pattern is as follows: 1 knit stitch/2 purl stitches.
- After we knit 23 cm from the cast-on edge, we will reduce the number of loops. To do this, reduce the first row evenly by 30 stitches at once. We should have 61 stitches left on our knitting needles. We will knit again with an elastic band according to the same pattern.
- We knit 3 centimeters and in the next row we begin again decreasing by 30 loops. We should end up with 31 loops, which we knit with an elastic band until the top of the beret reaches 28 cm in height. We tighten the open loops.
- The knitting density should be as follows: 18 rows of 13 loops equal to a square with a side of 10 cm.
Knitting binding
On the same knitting needles we cast on 11 stitches. We knit the pattern according to the following pattern:
Row 1-2:
1 purl, 9 knits, 1 purl.
Row 4:
P1, k3...Slip 3 stitches using extra needle before work. The next 3 loops are knit stitches, and we also knit them with knit stitches. The last stitch of this row is the knit stitch.
Rows 5 and 6:
1 purl, 9 knits, 1 purl.
Rows 7 and 8:
P1, k3...Slip 3 stitches using extra needle before work. The next 3 loops are knit stitches, and we also knit them with knit stitches. We knit the last loops like this: 3 knit stitches and 1 purl stitch.
If you want to knit a pink beret with a braid pattern, then knit according to the described pattern until the length of the binding reaches 56 cm (this is the circumference of the head). Cast off 11 loops and you will have a binding knitted in a rope pattern.

Pink beret with textured braids
- To make a pompom you will need two cardboard circles (diameter - 11.5 cm). In them you need to cut circles of a slightly smaller diameter (1/3 of the diameter of the larger circle).
- Between the circles we will place a thread folded in half, which we will use to tighten the pompom.

- The pompom can be made colorful, using multi-colored threads. We wind yarn onto the cut-out cardboard blanks, filling the entire circle evenly.
- Let's run scissors along the top of the wound threads, pushing apart the edges of the cardboard blanks.
- We tighten it with a thread folded in half and carefully pull out the cardboard circles. If necessary, cut off loose threads with scissors.
Collection of parts:
- In order for all the parts to come together in one headdress, we need to make a seam at the top of the beret and stitch the smaller edge of the trim.
- We connect the binding with a seam to the bottom of the upper part. At the same time, we perform a small assembly.
- After all the details of the beret are sewn on, add the pompom.
- All that remains is to wet the finished headdress and wait until it dries.
From the video you will learn one of the ways to quickly and easily knit a beret.
Video: knitting a knitted beret
Another way to knit a voluminous beret:

Volume beret

How to knit a mohair beret with knitting needles: diagram with description?
A classic headdress for the cold season is a mohair beret.

Tie a voluminous model with an interesting texture, then the hairstyle will not lose its pomp during the time spent on the road to work. Add a scarf in a contrasting color to your look and you'll look stylish.
For work we will need:
- 3 skeins of turquoise yarn (acrylic and mohair in a 1:1 ratio)
- stocking needles No. 3
- circular knitting needles 40 cm long
- spool rubber
- needle

Here is a detailed description of how to tie a beret:


Pink mohair beret


Delicate mohair beret and scarf: diagram and description


Description for mohair beret
How to knit a beret with knitting needles Gerda: diagram with description?
Needlewomen who are fond of knitting have long appreciated the beauty and convenience of beret "Gerda". Many craftswomen are very fond of this design model and use the pattern for knitting other things, as well as for creating entire sets for cold winter days.
A special feature of this model is the ornate relief pattern that adorns the beret. You will learn how to knit such a wonderful headdress from the pattern diagram and description below.
Fashionistas will certainly appreciate textured knitting. The flat cap, which has survived centuries of history, embodies Parisian chic and elegance.
If you have any questions or something from the description is not clear, then watch the video, which talks about the technology of knitting a beret.


Video: Gerda beret - knitting
How to knit a beret with leaves: diagram with description?
An elegant burgundy beret is knitted with circular and sock needles No. 3. You will also need a No. 4 hook for this work. The beret is decorated with beads. It will need about 50 grams.

Burgundy beret knitted with an openwork flower pattern
You need to start knitting a beret with the “Braid” pattern, which will then turn into stylized large leaves.
Below is a diagram and description of the work:


To knit a melange beret, you will need:
- 200 g melange yarn
- sock needles No. 4
The elastic band is performed according to the following pattern: knit 1. p. and 1 p. P.
Basic pattern diagram:

When making a pattern in purl rows, purl all stitches.
Let's cast on 90 loops and knit with an elastic band of 5 cm. To get a hem, we perform 1 row like this:
- *Knit 2 with knit stitch and yarn over*. We knit 5 cm with an elastic band pattern and knit the yarn overs with a purl stitch.
- Now let's start knitting the main pattern. We make uniform additions in the 1st row. We need to add 54 loops.
- We will decrease these loops according to the diagram.
- After 12 loops remain on the knitting needles, cut the thread and pull its ends together to secure it.
How to knit a beret with braids: diagram with description?
Diagram and description of a white beret, knitted in the “Braid” pattern:

To knit this “sunny” beret, you will need bright yellow yarn. The diagram and detailed description are given below.

Beret "Sun"

Other knitting patterns can be used:

"Cage" pattern

Scheme of the "Cage" pattern


Beret knitted with a braid pattern

Beret knitted with a braid pattern


How to knit a braided beret with knitting needles: diagram with description
A beret knitted with a relief “braid” pattern looks very impressive and always fashionable. Here diagram and description:

Beret knitted in a braided pattern


Video: knitted braided pattern
How to knit a summer openwork beret with knitting needles: diagram with description?
The summer openwork beret is knitted according to the napkin principle: the beginning is in the center, and then additions are made in each row. You need to knit a beret on 5 knitting needles.


Below is a diagram and description of the openwork beret.


Video: how to knit a summer beret?
How to connect a beret with “heart” motifs: diagram with description?

Beret with a heart pattern

Description for beret


How to knit a beret using garter stitch: diagram with description?
If you like the classics, then knit a beret using garter stitch. Even a needlewoman who is taking her first steps in knitting can knit it.

What to prepare:
- 1 skein of milky yarn
- red yarn (remnants from previous knitting)
- knitting needles
- hook that will be used to connect the back seam of the headdress
We start by casting on 110 loops.


- 1st row: face loops
- 2nd row: elastic band made of 2 knits and 2 purls
- Next we knit a purl row in accordance with the resulting pattern.
- We knit again with a 5 cm elastic band
- We finish the elastic with purl loops, while at the same time adding 28 loops to it
- To get an additional loop, we need to yarn over between the knit stitches
- After this we proceed to garter stitch. Here's the diagram:

- As can be seen from the diagram, knit and purl loops are knitted with knit stitches.
- The fabric knitted with garter stitch will be quite dense. This is just right for a winter beret
- We continue to knit in garter stitch 11 cm or a little more (at your discretion)

11 cm garter stitch
The knitting pattern for these 11 cm is as follows:
- 22 rows - milky yarn color
- 4 rows - red
- 2 rows - milk
- 2 rows - red
- 8 rows - milk
Now we will make decreases: we will divide the fabric into 6 parts, each with 23 loops. We will tie the threads in places where they separate so as not to get lost.
- 1st row: we knit the front row, in which we knit the first 2 loops with one front one,
- after that, we also knit every 2 loops to the designated thread,
- after the thread - one front one. We will knit the remaining 2 knit stitches as one knit stitch.

- The row was then shortened by 12 stitches
- 2nd row and 3rd We knit a row with a garter stitch pattern
- We do not make reductions
- 4th row: repeat according to the same pattern as in the first row with decreases, make a reduction by 12 loops
- 5th row and 6th row: garter stitch without decreases
- 7th and until the end of the mating and - decrease by 12 loops
We knit the purl rows without reducing the number of loops.

The remaining nine loops are dropped onto the thread and tied. Sew the side seam
- After there are 18 stitches left on the knitting needles, we’ll decrease by half: we’ll knit every two knit stitches with one loop.
- We have 10 loops left that need to be dropped onto a thread (it’s easier to do this with a hook) and tied
- Sew the back seam (again, a hook will be useful for this) with milky yarn
Video: takes with knitting needles (last part)
How to knit a Nako beret with knitting needles: diagram with description?
When you knit Nako's beret using knitting needles according to the pattern, do not tighten the threads too much, and do not take thin knitting needles, otherwise the headdress will only fit a doll.
The knitting pattern is as follows:
- We cast on 16 loops.
- Let's start knitting 1 row. We use the following combination: knit 3 purl loops.
- Next we knit 8 stitches in knit stitch(we form a braid), purl 3, knit 1 loop in knit stitch, yarn over, and finish with a knit stitch.
- 2nd row: knit purlwise according to the pattern.
- 3rd row knitted like the 1st, only the last ones will be 2 knit stitches, instead of 1.
- Then everything repeats: 5th row and remaining unpaired up to the 11th row we knit similarly to the 1st row, with the only difference that in 5th add 3 knit stitches at the end, 7th- 4 knit stitches are knitted last, 9th row- the last 5 knit stitches are added, in the 11th - 6 knit stitches.


Cross braids every 12 rows
- Let's start knitting 12th row d. We knit 3 loops in purl stitch, 8 in knit stitch, cross 4x4, 3 purl loops, knit 1 loop in knit stitch, make 1 yarn over and finish with 7 knit stitches.
- In every 12th row we do crossing braids. When the desired height of the beret is reached, we will knit an elastic band from the edge loops of the braid. Let's sew a finished headdress.

When the triangle consists of 14 loops, we begin decreasing
- Change the direction of the braid. Having knitted the first 4 loops, using an additional knitting needle we transfer them to the place of the other 4 loops. We knit the next 4 loops, and then we knit 4 loops, removing them from an additional knitting needle.
- We have formed a triangle of 14 loops. There should be 6 triangles on the entire canvas. It is necessary to make decreases after the 14th loop. Thus, we will make a small triangle out of a large one.
- In the large triangle we decrease the loops, and in the small triangle we add.

The beret consists of 6 triangles

How to cross stitches every 12th row?
- We knit all the front rows with decreases in the 1st loop after the yarn over, in other words, we knit the 2nd loops together and turn the work.
- We do not knit the remaining loops, leaving them on the knitting needles. So our large triangle becomes smaller, and loops are added to the small one.
Video: how to knit a beret with classic wedges using knitting needles?
This master class with photo and video materials will demonstrate for beginning needlewomen how to properly knit a beret with knitting needles. This is one of the most original, stylish and feminine headdresses. In France it is very popular, so not only women's berets are in fashion there, but also men's and children's berets.

The lessons will tell you how to knit simple and classic berets.


In needlework, each model has its own diagram with a detailed description. This helps us in our work when we knit berets. Some of them may have a very simple appearance, others can be extremely sophisticated and stylish.


Among all possible models, hand-knitted berets have always been, and now remain, the most beautiful thanks to their delicate and expressive patterns, of which there are a huge number. 
Each drawing has its own diagram with a description, which allows you to successfully knit a beret. In addition, knitting is a pleasure for women. Any complex patterns according to the scheme can be made by any novice needlewoman. 
This photo shows the simplest beret, knitted with primitive garter stitch. 
And here you see a photo of a version of the classic beret.
Description of knitting a simple winter beret

We knit this simple, but effective, stylish and warm beret for a woman.
Winter forces us to wear warm hats. It is very important that they do not spoil women’s hairstyles, and the extended shape of the accessory contributes to this. Making such a simple option is suitable even for beginners.
The pattern is made with circular knitting needles, so it is seamless. The seam is only present on the rim, which is done at the last moment.

To make this beret with knitting needles, you will need 130 grams of melange threads in shades of purple, where one skein weighing 50 grams contains 80 meters of thread. We will knit the headdress using knitting needles No. 7.
Video: Detailed lesson on knitting a beret
Knitting a classic beret  The master class will show beginners how to properly knit a classic beret with knitting needles. The photo clearly shows that the model is very simple, but visually extremely original and interesting.
The headband of the accessory is knitted with a regular elastic band across the beret fabric, after which stitches are picked up along the side edges, from which the rest of the headdress is made in the “Garter Stitch” pattern.
We knit this beret model with knitting needles No. 3 and No. 5, from 100 grams of yarn, where one hundred gram skein contains 180 meters of thread.
- We start by knitting the headband, and cast on 9 P with knitting needles No. 3. Note that the length of the headband is 52-54 cm, and it should have a tight fit.
- Having finished knitting the headband, we cast on edge loops along its side edge using knitting needles No. 5, alternating them with yarn overs, 1 p and 1 yarn over.
- In purl P yarn overs are knitted with crossed P's to avoid holes.
- We knit a beret with a 10 cm Garter Stitch pattern, without changing the number of stitches, that is, with a straight fabric.
- Then we begin to decrease P. For this purpose, we knit every 3rd and 4th P together.
- We repeat the decreases three times through three R. In the last row we knit 2 together, and tighten the remaining P onto the thread.
- We sew the back seam of the product with the long end of the yarn, and you can try on a classic beret with knitting needles.
Video: Simple classic knitted pattern
Openwork patterns for berets
You can knit a beret by choosing any pattern you like. We looked at knitting warm berets with the simplest patterns earlier.
This master class will show you some examples of openwork patterns that can be used to knit berets for the spring or summer season. These berets go well with jackets, light coats and jackets. Delicate and airy designs must be made from thin yarn, the composition of which is selected for each specific model. We knit a beret from thin viscose yarn with circular knitting needles No. 4, according to the following pattern.


The next beret is made of fine wool, and is knitted on circular needles No. 3. The density of the fabric is 24 P horizontally, and 36 P vertically in a standard pattern of 10x10 cm.  We dial 162 P, and close the first row into a ring. Then we knit nine rows with a 1x1 elastic band. Having finished doing the elastic, we move on to knitting according to the following pattern.
Video: Knitting an openwork beret
Berets with voluminous patterns
Many women will like knitted berets with voluminous and embossed patterns. These can be very voluminous braids, various weaves and aranas.


Video: Knitting a beautiful crown
MK with a video tutorial on knitting a beret using an English elastic band
The video master class is intended for beginners and talks about knitting a beret with an English elastic band.
The product is knitted from mixed yarn, which includes wool and acrylic. A 100 gram skein contains 240 meters of thread. The knitting density with needles No. 4 is 17 P and 22 R in a 10x10 cm sample.
The video lesson will teach you how to correctly perform all the calculations for knitting a beret and decreasing in the right place.
- According to the calculation, you will need to cast on 86 loops using the Italian cast-on and close the knitting into a ring.
- After casting on, we knit 4 rows with a hollow elastic band, and then 6 rows with a 1x1 elastic band. The total length of the elastic is 3 cm.
- Then you need to switch to the English elastic pattern in circular rows. It is somewhat different from the English rib, which is knitted in turning rows.
- When making the transition of the ornament, we replace the knitting needles with a larger number so that the product turns out to be voluminous and fluffy.
- We knit 14 cm with English elastic without any increases or decreases, using straight fabric. At the moment, the height of the beret is 17 cm including the elastic band.
- Then you need to switch to knitting with decreasing loops, which should extend the beret by another 4 cm, so that the total height is 21 cm. Perform decreases as shown in the video.
Schemes and photos of MK with a description of knitting berets


A beret is an everyday headdress that can be easily matched with any demi-season clothing. The simple beret has come back into fashion; even serious fashion designers offer it. It’s interesting that any woman can create several of these hats with her own hands and change them at will, matching them with the rest of her clothes.
Berets come in different varieties, from velor and velvet, fur and cashmere, but the easiest way to knit new items yourself is from yarn. The 2019 season, spring, is coming soon, and we need to get ready, create berets of different colors and styles. You can master knitting patterns by listening to our video lessons and repeating the movements of the instructor’s hands on the computer screen.
Beret with a braid pattern
The beret size 50-52 is knitted from yarn, per 100 grams of which there are 130 meters of thread. Its diameter is 27 centimeters, height with elastic is 24 cm. We used knitting needles No. 4 and No. 2. We cast on 90 loops on the knitting needles and begin to knit a 2 x 2 elastic band, which is well known to everyone. The height of the elastic band is 5 cm. After finishing the elastic band, you need to start making additions.
Our pattern report consists of 21 loops, and there are six reports in total plus two edge loops. The total number of loops reached is 36, approximately every two or three loops. The addition is made in double yarn overs. We calculate the number of loops needed for the pattern.
Video lesson:
Takes it with an English rubber band.
Work begins with casting on 96 loops using the Italian cast-on. We knit the first row with a hollow elastic band, removing the purl loops and knitting the front ones. Rows up to and including the fourth are knitted in the same way. In the fifth row, two stitches are knitted together, then purl one. In the sixth row, knit stitches alternate. The length of the elastic is 5 cm.
Next, knitting of English elastic begins, for which the knitting needles are changed to five-millimeter knitting needles. It is described and shown in detail how an English gum is formed. Having knitted 15 cm in this way, we again switch to knitting needles No. 3 and begin knitting the crown.
Video lesson:
Beret with corn pattern
We used Caucasian troika yarn with a thickness of 150-180 meters per 100 grams and number 3 knitting needles. For a beret size 54-56, 80 loops are cast on the knitting needles, after which rows are knitted with a 2 x 2 elastic band to a height of 7 cm. The knitted beret has a diameter of 30 cm. Next, the addition of loops begins, one every four loops. The next row is knitted with purl stitches.
The formation of the “corn” pattern begins. The knit stitches are knitted with knit stitches and purl stitches with purl stitches. Further actions are shown in detail. The result is a simple pattern, the height of which will be 16 centimeters.
Video lesson:
Simple classic beret
A video tutorial is offered on how to knit a beret for women with a description. The beret is based on simple elastic bands. First, you get an elastic band that does not stretch. Used for work:
- half-woolen yarn from the Pekhorsky factory, 100 grams of which contains 130 meters of thread;
- knitting needles No. 4.5 on fishing line.
After the elastic band, there are rows of garter stitch and several strips of two rows are made with a contrasting thread in a simple satin stitch. The height of the elastic band must be selected in accordance with your own needs. For the elastic, 82 loops are cast on; after the elastic, increases begin, which are done in any way.
Video lesson:
Beret with pigtails
Let's look at how to knit a beret with knitting needles for a head circumference of 54-55 cm. We will need:
- 100% merino yarn, two skeins, in which there are 90 meters per 50 grams;
- circular knitting needles No. 3 for knitting elastic and No. 3.5 for knitting a beret.
First, an elastic band is knitted, then increases are made, several rows without increases and decreases after each row. The pattern report at first is eight loops, during the increase it increases by 4 loops and becomes equal to 12 loops. Therefore, the initially cast-on number of loops should be divided by eight. We cast on 97 loops - the required 96, and one loop to join in a circle.
Video lesson:
Italian beret
The master class of the Italian craftswoman is conducted in Italian, but she shows the entire sequence of work in such detail that everything is clear without translation. A table of possible beret sizes for a girl or a woman is provided. There are 165 meters of thread in 100 grams of yarn. By knitting an elastic pattern, you can calculate how many stitches you will need to create a beret of a given size.
Knitting is done with circular knitting needles, all methods of forming loops are shown in detail, so that by repeating the movements, you can confidently knit the same beret with a beautiful relief pattern.
Video lesson:
Takes size 56
This beautiful monochrome beret will remain in fashion not only this year. In the 2019 winter season, its openwork pattern is still in fashion. During the knitting process, you can adjust the pomp. The yarn used is acrylic, there are 250 meters of thread per 50 grams. Knitting will be done in two threads. It is recommended to use size 3 or size 4 needles.
112 stitches are cast on the knitting needles plus one more to complete the circle. We need to knit 2 centimeters of stocking stitch with knit stitches. Next, the formation of a pattern in the form of teeth begins. For each row, the sequence of loops is described in detail.
Video lesson:
Takes size 54 cm
The yarn used is 75 meters in 50 grams. You also need two pairs of circular needles No. 4.5 to create an elastic band and No. 6.5 for knitting the beret itself. After the elastic is formed, a pattern of seven sectors of 10 loops in each is formed. Rows with increases, without increases and with decreases are knitted sequentially.
First, 70 loops are cast on, plus one to close the knitting into a ring. A 1 x 1 elastic band is knitted with alternating knit and purl stitches. The front one is knitted on the front wall, the purl one on the back wall. This elastic band is knitted up to a width of 4 cm. We switch to knitting needles of a larger diameter and place markers every 10 stitches.
Video lesson:
Fashionable beret
Let's consider knitting a new item - a beret with a gradient transition from one color to another. We start knitting with dark yarn, then it smoothly turns into bright pink and then again into dark. The beret consists of an elastic band, a main part and a bottom. We will need:
- knitting needles No. 4.5, 6.5 and 5.0;
- seven markers;
- centimeter;
- hook;
- scissors;
- yarn made of silk, cashmere, viscose and polyamide, in which there are 75 meters per 50 grams
The loops are cast on in a cross-shaped cast-on. Knit an elastic band, a wall, a section without increases and then decreases. A detailed scheme for calculating the number of loops depending on the required beret size is proposed.
Video lesson:
Beret with pompom
The beret is made from Lan Grossa yarn and uses two full skeins. First, the band is knitted, followed by a section with increases, a section without increases, and a bottom with decreases. A hollow cord is tied along the edge of the band, giving it the correct shape. Used circular needles size 3.5 mm, double needles for the top, markers for marking.
100 loops are cast on. This quantity is selected based on the required head circumference. All calculations for this are given. The first row is knitted with knit stitches; later it will become the basis for obtaining a hollow cord. A 1 x 1 elastic band is knitted with alternating knit and purl stitches.
Video lesson:
It’s no longer summer outside, and the cold season only inspires you to create something warm and cozy, namely a knitted headdress. A beret is the perfect accessory to keep your head warm during bad weather, hide your hair if it's poorly styled, or simply add something special to your look.
Where did the beret come from?
The beret is the national French headdress, usually made of wool or felt. This accessory is the adoration of many fashion designers and designers, because to this day it remains a classic, stylish and versatile headdress. It can often be seen on style icons.
Art history tells us that headdresses similar to modern berets were worn back in the Bronze Age. They first began to be worn in Northern Europe, and later berets became widespread in the south. In a state like Ancient Crete, they were worn by the Minoans - local peasants. The beret also served as a headdress among the Romans and Etruscans - the mysterious people who inhabited Italy. The beret has been especially popular among European artists throughout human history.
The Basque national beret was the traditional headdress of shepherds from the Pyrenees valley (the mountain range that divides southern France from northern Spain). Industrial production of Basque berets began in the 17th century in Oloron-Sainte-Marie, in the south of France, with the first factory being Beatex-Laulhere. From 1810 to 1920, berets were intended for people exclusively of the working class, and by 1928, more than 20 French factories and some Spanish and Italian factories were producing millions of berets for everyone.
In Western fashion, since the 1920s, men and women have worn berets as part of a sports uniform, and then as a stylish headdress. Military berets were first adopted by the French Chasseurs Alpins in 1889. After seeing berets worn by military personnel during World War I, British General Hugh Ellis proposed the use of the beret as a necessary headdress for soldiers.
How to wear a beret?
The beret can be worn in different ways, but this does not prevent it from being probably the most elegant headdress that has won the love of many. In the Americas, berets were usually worn pulled down to one side of the head. In Central and South America, the local custom is to wear the beret so that it lies in the shape of a square and is pulled down over the front of the head. It can be worn by both men and women.
Military berets were made from wool. They usually had a cord that allowed the headdress to be tightened. The beret was often decorated with metal or fabric items.
Knitted beret
When it’s snowing or raining outside, you want to hide under something warm, and first of all, cover your head. What can warm your head better than a warm hat? Of course, store shelves are replete with a wide variety of hats. But why buy them when you can knit them! Knitted items are very beautiful, and most importantly, profitable. After all, you can tie it exactly the way you want.
Knitting a hat is trivial. And to look like a true lady, tie a beret. The advantage is that the beret knits up very quickly. Its thickness is sufficient to provide warmth and comfort. Who doesn't like fast work with high-quality results?
It will look very beautiful. The beret will always be in fashion. If you combine it with the right things, your look will be feminine, sophisticated and elegant. Some people believe that berets can only be worn in winter. But this is not true at all. The beret will look appropriate at any time of the year, and even in summer.
In a word, if you need a headdress and you like to knit, then combine business with pleasure and Patterns and ornaments will make it even more unusual and original.
Patterns and ornaments
If you decide to knit yourself a stylish headdress, then before you start thinking through the pattern, you need to choose a color. Be sure to take into account the color of your eyes, hair, and type of appearance. An irregularly shaped beret may not suit you. Therefore, take the choice of form responsibly.
Now you can begin the creative part of the work. Patterns for knitted berets can be found everywhere: in magazines, in books, on the Internet. Or you can come up with it yourself. Patterns for are not limited to ten - in fact, there are many more. A huge selection will allow you to make your beret unique.
How to choose a pattern? If your beret is intended for the winter period, then you can choose snowflakes or any New Year's ornament as a pattern.

If you are a fan of original prints, you can use “animal” patterns for knitting berets, such as leopard or zebra.

Also, your beret will be very decorated with small elements, such as a button or a fluffy pompom. They will make your look more sweet and gentle.

If you consider knitting patterns for berets to be overkill, then a plain beret would be an excellent option for you.
Knitting process
So, you are planning to knit a beret. Where to begin? Here are some tips on how to knit a beret correctly.
Even beginners can knit a beret with knitting needles. You need to read the description of the actions in advance. Therefore, before purchasing balls of yarn, evaluate the amount of work you have to do.
Then you need to choose a headdress model and think about the design of your beret. Knitting patterns for berets play an important role.
The next step will be to calculate the sizes of the beret parts, you can even create a pattern. Once you have determined the pattern, sizes, yarn, patterns and gauge, you can start knitting the beret. The diagram and description of the knitting process should always be at your fingertips so that you can consult them if you notice any error.
There are different techniques for knitting a beret - you can choose the one that you like the most. You can knit a beret from several parts, knit it entirely from the elastic band, or, conversely, from the top of the head. For beginners, it is better to use the ribbed knitting method, as it is the least difficult. Berets knitted from several parts are most often created from motifs in the shape of a triangle or rectangle.
An example of a description of knitting a beret
Let's look at the process of knitting a voluminous beret with braids.

So, you will need: 200 g of yarn, circular knitting needles No. 4.
Explanations: consists of knit stitches and purl loops. Garter stitch involves knitting both knit and purl rows using purl stitches only.
Knit an openwork pattern according to pattern 1. Fancy pattern - according to pattern 2.
Note: knit with thread in two folds.
So, first you need to cast on 104 loops and knit an elastic band, alternating purl and knit stitches. The height of the elastic should be 2 cm. Next, continue knitting with a fantasy pattern (pattern No. 2). When the height of the cast-on row reaches 15 cm, start casting off 20 stitches in every 3rd row. Knit until there are 5 stitches left on the knitting needles. Tighten the loops with thread and sew the back seam of the beret.

Beret patterns
Knitting patterns for a beret, the patterns of which are not at all difficult to understand, will certainly make your beret only brighter and better. Of course, if you are just learning knitting techniques, you can choose simple patterns for knitting berets. Or you can refuse them altogether. In order to understand pattern patterns, you first need to learn how to knit well in regular stitch. Patterns for berets are knitted, just like patterns, for example, for a sweater. The technique is no different. You can find individual fragments of ornaments and combine them as you please! Give free rein to your imagination, and any knitting beret (with or without a description) will become an easy task for you!

Designations in knitting
Crochet and knitting have their own symbols that you definitely need to know. Otherwise, you simply will not be able to tie the beret. Each scheme has its own symbols, but there are standard symbols.

For the diagram above, the notation is as follows:

Crochet beret
If you want to knit not so much a warm beret, but rather a beautiful one, then you can use a crochet hook. Crochet is simply adored by those who love openwork, because it allows you to knit beautiful, openwork, neat patterns.
Summer berets are usually crocheted. They look very stylish and elegant when paired with the right things. Therefore, if you want to diversify your summer look, buy some yarn, pick up a crochet hook and start knitting!

Conclusion
And a few final words. Everyone has free time. Even if there is not as much of it as we would like. But, you must admit, you watch TV, read or just drink tea. Sometimes we waste time. But you can watch TV and knit! Don’t waste time and start knitting a beret with knitting needles as soon as possible. A diagram and description, yarn and skill - that's all you need. And of course, desire. If you really want something, then you can handle any problems!