DIY bouquet of soft toys step by step: master class with photos and detailed explanations. DIY bear bouquets. Bouquet of Teddy bears DIY bouquets of toys in a basket
Hello, all lovers of cute and fluffy things! Today we have an extremely soft and warm theme - bouquets of toys.
A plush bouquet is a product in which, instead of ordinary flowers, there are toys and corresponding decorations - wrapping paper, rhinestones, ribbons, etc.
Ordinary compositions are, of course, good, but originality in this regard has never hurt anyone. And florists now go to great lengths to satisfy this desire of a picky buyer.
Although soft bouquets are rather a kind of fusion of floral, design and handicraft thoughts. From the series “What will happen if...”))
In general, today’s post turned out to be not just informational, but also handicraft, so read on
Bouquets of soft toys: advantages and disadvantages
The main advantages of plush bouquets include their originality, durability and variety of shapes. In addition, such a gift does not require special storage conditions and can be an excellent addition.
And the most important advantage is that the prices for such bouquets do not exceed the prices for ordinary flower arrangements.
There are few disadvantages, the only one is the lack of versatility of the bouquet. More on this below.

Who can you give a plush bouquet to?
One of the few disadvantages of giving a plushie is that it is not universal. Think for yourself - shouldn’t you give this to, say, your boss for his birthday? If only as a joke.
So, who definitely can, and maybe even should, be given a toy bouquet:
- To a little girl. This is especially true if there are no ideas for a gift. Absolutely anyone under the age of 12 can give this as a gift.
- For a girl on informal occasions. For example, as a romantic gift. Although in some situations it will probably be appropriate even at an official event - say, when presenting a diploma for first place in a soft toy competition.
- To mom. Such a handmade gift will be especially valuable.

What does a toy bouquet consist of?
You can use absolutely any toys to create a bouquet - from classic bears to extravagant Stitches, hearts, pigs, etc.
Typically, such a bouquet is made up of the following elements:
- one or more toys
- base sticks (or thick wire for stems)
- foam sponge
- organza
- additional decor from paper and fabrics, as well as various kinds of ribbons
- corrugated paper.

In general, you can make such beauty yourself, which is what I will show you today
DIY bouquet of toys: step-by-step master class
I’ll say right away that a toy armful of flowers can be made in VERY different ways. I will try to describe a general principle that can be used in the future for specific projects.

Prepare:
- everything that was described in the previous section
- a stick to hold on to
- adhesive tape
- glue gun (optional)
- wire cutters
- stapler
- scissors
The general process of creating a product is as follows:

By the way, the following articles will be useful to you for selecting and creating decorative elements:
The classics in the form of flower bouquets are sometimes replaced by the avant-garde - do-it-yourself bouquets of plush toys. They can serve as a great gift for some celebrations. To learn how to make a bouquet of soft toys with your own hands, pay attention to any master class on their creation.

Master class “wedding bouquet with teddy bears”
In this master class you will learn how to make a bouquet of toys with your own hands as a wedding gift.
The first step is making the frame yourself. You need regular polystyrene foam and a tool for cutting it, for example, a stationery knife. The top part should be round and voluminous. The approximate diameter is twenty centimeters and the width is five.
The vertical base is a pipe or a foam block. The width should be at least five centimeters, and the length should be about twenty. We glue both created parts so that the “pancake” is on the “leg”.

The next step of the master class is designing the base. The circle should be covered with snow-white or cream satin fabric. To do this, you need to cut out a piece from the fabric, the diameter of which will be approximately half the size of the round base. The vertical base should also be carefully covered with this material.
Next, you need organza or other thin fabric. For the best effect, take about six pieces of fabric (two pieces of each color). It is advisable to choose subtle shades, but if the wedding will be in a certain color, it is better to use that color.

The size of the pieces of material should be such that, wrapped around the foam vertical and tied with a ribbon almost under the round base, they cover the entire frame and are about five centimeters longer than it.
Each piece of six must be trimmed at the top and bottom with a border of satin fabric. We cut out a strip of satin (about three centimeters), wrap it around the edge of the main fabric, bend the edges of the tape and make a seam. Then we wrap the resulting fabric around the frame and tie it with ribbons.
The most important stage of the master class is DIY wedding bouquet decoration. We take two small bears and dress them up in a festive way, that is, we decorate one bear with black bows and a hat, and the other with beads made of pearl details and a veil. We place the bears on the wire, and insert part of the bouquet into the frame at the other end.
The next stage is decorating the bouquet with beads and flowers. To create a flower meadow you need pieces of beautiful fabric of different colors. You need to make a lot of roses from them in order to paste them over the top of the bouquet around the bears.

Woven roses are suitable for a bouquet. There are no difficulties in creating them - we fold the satin strip in half, twist it into a bud, straighten it a little and hem the tip to the bottom so that the flower does not bloom. To make the rose as voluminous as possible, after folding the strip, you can connect its bottom simple seam and pull it a little, and then make a bud. Don't forget about the leaves!


An excellent alternative to leaves that add pomp and volume are baskets. They are made from mesh fabric or organza. The resulting rose is framed with thin material, that is, it is wrapped in it. Flowers can be decorated with rhinestones or beads sewn on them.

It is better not to put floral decor on a wire, but to sew it on - it will be more reliable. If you have a shiny varnish in your arsenal, add a couple of spritzes to the bouquet - this is the final step of the master class.
Master class “bouquet of bunnies”
Bunnies look no less cute than bear cubs. Therefore, they are perfect for a bouquet.
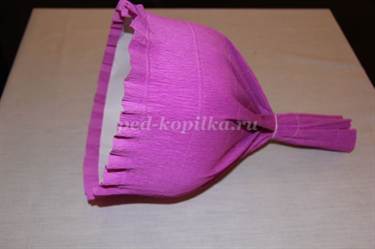
The base must be made with your own hands from polystyrene foam, as in the previous master class. You can use corrugated floral paper to wrap the frame. It should be glued to it.

We take corrugated paper of two colors. Cut out a circle slightly larger than the base from each and cut it into three equal parts. The resulting six parts must be placed on the frame in a checkerboard pattern and glued. Then we make a second layer of two smaller circles, also dividing each into three parts and cutting out the details.

We take the bunnies and place them on the frame so that they form a triangle. We glue a fabric rose into the middle, and place another rose between them (a total of four flowers are required).
Master class “romantic bouquet step by step”
This handmade bouquet of toys is perfect as a present for your significant other. Its peculiarity is that the frame must be made of cardboard.
Cut out a rectangle from cardboard and roll it into a tube. We make a circle out of thick cardboard. We cover the round part with fabric and wrap the tube. We frame the round piece both top and bottom with beautiful flower wrapping material using glue. Ribbons, foil, fabric, etc. will do.

We decorate the lower tube corrugated paper. We tie it with a ribbon in the middle of the base. We glue small plush figures to the top. You need to arrange them as your own imagination dictates.
How do girls love interesting gifts from your fans. And every time the boys think about what interesting things they can do to surprise their girlfriend on her birthday. But besides the main event in a girl’s life there are many others. interesting holidays, where a boy can show himself as a real man by giving a beautiful bouquet to his girlfriend. It was for such purposes that an interesting activity was invented - how to make an original bouquet of toys yourself. Doing it yourself will bring many pleasant and useful moments of leisure, and will also make the girl happy, so a simple master class is attached.
An interesting article on how to create such a wonderful gift is presented to users. A gift given with all your heart brings happiness to its owner. It can be stored for a long time and admired every day. If desired, toys can be replaced. If you carefully study the technique, success is guaranteed. Even schoolchildren can do a great job with this craft.
Technique for making a bouquet of toys with your own hands
A bouquet of toys made with your own hands is very easy to make, and will help to realize creative ideas step-by-step instruction with an interesting description and photo. First, prepare your workspace.
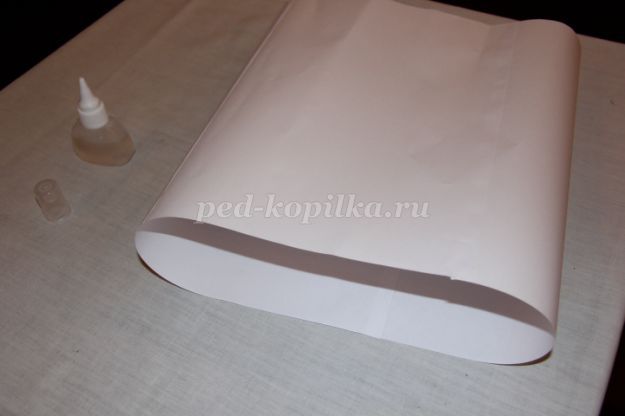
For work you will need: a toy, crepe paper, various decorative elements. Prepare paper measuring about sixty centimeters. If you want a larger bouquet, then add ten centimeters.
Take curly scissors and, stretching the edges of the crepe paper, cut to the desired length.

Prepare whatman paper. Cut out a base twenty centimeters in diameter from it; an ordinary round plate will help you with this.

To make the circle beautiful, trim the edges with curly scissors. Next, make a cut and remove a piece of the circle. Now you will definitely get a cone.

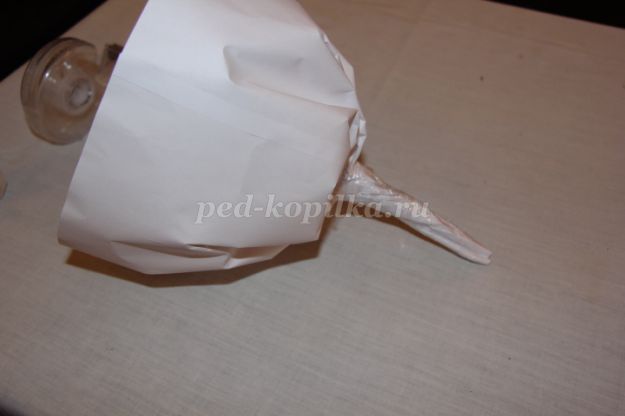
The bouquet needs a handle, so we glue it to the cone. We twist half the sheet into a tube, which needs to be cut on one side and glued to the cone.

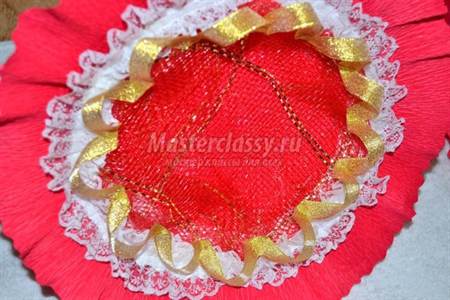
To make the cone beautiful and decorative, you need to process its edges, that is, decorate it. For such purposes it will be useful lace. Using hot glue, glue it to the edges of the cone.


It turned out to be an interesting basis.

Now it’s time to decorate the middle of our blank. A circle of crepe and whatman paper needs to be connected. They should be the size of the inside of the base.

These mugs are glued together and wrapped in decorative mesh.


Cover the place where the circles and mesh were attached with a beautiful ribbon to match the work.
Now, for greater beauty, they used hearts on a wire, which was removed with the help of pliers. The toy will be attached to the center of the base; for this purpose, the wire is attached to the mesh and the toy is screwed to it.
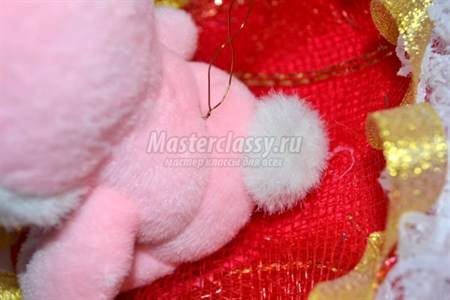
To prevent such wire from being noticed, it can be covered with an unusual ribbon or animal belt.

We put hearts on glue, a glue gun will help with this.

We finish the work by gluing rhinestones. Tie the handle with ribbon. And now a wonderful gift is ready!

Bouquet of toys and sweets for beginners
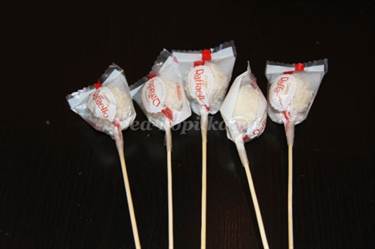
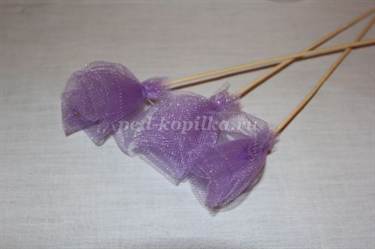
For a more interesting gift design, you can add sweets to the bouquet itself. You will get a wonderful bouquet of toys and delicious sweets. Do-it-yourself work follows the same scheme as described above, but delicious candies are added. The candies that have been selected are attached to skewers with tape or another convenient method. This bouquet needs five of them.
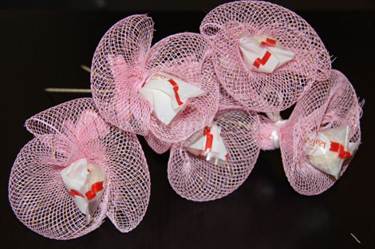
The following steps involve refining the skewer with the candy itself. To do this, they need to be wrapped in a beautiful decorative mesh.
Then we prepare the toys. They need to be placed on sticks, secured with glue or tape.

For more splendor, add roses. You need to cut a rectangle from the decorative mesh, fold the long side in half and roll it up. Tie with thread and attach the sticks using a glue gun.
The stage of creating a frame using this method is the simplest. Glue three sheets of xerox paper together to create a leg.
Such a frame can be filled with polystyrene foam either in pieces or in a solid circle.

Wrap the frame beautifully with corrugated paper, and glue lace along the edges that matches the color scheme.

There is a small child in the family and he needs a holiday every day. We will delight the baby as often as we want if we learn how to make a surprise out of soft toys: the instructions will show the whole process of creating an original bouquet. The bouquet should be soft so as not to hurt, and voluminous so as to arouse interest.
Do-it-yourself bouquet of soft toys step by step “Hares in the sky”
Composition details:
- plush hares, 10 cm / 5 pieces;
- blue organza;
- blue and white tulle;
- cardboard or foam;
- blue corrugated paper;
- satin ribbon and feather boa;
- plastic tube about 20 cm and floral wire;
- transparent tape;
- scissors, stapler, heat gun.
Execution steps:
We cut out a conical frame from polystyrene foam or roll it into a bag 15 cm high and 25 cm in diameter. We cut off the bottom corner and insert the tube inside. The outer part of the tube should be 12 cm.

We fill the inside of the bag with polyurethane foam, wait for 8 hours to harden and clean off the frozen material, forming a rounded surface of the frame.

We wrap the workpiece with blue tulle.

We wrap the frame on the outside with organza. We place the boa on top along the perimeter. We secure the organza with a satin ribbon.

We thread a thick wire through the bottom of the plush bunny and bend it in half.

We insert the hares on wire into the frame, as we are used to working with flowers on wire, and drape the empty space with white tulle.

At the final stage, you need to decorate the top of the frame with blue organza and decorate it with beads.

Important comment
The composition contains small fastening material (wire and beads). She should not be left with a child aged 3 to 5 years. After the joint celebration, quietly remove small parts from the composition and leave the toys loose on the carp.
DIY bouquet of soft toys step by step “3 bears”
Such a touching composition will be a joyful moment for any girl. Your sister or friend will appreciate your work. This is a simple bouquet of soft toys; you can repeat the master class yourself in 10 minutes.
Will be in work:
- wicker basket, 3 bears 15-20 cm, bouquet of pink peonies 10-15 cm;
- yellow decorative fabric;
- polystyrene foam for the base, tape, tape, wire.
Exact steps to create a bouquet:
- A wicker basket was chosen as the frame. Gold-colored decorative fabric is placed on its base.
- Foam plastic is placed at the base of the basket and secured with tape, covering it with decorative fabric.
- Artificial peonies are placed on a wire and wrapped with green tape.
- A wire is threaded through the bottom of the toys, bent and turned into a paper clip.
- Bear cubs and flowers are placed on a frame with wire. The middle of the bouquet is draped with gold fabric and beads.

Composition "For a Friend"
For my colleague’s last birthday, I thought about how to make a bouquet of soft toys for an adult, and so that it remains touching and funny?” Specialists in fluff bouquets will answer that if the composition is arranged in the form of a flower bouquet, then such a gift will suit any friend.
We choose the material: any funny kittens, fox cubs, bear cubs up to 15 cm in size are suitable for the bouquet. Their price is around 60 rubles;

Any packaging organza, brocade or satin;

Any satin ribbon for securing toys inside the frame or for tying decorative bows;

Frame, any color you are interested in;

Needle and thread or stapler.
Manufacturing process
Tie a ribbon to the back of the toy and leave long ends.
Cut strips from wrapping fabric, wrap the toy and sew on the side. The satin ribbon should be visible from the bottom of the fabric tube, and the toy should be visible from the top, as in this photo.

Pull the fabric and pull the resulting “skirt” under the toy.

Collect all the toys together.

Using tapes, secure them inside the frame.
If desired, the frame can always be additionally wrapped with organza and decorated with beads. Create such cute toy bouquets and give them to your friends!
Video on the topic of the article
The classics in the form of flower bouquets are sometimes replaced by the avant-garde - do-it-yourself bouquets of plush toys. They can serve as a great gift for some celebrations. To learn how to make a bouquet of soft toys with your own hands, pay attention to any master class on their creation.
Master class “wedding bouquet with teddy bears”
In this master class you will learn how to make a bouquet of toys with your own hands as a wedding gift.
The first step is making the frame yourself. You need regular polystyrene foam and a tool for cutting it, for example, a stationery knife. The top part should be round and voluminous. The approximate diameter is twenty centimeters and the width is five.
The vertical base is a pipe or a foam block. The width should be at least five centimeters, and the length should be about twenty. We glue both created parts so that the “pancake” is on the “leg”.

The next step of the master class is designing the base. The circle should be covered with snow-white or cream satin fabric. To do this, you need to cut out a piece from the fabric, the diameter of which will be approximately half the size of the round base. The vertical base should also be carefully covered with this material.
Next, you need organza or other thin fabric. For the best effect, take about six pieces of fabric (two pieces of each color). It is advisable to choose subtle shades, but if the wedding will be in a certain color, it is better to use that color.
The size of the pieces of material should be such that, wrapped around the foam vertical and tied with a ribbon almost under the round base, they cover the entire frame and are about five centimeters longer than it.
Each piece of six must be trimmed at the top and bottom with a border of satin fabric. We cut out a strip of satin (about three centimeters), wrap it around the edge of the main fabric, bend the edges of the tape and make a seam. Then we wrap the resulting fabric around the frame and tie it with ribbons.
The most important stage of the master class is DIY wedding bouquet decoration. We take two small bears and dress them up in a festive way, that is, we decorate one bear with black bows and a hat, and the other with beads made of pearl details and a veil. We place the bears on the wire, and insert part of the bouquet into the frame at the other end.
The next stage is decorating the bouquet with beads and flowers. To create a flower meadow you need pieces of beautiful fabric of different colors. You need to make a lot of roses from them in order to paste them over the top of the bouquet around the bears.

Woven roses are suitable for a bouquet. There are no difficulties in creating them - we fold the satin strip in half, twist it into a bud, straighten it a little and hem the tip to the bottom so that the flower does not bloom. To make the rose as voluminous as possible, after folding the strip, you can connect its bottom with a simple seam and pull it a little, and then make a bud. Don't forget about the leaves!


An excellent alternative to leaves that add pomp and volume are baskets. They are made from mesh fabric or organza. The resulting rose is framed with thin material, that is, it is wrapped in it. Flowers can be decorated with rhinestones or beads sewn on them.

It is better not to put floral decor on a wire, but to sew it on - it will be more reliable. If you have a shiny varnish in your arsenal, add a couple of spritzes to the bouquet - this is the final step of the master class.
Master class “bouquet of bunnies”
Bunnies look no less cute than bear cubs. Therefore, they are perfect for a bouquet.
The base must be made with your own hands from polystyrene foam, as in the previous master class. You can use corrugated floral paper to wrap the frame. It should be glued to it.

We take corrugated paper of two colors. Cut out a circle slightly larger than the base from each and cut it into three equal parts. The resulting six parts must be placed on the frame in a checkerboard pattern and glued. Then we make a second layer of two smaller circles, also dividing each into three parts and cutting out the details.
We take the bunnies and place them on the frame so that they form a triangle. We glue a fabric rose into the middle, and place another rose between them (a total of four flowers are required).
Master class “romantic bouquet step by step”
This handmade bouquet of toys is perfect as a present for your significant other. Its peculiarity is that the frame must be made of cardboard.
Cut out a rectangle from cardboard and roll it into a tube. We make a circle out of thick cardboard. We cover the round part with fabric and wrap the tube. We frame the round piece both top and bottom with beautiful flower wrapping material using glue. Ribbons, foil, fabric, etc. will do.

We decorate the lower tube with corrugated paper. We tie it with a ribbon in the middle of the base. We glue small plush figures to the top. You need to arrange them as your own imagination dictates.


