DIY autumn crafts from salt dough for kindergarten. Crafts on the theme "Autumn" from salt dough: hedgehogs, vegetables, mushrooms Modeling from autumn dough
Master Class. Autumn composition “Forest Guest” made from salt dough
Purpose: can be used as a decoration in the interior of a corner of nature in a kindergarten, participation in the exhibition “Autumn Kaleidoscope”
Golden autumn has arrived, it's time to go mushroom picking. A real mushroom picker, having found a good mushroom, will first admire it.
Before the fungus
Put it in the box
Don't rush, wait
Admire the beauty.
And then don’t be lazy -
Bow low to the fungus.
I offer you a work made from salt dough. Kids really enjoy working with dough; it brings a lot of joy. While doing work, the child reflects not only what he sees around, but also shows imagination and improves fine motor skills.
Required material:
1. Salt dough (pre-colored)
2. Empty jar.
4. Paints (gouache)
6. Clear varnish.
7. Dry autumn leaves
Stages of work:
1. Prepare the necessary material: salt dough of 5 colors (1 glass of salt and 2 glasses of flour, add water, mix the finished dough with gouache paints), an empty jar with a screw cap, stacks, paints, brushes, colorless varnish, dry autumn leaves.

2. Apply a thin layer of brown dough to the jar, thus making a mushroom stem

3. Roll the brown dough into a ball, flatten it between your palms, place it on the lid and form a mushroom cap. Close the jar with a lid - the mushroom is ready.

4. Let's start making decorative items: we make grass from green dough - after rolling out the sausage, flatten it - we get a strip, then we cut out the grass of any shape in a stack. Maple leaves can be made yellow, as well as multi-colored; for this, you first need to mix two colors (yellow and brown), roll a ball, flatten it - you get a “pancake”, cut out a leaf of the desired shape on it in a stack. With a little dough left, you can make flowers and a ladybug.

5. We attach all the decorative elements to our mushroom. In order for the leaves, grass, flowers to stick, lightly moisten them with water on the back side and then attach them to the fungus. We fill in the missing elements with paints - these are the black dots on the ladybug and the eyes.

6. Let's start making the butterfly. From the remaining dough we roll into lumps, we have three, maybe more. Then we make flat cakes out of them and put them on top of each other.

7. Roll all the flatbreads into a roll

8. Cut our resulting roll into a stack


9. From the resulting pieces we put together a butterfly

10. Let our work dry for 3-4 days. Cover with clear varnish. Place it on a stand and add autumn leaves. The work is ready!

Tricky little fungus
In a round strong hat
He doesn't want to go to the box
He plays hide and seek.
Hidden near the stump -
It's calling me to play!
You can make a huge number of crafts from salt dough, for example: flowers, animals, various figures, inscriptions, numbers, toys, paintings and whatever you want! Modeling from salt dough is called bioceramics. The advantage of salt dough is that it is convenient to work with, this material is absolutely harmless and crafts made from it will delight you for several years. In this article we will look at how to make crafts from salt dough with your own hands.
You will need: a glass of wheat flour, a glass of extra salt, half a glass of cold water, a bowl.

Recipe

The finished salted dough should not stick to your hands or crumble. It should be cool and easy to sculpt. I recommend watching the video master class!

There are two most common ways to dry salt dough. The first method: the finished craft will dry on its own. The main thing is that it should not be exposed to direct sunlight, otherwise it will crack. The craft can be placed on a flat surface and wait a few days. Second method: dry the finished craft in the oven for 3 to 6 hours (depending on the size of the craft). Drying occurs in batches with breaks. One approach is 1-2 hours. For quick drying in one go, set the oven to 75-100 degrees, and then the craft will dry in an hour. At a temperature of 120 degrees, the craft will dry in 30 minutes, but it is better to dry it naturally.
There are two most common ways to color salt dough. The first method: after drying, paint the finished craft with acrylic paints or gouache using a brush. Second method: food coloring is diluted in water, then added while preparing the dough. When the craft is completely painted and dried, it must be coated with transparent manicure or furniture varnish in 2-3 layers. Each layer must dry before applying the next. This way the craft will last for a long time.

You will need: colored salt dough, stack, clear manicure polish, toothpick.
Master Class

The salt dough star is ready!
Salt dough caterpillar
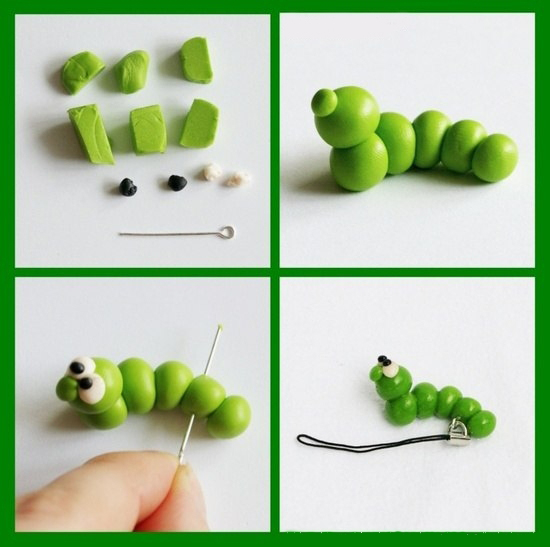
You will need: colored dough, knife, pva glue, toothpick, pendant, clear manicure polish.
Master Class
- Roll out the sausage.
- Cut it into 6 equal parts.
- Roll into balls.
- Glue 5 balls together.
- Glue the head.
- Make a nose and eyes, then glue them on.
- Poke a toothpick into the hanging area.
- Dry the craft.
- Attach the pendant.
The salt dough caterpillar is ready!
Salt dough apple

You will need:
Master Class
- Make half an apple, make the inside flat, pressing it onto a flat surface.
- Make a thin flat center and glue it to the main part.
- Roll 6 seeds and a stick, then glue to the apple.
- Blind the leaves, then glue them.
- Dry the craft.
- Apply varnish and wait until completely dry.
The salted dough apple is ready!
Salt dough elephant

You will need: colored salt dough, pva glue, clear manicure polish.
Master Class
- Make the elephant's body by rolling an elongated ball.
- Make 4 legs in the shape of plump sausages.
- Make a proboscis.
- Make the elephant's ears in this way: roll out 2 flat cakes, glue flat cakes of the same shape of a smaller size and a different color to them.
- Make a small ponytail.
- Blind your eyes.
- Assemble the elephant in the following sequence: glue the legs to the body, then glue the proboscis, then the ears, eyes and tail.
- Dry the craft.
- Apply varnish and wait until completely dry.
The salt dough elephant is ready!

You will need: salt dough, foil, a candy bowl or similar plastic container, gouache, a brush, clear manicure polish, a modeling board, a knife or a stack.
Master Class


You will need: salt dough, nail scissors, PVA glue, acrylic paints or gouache, manicure brush.
Master Class

Salt dough hedgehog is ready!
Owl (eagle owl) made from salt dough
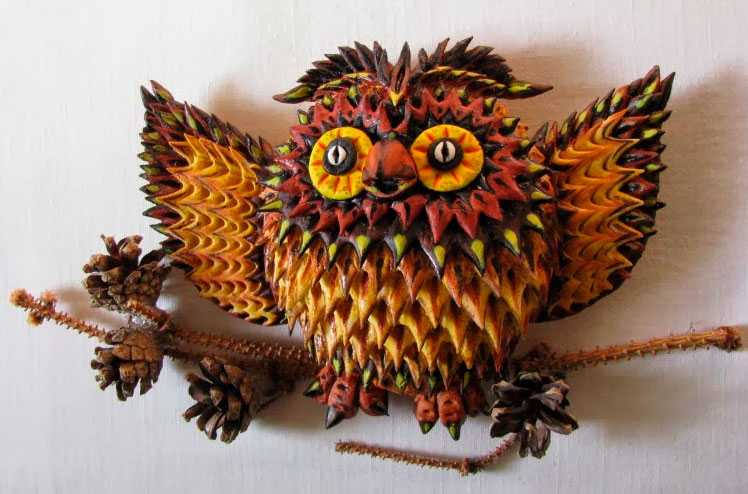
You will need: salt dough, pva glue, nail file, manicure scissors, acrylic paints or gouache, brush, wooden board with a pendant, clear manicure varnish.
Master Class

The salt dough owl is ready!

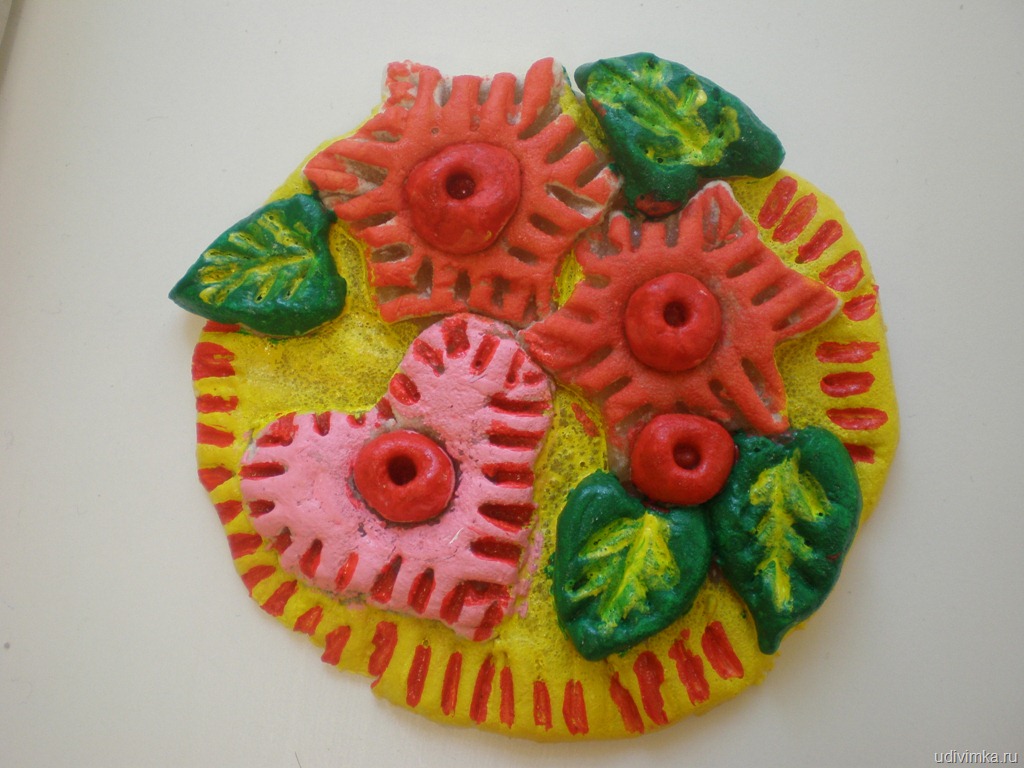
You will need: salted dough, the base on which the craft will be attached, for example, a board or plate, a glass or a knife, a sheet of paper, a simple pencil, a garlic press, a rolling pin, pva glue, acrylic paints or gouache, a brush, clear manicure polish, cloves.
Master Class

Salted dough fruit basket is ready! I recommend watching the video master class!

You will need: salt dough, knife, rolling pin, simple pencil, sheet of paper, sandpaper, acrylic paints or gouache, brush, transparent manicure varnish, glue gun or pva, base for crafts, for example: a board with a frame, transparent manicure varnish.
Master Class

Salt dough pencil

You will need: water, flour, extra salt, cardboard jar for the frame, PVA glue, scissors, a piece of decorative rope or corrugated paper, gouache, brush, button, stacks, acrylic varnish for crafts, toothbrush.
Master Class
- Knead the salted dough in this way: add a glass of flour, a glass of salt, add water, then knead until the desired consistency of the dough. Separate part of the dough, add beige gouache, then knead.
- Roll out the cake to a thickness of 10-15 mm.

- Apply PVA glue to the outer rim of the jar and wrap it with dough. Cut off the excess with a stack and smooth the joints with a damp brush.
- Create a small dotted texture with a toothbrush on the surface of the dough.
- Knead the brown dough, roll it into a flat cake 10-15mm thick.

- Cut a 5cm wide strip of brown pastry and glue it to the bottom of the jar.
- Make 2 large owl eye bases from white dough, then glue them on.
- Make a beak out of brown dough and glue it on.
- Make eyes from turquoise dough and glue them on.
- Roll out 8 strips of pink dough, twist them into 4 flagella and make a bow, then leave it to dry for 2 hours.
- Make droplet-shaped owl wings using brown dough, then glue them on.

- Weave ropes of beige dough and glue them onto the neck of the jar.
- Roll out a sausage from white dough, draw the texture of the lace with a stack and glue it as a collar under the beak.
- Place the craft in a warm place for a day.
- Paint the bottom and wings with brown gouache and decorate with white dots.

- Draw the pupils and eyelashes with black gouache, wait until the paint dries, then paint white highlights on the eyes.
- Glue a pink bow above the wing.
- Glue a button with a bow from a corrugated strip onto the lace.
- Cover the craft with varnish and wait until it dries completely.
The salt dough pencil is ready!
Salt dough dachshund

You will need: salt dough, simple pencil, scissors, cardboard, paints, brush, rope, toothpick, foam sponge, clear varnish, PVA glue.
Master Class

The salt dough dachshund is ready!
Boletus mushroom made from salt dough

You will need: salt dough, light bulb, paints, brush, foil, cardboard, masking tape, superglue, PVA glue, paper napkins, clear varnish, stack.
Master Class

Boletus mushroom made from salt dough is ready! I recommend watching this video!
Funny salt dough pigs

You will need: salt dough, paints, brush, foam sponge, stack, thin rope, toothpick, black gel pen, PVA glue.
Master Class

Funny salt dough pigs are ready! I recommend watching this video!

You will need: salt dough, baking sheet, rolling pin, knife, sheet of paper, acrylic paints, brush, ribbon, water, shoehorn, pencil, sandpaper, clear manicure polish.
Master Class

LESSON SUMMARY A MUG OF MODELING FROM SALT DOUGH
ON THIS TOPIC:
"AUTUMN SOUVENIR"
Child Tatyana Alekseevna,
teacher of a class for children with mild mental retardation
GBS(K)OU for students and pupils with disabilities general education boarding schoolVIIIview of the village of Ilsky, Krasnodar Territory
Target: continue teaching students how to work with the test; develop manual skills, tactile sensations, visual perception; correct motor-motor memory, voluntary attention, imagination; help instill accuracy and perseverance.
Equipment:sound recording “Seasons” by P.I. Tchaikovsky, tape recorder, multimedia projector
Materials and tools:salted dough, modeling boards, stacks, rolling pins, leaf templates, plastic straws, hand wipes, water glasses, brushes, paints, glue, cards with safety regulations.
PROGRESS OF THE CLASS
When guests arrive, the song “Autumn” is performed by students.
I.Organizing time.
Educator:Good afternoon, good hour!
I'm so glad to see you.
They looked at each other
And everyone sat down quietly.
II.Updating attention.
Educator:Hello, dear guys and distinguished guests!
We are very pleased to welcome you within the walls of our school. Today you are attending a salt dough modeling class, and we will be happy to show and teach you what we can do. First, let's get acquainted and introduce ourselves to each other /introduction of guests and children/
Educator:And now, I would like to ask: “Do you know what testoplasty is?”
Testoplasty is modeling from salt dough.
In recent years, salt dough has become a very popular modeling material. Although dough crafts are an ancient tradition, they have a place in the modern world, because now everything that is environmentally friendly and made with one’s own hands is especially valued.
Salt dough has an ancient history. Since ancient times, people have baked not only bread from dough, but also decorative items. Initially, products made from it had a cult significance: figurines of deities, images of animals, and amulets were made from it.
The Slavs believed that animal figures made from dough would bring wealth and abundance to the house; they were sculpted in the hope of increasing the number of livestock. Dolls were made from dough for children, which also served as amulets.
In Germany and Scandinavia, it has long been customary to make Easter and Christmas souvenirs from salt dough. Various medallions, wreaths, rings and horseshoes were hung in window openings or attached to doors. It was believed that these decorations brought good luck and prosperity to the owners of the house.
Dough figures are made in Poland and the Czech Republic, Slovakia, Greece and Spain; even in distant Ecuador, craftsmen make crafts from brightly colored dough. As we can see, the geography of use of salt dough is wide and varied. Nowadays, dough crafts are purely decorative, but that doesn’t make them any less popular.
Educator:Today the guys and I will teach you how to work with salt dough and really hope that you will enjoy this lesson.
It is no coincidence that at the beginning of our meeting a wonderful song about autumn sounded. Because autumn is one of the most beautiful times of the year. Whatever shades you see in nature. Going to the forest, autumn takes on the brightest colors for its work. Birches and maples are covered with lemon yellow, aspen leaves resemble ripe apples, and mighty oaks are dressed in copper bronze.
Autumn festival in the forest,
And light and cheerful.
These are the decorations
Autumn is here.
Every leaf is golden
Little sun,
I'll put it in a basket
I'll put it on the bottom.
I take care of the leaves
Autumn continues.
I've been at home for a long time
The holiday doesn't end.
Educator:Dear guests! Today we invite you to make autumn souvenirs in order to preserve the beauty and charm of this unique time of year for as long as possible. /Product sample display/
Educator:
- What tools will we use to work with the dough? /children answer using past experience/
STACK –tool for modeling from soft materials /clay, plasticine, dough/.
ROLLING ROLL –tool for rolling out dough.
We will begin our work by making a leaf. To do this you need to use a template.
- What is a template?
Sample- This is a blank made of cardboard, of the required shape.
Who will tell us how to use the template in our work?
I suggest you choose the template that you like best, with the help of it you will give the shape to your product, /master class participants choose leaf templates as desired/
Repetition of the rules for working with the test and TB
/work with cards/
– Guys, we are learning to work in pairs, so now I will name who will work with whom.
Determination of pairs for work.
Before starting work, we must perform a hand massage.
Performing a finger massage. /Annex 1/
Now, look carefully, everyone, I will show you how to sculpt a leaf.
PRACTICAL PART
Show a presentation about the sequence of work.
Slide No. 1. Roll a piece of dough into a ball.
Slide number 2.Roll the ball into a flat cake 5 mm thick.

Slide No. 3. Place sheet-shaped templates on the rolled out dough.

Slide number 4.Trim the product along the contour of the template in a stack.

Slide number 5.Draw veins in a stack.

Slide No. 6. Place the finished product to dry.
Educator:Now you are ready to do the work yourself.
PERFORMING THE WORK OF MANUFACTURING A SHEET.
/The teacher helps MK participants in the process of making a souvenir/
Educator: Guys, let's rest a little and do some physical exercise.
FISMINUTKA /application No. 2/
Continued work.
Demonstration of the presentation “Modeling a ladybug”.
Slide No. 1. Roll a small piece of dough into a ball.

Slide number 2.Using your thumb and index finger, form the ladybug's head.

Slide number 3. Use a stack to outline the wings and head of the ladybug.

Slide No. 4. Using a juice straw, squeeze out dots on the ladybug's wings.

Slide number 5.Place the finished product to dry.
Educator:At this stage, our lesson could come to an end, since according to the rules for working with salt dough, the product must first be dried and then painted. But we couldn’t deprive you of the opportunity to show your artistic abilities and therefore prepared the dried products in advance.
Upon completion of work: cleaning the workplace.
Lesson results:
What did we do in our circle class today?
Dear guests and guys, did you like our lesson?
What did you like most?
Educator:Our meeting has come to an end, I will be very glad if working with salt dough gave you pleasure and you want to do it further. Wish you luck!
Now the moment of farewell has come,
My speech will be short.
I say to you, “Goodbye!”
Back with us, see you again!
Appendix No. 1
Hand massage.
Using circular movements with your right hand, massage the back of your left hand. Do the same on your right hand.
Using compacting movements from the base of the finger to the nail phalanx, massage each finger.
Holding the wrist joint of your left hand, rub it with your right hand /2-3 twisting movements - “nettle”/.
Perform circular movements in the wrist and elbow joints of both hands.
Relax your hands with shaking movements.
Rub your palms together, let them feel the warmth of your hands.
Appendix No. 2
FISMINUTKA /relaxation for hands/
Hands need care
After all, they have a lot of work
It's hard to write all day long
And sculpt and draw.
/HAND JERKS IN FRONT OF THE CHEST/
Let's stand up right now
We will sit down eight times.
Five times slow and three
We have to sit down quickly.
/SIT-UPS, HANDS IN FRONT OF CHEST/
We reached up, then
Let's spread our arms wider
/PULLING, HANDS UP AND TO THE SIDE/
That's all. End of charging.
The boys are back at their desks.
/WALKING IN PLACE/
Autumn is a time of interesting ideas and inspiration that allow you to create a lot of original things from salt dough with your own hands. We have collected many interesting options, as well as recipes for preparing mass for creativity. This will allow you to organize exciting leisure time together with your child!

What you need for dough sculpting
To start creating, you will need to prepare a sufficient amount of the material itself. To do this you need:
2 cups of flour.
1 glass of plain water.
1 glass of salt.
For better plasticity, you can add a few tablespoons of sunflower oil. This master class will demonstrate the cooking sequence, where you will also learn about the features of storage and use.
In addition, you can add various dyes to prepare a multi-colored mass. Do you want to make autumn crafts from dough of different colors? You can find the recipe here:
Salt dough: advantages
If you are planning to make autumn crafts, you won’t find better material:
1. It is safe for humans, unlike plasticine and plastic.
2. For creation, improvised materials are used, the cost of which is quite low.
3. Easy to make! It only takes 10 minutes to create a large amount of modeling material.
4. Does not stain your hands or work surface, and is easy to clean and wash.

Original ideas: crafts from salt dough on an autumn theme
The existing fall-themed dough crafts are incredibly diverse! You and your children can create individual figures or create a real decorative panel to decorate your home. For example, as in the version in the video, a basket with mushrooms will decorate every room! These autumn crafts made from salt dough, the step-by-step creation of which can be seen in the recording, are incredibly easy to make!
In addition, autumn dough crafts can be made in the form of figures of various animals. Plants also look great: maple and oak leaves as in the photo can be used to create an autumn garland, tabletop composition, or painting.
Also, traditional autumn crafts made from salt dough include hedgehogs! This small animal is very popular in children's creativity. So don’t forget about it when working with your child!

In general, when choosing an idea for joint creativity, focus primarily on the child’s wishes. Offer a choice of several of your ideas, or let the child come up with his own version to implement! There are other things you can do to please your kids even more!
Autumn crafts can be made not only from natural materials, but also from salt dough. I bring to your attention an original craft.
Materials:
1. in order to knead the dough you need:
Wheat flour - 100 g.
* Rye flour - 100 g.
* Salts - 400 g.
* Water - 250 mg.
* Dry wallpaper glue - 2 tablespoons.
2. leaf shape
3. knife
4. base in the form of a circle for a wreath
5. hot glue
6. food coloring: green, red, yellow
7.oven
8. rolling pin
9. wallpaper glue
Progress:
1. First of all, you need to make the dough. To do this, we will mix the above ingredients together.
Advice: Add water to the dough little by little and only cold. The salt should be fine and homogeneous. Excess salt can make the dough brittle and brittle. Before adding dry wallpaper glue to the dough, dilute with warm water to the consistency of sour cream.
Preparing the dough
Mix sifted flour, wallpaper glue and fine salt, pour in water.
To ensure that the dough does not tear or crumble during the modeling process, it must be kneaded and kneaded well.
2. For coloring, food coloring is used, which is added to the kneaded dough.
Yellow dough - 2 drops of yellow dye per 100 g of dough
Green dough - 2 drops of green dye per 100 g of dough
Lilac dough - 2 drops of red dye and 1 drop of blue per 100 g of dough
If the dough needs to be colored in several colors, then it is divided into parts and each part is colored separately.

3. Cut out the leaves from the dough on a baking sheet: in this case, the back side of the product will remain flat. The baking tray should be moistened with water before use.
4. When the molds are ready, put them in the oven. The 5 mm thick product is dried at a temperature of 75C for 1 hour. Then 30 minutes - at a temperature of 100C, then another 30 minutes - at 125C and 1 hour - at 150C
Advice : Before drying, turn on the oven at the lowest heat setting. The baking sheet is placed on the top shelf and kept there until the product begins to brown. After this, the baking sheet is moved to the middle shelf.
If, during drying, bubbles begin to appear on the product or it begins to swell, it is necessary to immediately reduce the heating temperature, otherwise cracks will appear on the back side of the product. The product is considered dried if a ringing sound is heard when you tap it with your finger. If the sound is dull, then the product inside is still damp and the drying process can be continued.
5. If the product is ready, remove it from the oven and let it cool. Then glue it to the cardboard circle.