Toys for the new year made of wool felting. Christmas balls made of wool (master class). We make felting toys for beginner craftswomen
New Year's felting toys on the Christmas tree with your own hands: felting technique and master class
Subject New Year's crafts for each of us has a special relationship and therefore, we try to prepare for the holiday, using all the provided opportunities and solutions that can help in solving our problems. A set of a wide variety of techniques opens up previously unavailable opportunities that will help ennoble the home atmosphere. It is no secret that for many of our people the real family tradition is the celebration of the New Year in the company of his family. And therefore, the assembly of the Christmas tree, as well as its subsequent decoration, excites every member of a large family.
New Year's felting toys on the Christmas tree with your own hands: felting technique and master class
New Year's yarn is a special type of needlework, which includes wet and dry felting techniques. We will review the technique wet felting, which implies a complete deformation of the threads and the creation of certain shapes from them. Two striking examples of wet felting should be considered against the background of New Year's technique. Such crafts will help decorate the apartment, and the simple shape of the circle will allow you to take the first step in learning the felting technique in general. Throughout the lesson, you will get acquainted with different options for the same felting decoration. The principles of interaction and work on wool may differ slightly. We will try the standard felting method without the use of fillers, as well as the second - an alternative version of felting with a lot of toys and opportunities. Each toy can be decorated individually and used for the Christmas tree for many years to come! First felting technique

There are the most different variants decorations that we can use in the course of our work. For example, a decoration option in the form of a yarn toy can be a very successful experiment for the whole family. Our task is to consider the best felting solutions that will help the master decide which toys he should make with his own hands. Master classes of eminent and legendary needlework teachers will tell you how to prepare a unique and interesting piece of jewelry.  We should master the technique of wet felting, which will allow us to create toys of various shapes and objects. With the help of the wet felting technique, various crafts are often created, but the time has come for the New Year holiday, when there is a full-fledged opportunity to create toys. Consider a popular example that allows craftsmen to make their own toy using one of the methods. It is worth noting that yarn crafts are the most convenient of their kind. They are easy to make and at the same time, they do not require too much attention during operation. The main thing is to create a form in time. The main part of the craft is prepared using the wet yarn technique: its essence is to soak our future craft and, accordingly, “wash the product”. Thus, the future craft takes on its new form and can be used for a variety of purposes. Many needlework masters try themselves in this method of work and make some progress! So, a simple technique for felting wool or giving your craft the necessary shape includes creating rounded shapes, which can serve as New Year's toys. It is extremely simple to make it and for this you may need a regular set of wool, which must be diluted with various tools and materials:
- Take the rest of the wool threads that we may need
- We will also take combed wool in order to felt it in the future
- You will need felt in the form of a thin sheet
- Take beads for decoration
- Thread for embroidery should also be prepared
- You will need a ribbon for hanging silk
- We also take pins and a needle
- Need a washing machine for wet felting
- Golf, or stocking (can be replaced with a sock)
Preparing the ball for processing  Using the remnants of woolen threads, we must wind the ball. Using our material, we tear off a small piece of combed wool and put it on our club. Next, you need to tear off the next piece in order to also put it on the ball, but already using a different direction. Next, you need to cover the entire club with several “sheets” of wool, which will fit in different directions. Next, carefully tuck this ball into a golf or sock, then to tie it on both sides. Several options for future balls can fit in golf, but they need to be separated using a knot.
  Golf and balls are laid out in the washing machine, then to be washed using high temperature. You should also use washing powder. Thus, we will prepare a version of the ball. It will need to be dried using a battery. This process can take up to several days, depending on the volume of the balloon.
  Your yarn and its dye may not be of high quality to process. In this case, you need to check the quality of the yarn by pre-washing a separate batch. Check to see if your yarn will shed or deteriorate during the hot wash. Depending on the characteristics of your yarn, you will have to adjust the temperature of our product and determine in advance whether the material is suitable for the job. See how well the balls fall off during washing. A low temperature may be suitable for your type of yarn. For those for whom one wash cycle may not be enough, do not be afraid to start a second one by raising the temperature. “Hairy” balls should be rolled in your hands in order to return them to a soft and light surface.
  Next, we embroider any version of the motive for our crafts on a piece of our felt. Then, we cut out a special circle with our embroidery and, using pins, pin it to the craft. Then, you need to sew it on. A regular overlock stitch for a blanket will work for this job. You need to add a small amount of beads and then sew the ribbon to the craft. That's all! The second option of felting
  So, we have already got acquainted with the basic principles of felting a woolen ball using the wet felting technique in a washing machine. But, even such an interesting technique can be changed in better side. The most qualitative difference from method number one will be that we will use either a synthetic winterizer or a holofiber as a filler. The main advantage of this method over others is that the toy can be made much lighter and weightless in space. In addition, the shape of the toy does not suffer and as before, you can create a variety of shapes. Of course, this will also save material for felting. An ordinary skein of yarn can be enough for 4-5 balls.
  Let's start our work! In total, toys will be prepared in the amount of two options. One toy will be round, the other will be in the shape of a heart. Here you can experiment and think over your own options in the form of flowers and other items. But, in any case, it is best to try options with simple shapes. We prepare a template on paper or cardboard, then cut out our object from this template. We have a heart and a circle. Two hearts and a circle for a diameter of 15 centimeters (The circle itself will be half the size). We collect the mold
  It is necessary to pick up the circle, using the outer edge, while the end of the thread must be left free, in a state of sticking out, without knots. The bag that we receive must be filled with holofiber, as well as a piece of padding polyester. Next, you need to tighten tightly, tie both ends, using two or three knots to make the product strong. Then, the ends of the threads must be cut. It will turn out to be a variant of work in the form of ... whitewash! After, we work on the details of the heart, which must be sewn between each other and then stuffed, then tied with the ends of the threads. After, it is necessary to pull out the strands of wool, which we will straighten and subsequently lay using the laying technique in different directions at the base. It is necessary to evenly distribute the wool and apply it tightly to each form so that no bald spots form on the object during washing.
  Then, using a felting needle, it is necessary to fix the strands of wool so that they do not move. Then, using a nylon stocking, it is necessary to send each toy to a full washing cycle using washing powder. Set the temperature to 50 degrees. But, you can choose the optimal temperature yourself. Keep in mind that wool tends to shed. Therefore, if you have any doubts, separate the colors when washing. After that, you need to get the toys that you felt out of the wash and then dry them on the battery. Another feature of the synthetic winterizer material is the quick drying of toys due to the properties of the material. Finishing work If after the process of wet felting you have small defects, they can be hidden with patches. She needs to be nailed down. Then, the shape of the heart, after it dries, can be corrected using a thin needle felting technique. Our molds are ready! Now, having imagination and your own taste, you can decorate them according to your own decisions. We will use felt, beads and wool decorations, and also circle with floss threads. Then, for toys, you need to sew a loop. Some toys can be used as a separate Christmas tree decoration, others can be used to make a small New Year's garland.
Do you love needlework? Then you'll enjoy doing Christmas decorations with your own hands! This is a pleasant and exciting activity for the whole family that will not leave anyone indifferent - you will spend several evenings with pleasure making toys for the Christmas tree with your own hands.
What do we use for the material
What do you need to make DIY Christmas decorations? You can use almost anything that comes your way. If you want, you can buy special consumables (sold in art stores), or you can use what is in any home. So what to prepare:- plain paper (suitable for making patterns);
- pencils and markers;
- ordinary, white and colored cardboard (velvet can be used);
- sharp scissors and a dummy knife;
- glue (PVA or glue gun with rods);
- threads and needles;
- yarn of different shades;
- various decorative materials - it can be sparkles, sequins, confetti, multi-colored foil, stickers and much more.
Simple crafts from improvised materials
Of course, you have probably seen how Christmas balls are made from threads and glue with your own hands, but why not expand the range? We make different Christmas decorations with our own hands.From yarn
This is a simple and at the same time spectacular Christmas decoration that can decorate any Christmas tree.
For manufacturing you will need:
- yarn;
- tailor's pins;
- plate or bowl;
- porous material (for example, a disposable tray);
- cutting paper;
- marker.

The template needs to be attached with pins (or ordinary toothpicks) to the porous material, and lay out the pattern you need on top - first the contour is laid out, then the interior decor. Do not cross the threads too often, the toy should be fairly flat. After you are done, dry the product and remove it from the pins, and tie a loop in the eye. If desired, you can decorate with sparkles or rain.

From wire
How to make Christmas toys with your own hands in just a couple of minutes? Use wire!
To make toys you will need:
- two types of wire - thick and thin (thin can be replaced with bright threads, for example, floss. Pure white strong threads look very nice);
- beads, beads;
- colored tape;
- pliers.
The ends of the thick wire must be twisted. You need to string beads and beads mixed on a thin wire, tie the end of a thin wire to a future Christmas tree decoration, and wrap it randomly.

When the toy is evenly wrapped, you need to wrap the free tail of the wire around the toy, and tie a ribbon in the shape of a bow - your toy is ready.
Another original idea:

Ribbon and beads
Who said that do-it-yourself New Year's toys must be done for a long time and painstakingly? Not at all. Literally in five minutes you can, which will decorate both the New Year's tree and the interior.
You will need:
- beads;
- narrow tape;
- yellow, gold or silver cardboard;
- glue "Second";
- needle with thread.

The interior decor made in this way looks very attractive.
From cardboard - in a couple of minutes
Some Christmas toys made of paper or cardboard take a lot of time to make, but not in this case - here you really need a couple of minutes to make an elegant hand-made Christmas decoration.So, you will need:
- ordinary cardboard;
- some twine or thick yarn;
- glue;
- paints and brushes;
- napkin or cloth;
- varied decor.

We wrap the tree in different directions with a free tail of twine. After some pattern of threads appears on the Christmas tree, you can start gluing it with a napkin. You can tear the napkin into pieces, coat the Christmas tree well with glue, and glue it tightly with a napkin. This will give a nice texture to the future toy.

After the toy has dried, you can start painting - paint the Christmas tree green.

After the paint layer dries, shade the texture of the toy with a dry hard brush and white paint, and then decorate as you like.

From bright patches
Here you will need sewing machine, but with a special desire, you can cope without it. This The best way make Christmas toys from cotton wool and fabric - just choose a fabric with a Christmas ornament, or use the one you have on hand.
Prepare some paper patterns - for example, deer, stars, gingerbread men, cubs, letters and hearts. Cut the blanks out of the fabric with your own hands, sew them in pairs, leaving a small gap (for stuffing), and through this small hole, stuff the toys tightly with cotton wool or padding polyester. It is most convenient to fill with a pencil.
Patterns can be downloaded here:


By the way, do not forget - we sew on a typewriter from the inside, but if you decide to make toys made of thick fabric with the kids, then it is better to sew them with a decorative seam over the edge - a toy with your own hands will look simply charming and suitable even for a home Christmas tree, even for kindergarten- usually for kindergarten trees, children make decorations themselves.
From twine and cardboard
New Year's toys made of paper and cardboard will be much more interesting if you add a couple more simple materials to them. To make such a toy, you will need ordinary cardboard, simple paper or natural twine, a little felt or any other fabric, as well as plain paper, a pencil and a ruler, a drop of glue.
The star pattern can be downloaded here:

First, make a pattern on plain paper, and then transfer it to cardboard. Do not forget that the star must be double. Do not make the star too thin, it is better to make it from a centimeter or more. The tail of the twine is glued to the cardboard, then you need to gradually wrap the entire workpiece.

Lay the thread as tightly as possible so that there are no gaps. In order to decorate the star, make a couple of leaves and berries out of fabric and decorate one of the rays. Your decoration is ready.

From yarn and cardboard
Do you want to make original and at the same time charming Christmas decorations with your own hands? Then it's time to make small gift hats with your own hands from improvised materials. It's wonderful new year gift which looks cute and will keep you warm all winter!
To make Christmas tree decorations in the form of hats, you will need:
- a couple of toilet paper bushings (you can just glue cardboard rings together);
- remnants of colored yarn;
- beads and sequins for decoration.

The threads need to be cut into segments of approximately 20-22 centimeters. We fold each piece in half, draw the loop through the cardboard ring, and stretch the free edges of the threads through the loop. It is necessary that the thread is firmly fixed on the cardboard base. So you need to repeat until the cardboard base is hidden under the threads.

All thread tails need to be pulled through the ring so that our hat has a “lapel”.

And now we drag the free ponytails tightly with a thread and cut them in the shape of a pompom - the hat is ready! It remains only to make a loop and decorate your Christmas tree toy with sequins and sparkles.

From beads
Making a New Year's toy in the style of minimalism is easy and simple - you will need wire, beads and beads, a ribbon and a coin (you can replace it with a small candy, but it looks much more spectacular with a coin). Try to make this Christmas tree toy with your own hands, a very simple master class.
Make a loop on the wire and string green beads mixed with large beads on it - they will play the role of New Year's balls on our Christmas tree. After the wire is filled, give it the shape of a Christmas tree, folding in a spiral.
Once your tree is in shape, fold the loose end into a loop.

We cut off a piece of ribbon, form a loop for hanging from it and stretch it through the Christmas tree, and decorate the free tail with a coin (the easiest way is to stick it on double-sided tape). We tie a decorative bow on the loop for hanging - your decor is ready!

Christmas balls
How to make a Christmas ball of thread? As easy as shelling pears, watch our master class about spectacular lace balls on the Christmas tree.Required:
- several balloons;
- cotton threads;
- PVA, water and sugar;
- scissors;
- polymer glue;
- spray paint;
- decor.

First you need to inflate the balloon - not completely, but according to the size of the future decoration. Mix two tablespoons of water, two teaspoons of sugar and PVA glue (50 ml), and soak the thread in this mixture so that the thread is saturated. Then you need to wrap the ball with a thread randomly. The balls need to be dried for several hours. After the glue is completely dry, you need to blow off the ball and take it out, and gently paint the thread ball with spray paint and decorate with sequins and sparkles.
Do-it-yourself thread Christmas balls will turn out to be very, very spectacular if you make them in different tones - for example, red, silver and gold. Try to make Christmas balls with your own hands using different techniques - you can sew or knit balls, make them from cotton wool with your own hands or, for example, sew them from felt - there are never too many such toys.
From paper
Christmas decorations made of paper are very popular with both big and small fans. New Year's miracle- Try to make paper Christmas balls with your own hands.
Do-it-yourself New Year's paper toy is done like this: 
Decorating such a toy is not additionally required, it is already expressive.

Another version of the ball:

Or you can make such a ball according to the master class:


From felt
Do-it-yourself Christmas toys made of felt look very warm and cozy, and making them is very, very simple. To make your own charming Christmas toys made of felt, you will need:- red, white and green felt;
- threads of red, white and green;
- glue Crystal;
- scissors and needles;
- cardboard;
- some satin ribbon;
- soft filler (cotton wool, holofiber, synthetic winterizer).

First make sketches for your future toys. It can be anything. After the patterns are ready, transfer them to the felt and cut them out. What is good about this material is that it does not crumble, you will not need to additionally process the edge of each workpiece.
Make the same decorative elements - for example, holly branches (by the way, did you know that this is a symbol of joy and Christmas reconciliation?). Berries need to be glued to the leaf with glue, and then make a decorative knot - this will add volume to the berries.
We sew each blank in pairs. By the way, it is best to sew with contrasting threads, it will be fun and elegant. And how to make Christmas decorations voluminous? Stuff them with holofiber before sewing them up completely! Spread the product well, so the Christmas tree toy will be stuffed more evenly. For stuffing, you can use the back of the pencil.
Sew on decorative elements and your Christmas toy is ready!


Try sewing felt decorations not only for the Christmas tree, but also for the home - for example, a Christmas wreath decorated with felt toys looks very stylish. Look at a selection of DIY Christmas decorations photo workshops - and you will understand how much interesting things can be done from ordinary felt of two or three colors.

Master class on how to make a Christmas garland with your own hands from felt:

Below you can download templates and patterns of different Christmas trees for crafts from felt.
Wet felting balls for Christmas tree decorations.
In the next master class on wet felting, I will tell you how to mechanize the process of felting from wool. This simple and affordable technique of wet felting balls will help you make Christmas tree decorations with your own hands to decorate the interior for the New Year. It will be possible to dump a large number and quite quickly.
Let's start the master class on felting a soft Christmas tree toy - a ball.
We will need.
Wool for wet felting.
Threads.
Sintepon.
Needle for dry felting. You will need one for rough felting.
Thin socks, or stockings or tights (made of polyamide). Ordinary, thin women's.
Washing machine.
To save wool for felting, the base of the balls will be made of synthetic winterizer.


Take a synthetic winterizer. Start rolling on one side into a ball. Fold up the edges. Screw the synthetic winterizer again. Repeat these procedures until the desired size of the ball is formed. Tie the resulting shape with threads. Just wind the thread around the ball, forming a spherical shape.

Moreover, winding the thread, try to form a ball of the correct shape.

Next, you need to overlay the synthetic winterizer ball with wool for wet felting. Tearing off the bundles of wool, overlay a ball of synthetic winterizer with these bundles of wool. Do not forget that the wool should cover the entire surface of the padding polyester ball. You need to lay out several layers of wool, each subsequent layer should be perpendicular to the previous one. There should be at least 3 - 5 such layers perpendicular to each other. The main thing here is that there are no bald spots, and the wool is laid out evenly on all sides. 
Take a needle for dry felting and slightly felt the wool so that it acquires the desired shape, and the bundles of wool lightly stick to the ball of synthetic winterizer.
If you do not have the necessary needle for dry felting, then this operation can be skipped. When I felt balls with this technique for the first time, I did not do this operation.
Later, I realized that if the wool was slightly felted with a coarse felting needle, then the result of the work could be more expected, the ball would turn out to be more even.
Of course, it would be possible to make a ball and dry felting, felting first with a coarse and then with a fine felting needle. But if we make one ball per unit of time by dry felting, then with this technique there are 10, or even 20 pieces.

Next, our workpiece must be placed in golf or stocking. If you used the dry felting operation, then the layers of wool will not fray. And if you did not use felting, then carefully straighten the layers of wool inside the golf so that there are no holes, otherwise white spots form from the translucent synthetic winterizer. The first time I did that. The result suited me, and there were no white holes. You just need to carefully lay the layers of wool on the ball and place it in the golf with more care.

Tie the golf in a knot close to the ball, but try not to grab the wool from the ball so that a tail does not form when felting.


One golf can be placed from 3 to 4 balls.

After placing each ball, it is necessary to make a knot so that all the balls are tightly crimped by the golf. 
Put our golf balls in the washing machine. Wash with powder. The balls fall off. You can combine this operation with the usual washing of your clothes.
Take out from washing machine our balls and take out of golf.

As you can see in the photo, golf is removed with difficulty, but the wool does not peel off, which means that the wool fell off well. Dry the balls.

If such felting flaws appear, as in the photo, just cut it off with scissors.
As you can see, this wet felting technique will save time and effort. We have mechanized the most tedious part of felting and now we can start decorating our New Year's balls.
You can sheathe them with beads or beads. This is similar to how I described in the master class on dry felting using the example of a mouse. Only there we made only eyes from beads, but here you can decorate the entire surface of the ball. Can be tied with ribbons. Rhinestones can be glued on. Make a loop of ribbon and tie a bow.
You can also make a colorful New Year's ball, wrapping around wool for felting of different colors. There are a lot of options to use your imagination. 
Such New Year's soft Christmas tree decorations, made by hand using the method of dry and wet felting, will decorate your home for the New Year holidays, decorate your Christmas tree, and also become original presentations or even a gift. self made for your friends and loved ones.
Where to start learning to felt, and where to find everything you need - step by step description making toys and a master class are presented below. Felting, a type of needlework known in the past, is gaining popularity again in our time. Not only felt boots are made by felting, but also clothes, jewelry, bags, interior items, toys. Like the decoupage technique, felting is a space for creativity. Having shown imagination, you can create an original handmade item that is suitable as a gift.
For felting, non-spun wool of sheep or other domestic animals, such as dogs, is used. Wool is bought in special shops for needlework or in online stores.
The felting technique is based on the entanglement of wool fibers when rubbing against each other. The material that is obtained from wool by felting is called felt. Distinguish between wet and dry felting. The method of wet felting consists in rolling wool with soapy water, and dry felting in the use of special needles that pierce the wool many times and tangle the hairs together.
Children can also be involved in an exciting activity, especially since it is useful for a child.
Felting develops fine motor skills, teaches accuracy, patience and diligence.
1.jpg)
The most interesting for young children and beginners will be felting soft toys. You can start learning with wet felting and learn how to felt a ball.
It is necessary to prepare:
- Wool;
- A small jar (suitable for Kinder Surprise);
- warm water;
- Soap.
Put a small piece of wool in a jar of warm soapy water, close and shake. Roll the resulting woolen ball between the palms until it becomes smaller and denser. Then rinse and dry.
From such balls you can make beads, a decorative frame for a photo, a rug, Christmas toys, use it as a designer for crafts. White balls will make a snowman. If you glue acorn caps painted with golden paint to the balls, you get acorns that can be hung on a Christmas tree.
We make felting toys for beginner craftswomen
In the technique of wet felting, it is not possible to make complex volumetric objects. This method is more used for making clothes, bags. To make toys, use the method of dry felting or folding.
Main necessary tools and materials:
- Felting needles. They have notches on them. Needles are distinguished by cross-section (triangular, asterisk), by serifs, by number. A needle with a larger number is thinner. Thicker needles are used at the beginning of work, and thinner needles are used for final processing.
- Needle holder. To work with three needles at once, the process will go much faster.
- Underlays so as not to damage the fingers and the surface of the table. Instead of a substrate, you can take a foam rubber sponge for washing a car or a brush.
- Thimbles can be leather or rubber.
- Dyed semi-fine wool. Fine wool is not recommended; when folding, it is destroyed by a needle.
- Sliver - undyed wool, not cleaned, cheaper. Used for the base of the toy. Instead, a synthetic winterizer will do.
In addition to the basic set of tools, you may need glue, a brush for combing wool, reverse needles, frame wire, and paint.

Wool can be neatly laid in the form of a combed ribbon or tangled, prepared for felting,
Such wool is called carded wool or woolen wool.
Beginner Tips:
- The needle should be inserted perpendicular to the surface, gently pulling the fibers inward to the center and back. When the coat begins to thicken, a characteristic crunch will be heard.
- Sufficient compaction is considered when the product does not change shape during compression.
- To increase the volume, apply a piece of wool, to reduce it, they often pierce with a needle.
- The individual parts made are connected with the help of the fluffed wool left. It is attached to the desired part and, for strengthening, a piece of wool is rolled on top.
- When processed by felting, the wool is reduced in volume by 3 times. It is necessary to take wool with a margin.
- For identical parts, it is better to measure the same amount of wool at the same time.
It is better to start mastering the methods of felting toys with simple products, with a small amount of details and finishes.
Making Christmas tree toys: wet and dry felting
Beginning felters can try to make a cute Christmas tree for new year holidays or as a gift to friends.
You will need the following material and tools:
- Green wool;
- Needle for felting;
- Warm water;
- Soap, you can liquid;
- Needle with thread.

From wool you need to tightly wind the cone. It will be the basis for the Christmas tree. When tearing off pieces of wool, lay them out perpendicular to each other so that the irregularities are invisible. Press everything tight. Put the substrate under the cone and continue felting with a needle, gradually turning the product. On all sides, you should get a dense, even surface.
Wet the Christmas tree with warm water and liquid soap, and rub it lightly with your palms. To make the Christmas tree stable, you need to put it on the table, and continue to rotate and rub the surface, smoothing it from top to bottom. Wash off the soap from the finished Christmas tree and dry.
You can decorate the Christmas tree by sewing multi-colored balls, beads, a garland of beads and other decorative elements to it.
The elegant Christmas tree is ready!
We carry out felting toys step by step and slowly
Starting with making simple toys, you can gradually move on to more complex work. To understand the process, it is not necessary to attend special courses, a good book will help you learn felting, which contains master classes and felting lessons, as well as pictures of beautiful toys. In the book you can find ideas for creativity, and download samples on the network.
.jpg)
Making a toy in stages:
- Draw a sketch of the toy.
- Conditionally divide it into parts (head, torso, paws, tail, and others). They can be made together or separately.
- Prepare wool. Divide in different directions to obtain a mass of homogeneous texture.
- Start with a thick needle. Gradually turning a piece of wool, give it the desired shape and sufficient density.
- When the desired shape is reached, continue processing the surface with a fine needle.
- After the manufacture of large parts, they move on to felting small ones (ears, paws). For paired parts, take the same amount of wool and knit the desired shape, remembering to leave a "skirt" of wool for connection.
- To give the paws a bend, it is necessary, by bending the workpiece with your fingers, to work out the place of the bend with a medium needle.
- Connect the small details and the main ones. Apply symmetrically (you can pin it with a pin) and roll in a circle, gently straightening the wool.
- Start decorating toys. Glue with transparent glue or sew on eyes, nose, draw some details with a felt-tip pen, cut out of felt. You can safely fantasize and use any decor options.
When gluing decorative elements, the place treated with glue can no longer be pierced with a needle.
Mastering the technique of felting, you can try to make a small toy with several details and different colors of wool with your own hands.
Where to find patterns for felting toys and instructions
You can felt a toy for a child by watching a master class and buying the necessary materials, or by purchasing a ready-made felting kit in a craft store. A wide selection of such kits is available to the public. The reviews left leave no doubt about the correctness of the choice.
With the help of ready-made kits, you can improve the skills of wet and dry felting.
The kit contains everything you need to get started, except for a few small things.

The set includes:
- Step-by-step instruction;
- Patterns of product details;
- Tools;
- Wool;
- Accessories.
Using felting kits, you can make felt toys according to your taste and desire. It can be cute kittens, mice, an owl, a dog, a Lolo penguin, a kitten from a children's cartoon. You can make little cool monsters.
Detailed master class for felting toys on a wire frame
Sometimes, when felting a toy, a wire frame is used, which allows you to move parts of the body and give them a certain position. Cat, dog, mice, horses can be made on the frame.
To felt a dog of an unknown breed, you need to prepare:
- Fine and semi-fine wool (black and gray);
- Needles No. 36, 38;
- Sliver;
- sketch paper;
- Brush for combing wool;
- Scissors (simple and thinning);
- Accessories: eyes, nose;
- Wire, wire cutters;
- Glue.
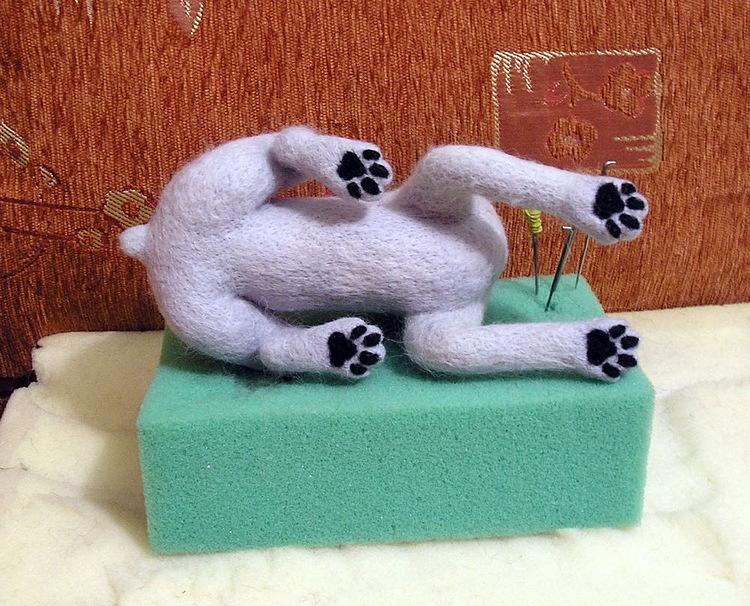
Draw a sketch, and determine the location of the frame. Make a wire frame, and roll it with a sliver, and then with wool according to the sketch.
Make a head. Comb a piece of sliver with a wool brush, and start felting with a #36 needle. Apply wool on top of the sliver and carefully process it, trying to give the desired shape to the dog's head.
To shape the muzzle, file the beard, mustache and eyebrows using black and gray wool. Long strands can be cut. Glue eyes and nose.
It turned out to be a cute dog, almost like a living one.
Felting toys (video)
Having mastered the technique of felting wool, you can create warm, soft toys for children, make souvenirs and New Year decorations, give gifts to friends and relatives. Everyone can learn a popular type of creativity. Worth a try and you will definitely succeed!