How to make a Christmas tree out of felt. Christmas trees made of felt with your own hands. Master class on making volumetric crafts "Ball"
The tree is a symbol of the New Year. Simplified, it has a conical or triangular shape, easy to make from any materials, which is why Christmas tree crafts for New Year's decor are so popular.
Agree, when we see a decorated cone or triangle made of fabric, paper, plastic, we automatically see a decorated Christmas tree in it. A cozy and cute decoration of the New Year's interior will be a do-it-yourself Christmas tree made of fabric.
A conical Christmas tree can be made in the following ways:
- Based on a rigid frame made of cardboard, plastic or foam blanks. The fabric is attached to the cone with glue, pins, sewn on, and then the Christmas tree is decorated with buttons, sequins, beads, sequins, a string of beads, and lace. For greater realism of the texture of the Christmas tree, you can use small shreds of different tones.

- With your own hands, a fabric cone can be made soft, stuffed.
- You can make a pyramid for the Christmas tree from circles of felt.
- Or collect a cone from bags with holofiber.
- The Christmas tree made of fabric balls sewn together looks spectacular.

Triangle

It can be a large felt tree on the wall, or maybe a small tabletop one.

Felt is the most successful material for sewing a soft Christmas tree with your own hands, it is matte and flexible. The edges of the felt do not need to be processed, moreover, the Christmas tree does not have to be turned inside out, it would be nice to add a decorative seam.

How to sew a Christmas tree out of felt?

To sew a Christmas tree with our own hands, we need green felt, holofiber, a pattern and a regular sewing kit.
You can build a scheme yourself, to your taste: with sharp corners, asymmetrical, elongated or squat. Or use our version (click to enlarge the pattern).
Operating procedure


- When cutting the felt, position the paper pattern so that there is a fold at the bottom, step back a couple of centimeters from the edge to make the bottom thicker.
- When the outline is outlined, remove the pattern and carefully chip off the details with pins before starting to cut.
- On the cut out part, mark the lower border, to which there will be a line. We scribble along the pencil line, leaving a hole on the lower tier for eversion and stuffing. We make out the corners of the bottom.
- We turn the Christmas tree, straightening the rounded corners, slightly stretching them with our own hands. Felt is plastic, it is easy to add volume to it. We fill the Christmas tree and sew it by hand with a hidden seam.
- As for decorating our Christmas tree from felt, here you can show your imagination. Now on sale there are special buttons in the form of stars, snowflakes. Any ribbons, lace, beads are suitable for the New Year's outfit of our beauty from felt.

Such a soft Christmas tree can be hung on a ribbon or planted on a stick inserted into a pot. It will suit any kind of interior, it will become a New Year's accent of the table, window sill, curtains, door handle.
In order to sew a Christmas tree from felt or other fabric with your own hands, it will take a couple of hours and simple materials, and it will delight you for more than one year.
Christmas tree with radial symmetry and composite Christmas tree made of pillows

These chubby Christmas trees are similar to each other like girlfriends. They consist of parts stuffed with holofiber.
Do-it-yourself Christmas tree with radial symmetry is made from two, and preferably from three identical parts. Each of them is sewn on a typewriter, leaving 2 holes for stuffing at the bottom. Then they are turned inside out, folded into a pile and stitched along the vertical axis. After that, each blade is stuffed and sewn up with a blind seam.

Click Class
Tell VK
Greetings, my dears! We continue the magical theme of preparing for the New Year. Let me remind you that we previously made and considered. That's not all, and today we figure out what kind of New Year's toys you can make from felt with your own hands. This material is affordable and easy to use, so even a novice child can handle it.
It is not expensive, it has many shades. And what crafts only from it will not be invented. Last year I wrote and gave patterns of different.
Today we will consider Christmas trees, deer, mittens and other paraphernalia of the new year. Of course, let's pay attention to the symbol of 2019 - the pig.
Let's talk a little about the nuances of working with this felt:
If you decide to sew all the details, then let's look at what types of seams are.
You can see that the edges of the crafts are beautifully finished. You can do this both by machine and by hand. If you prefer the latter option, then here is a buttonhole for you to note.

You can also see that the internal parts are processed with a “forward needle” seam.

Or "over the edge".

The "Tambour" type of seam looks beautiful.

Of course, someone even embroiders with satin stitch on their products, but the listed seams are enough for a novice craftswoman to create a very beautiful handicraft.

So, we considered the types of seams in advance. Practice them a little, but don't put off creating for later. After all, initially the toy can be glued.
What is simple and easy to make for inexperienced craftswomen or children? In my opinion, snowmen, mittens, balls and Christmas trees are the most suitable options.
Here is an idea for you where the parts are glued.

Well, let's continue about the snowmen. To get started, a few simple ideas for inspiration, and then step-by-step master classes.

Here we will already use a buttonhole seam to connect and process the edge.


Now consider the master class itself, how to make such a cute snowman face for the Christmas tree.
Master class №1. Snowman
You will need the bare minimum: three sheets of white, red and orange felt; scissors; threads; filler; decor.
Cut out 2 parts of the ball from a white sheet (you can use a cotton pad as a template). On the face, draw or make knots eyes, mouth. Glue the orange felt carrot.

We cut the hat, we need two parts. In length, it is equal to the diameter of the muzzle. We glue 1 side of the hat onto a blank with a muzzle, glue the second part onto an empty white round blank.
Now we put a loop of tape or thread between them and sew the edges with a buttonhole seam. We leave a small part not sewn up to fill the toy with filler. Then we sew the edge and decorate the craft.
Master class number 2.
Another simple one step by step master class. All steps are shown in the instruction photo.

If you are not yet very confident in your abilities, then choose simple shapes - a ball, a triangle, a heart. Already from them you get a lot of ideas for creativity - look.


Master class number 3. Christmas tree
These holiday trees are also very simple. But let's look at how to do such a craft.
So, we will take felt, a triangular template made of paper, curly scissors, a pencil, filler, threads and a needle and decor.
We transfer the template to the fabric. Cut out two pieces with curly scissors.
On the front side we make knots for beauty. You can replace them with decor. Then, with a “forward needle” seam, we connect both parts, after inserting a loop of tape or cord inside. We leave its very bottom not sewn up and stretch the filler there. We sew the cut and rejoice at the craft.


Let's also watch a video where the whole process of making the simplest toys is given step by step.
I think that almost every little man will be able to repeat the actions of the craftswoman.
Master class on making volumetric crafts "Ball"
Now we will greatly complicate the task - so that you do not relax. Let's take and sew soft voluminous Christmas balls for decoration. They can act as pillows and even.

Take: thin felt, threads.
The pattern is attached after the description of the work process. There are two schemes for the ball: large and small.
So, we transfer the selected scheme to the fabric and cut out the details. You need to take 6 pieces. Then, from the wrong side, we sew all the workpieces with threads, leaving a place from one edge.


We turn the part on the front side and fill it with holofiber or padding polyester.

We cut out the remaining details from the pattern from the silver fabric and make a suspension for the ball. We sew all the blanks together and fix them on our bulk crafts. Take a string as a hanger.

Patterns for the ball. 


That's all. You can repeat this craft from different types of fabric.
Toys for the New Year "Herringbone" for children, master classes
Christmas trees are also made quite simply. And they have many configurations, decoration ideas.
for example, you can make crafts with eyes, or with handles, legs, with a hat, etc.
Master class number 1. Christmas tree with eyes
According to the instructions below, you can make such a beauty.

For naughty crafts, you need to take green and brown sheets of felt, filler, scissors, a pattern and decorations.

So, we cut out two identical parts. We decorate them with thread knots and crosses, stars. We sew on the eyes and designate the mouth with a seam “Forward a needle” in one thread. Now we sew the edges with a looped seam or “over the edge”. We fill the toy through the barrel and close this hole with threads. 
Pattern - Tree of parts. All branches are marked with numbers so that you do not get confused, you need to cut 2 pieces of each part.

Master class number 2. simple tree
Here is a very easy toy idea. Cut out a four-pointed star and sew the rays together. Fill the craft and decorate it with decor.

Master class number 3. 3D Christmas tree
And how to make a tree for decoration? Yes, just my dears. It is important to see the entire stage of work just once.
Two identical parts are cut out. Then incisions are made. On one side, right up to the middle. On the other side, exactly to the middle, but already from below. Blanks are inserted into these cuts and the tree is almost ready.


Decorate the branches and praise yourself for the beauty.
Master class number 4.
Another one step-by-step instruction. Shown in great detail.

Master class number 5. Garland
Shown here step by step manufacturing multi-colored felt garland. I think there is no point in explaining here, everything is very clearly shown. To ensure that the cord that connects all the parts is not visible, use two sides of the Christmas tree. Pass the string through them, and glue the edges. This will work out very neatly. 
patterns


A very unusual craft made from different types of felt. The diagram is attached.


Master class number 6.
Another detailed tutorial. Take: felt, thread, filler, decor and ribbon.

According to this pattern, cut out two pieces of fabric.


We decorate both sides of the suspension with knots or decor.
To one we glue a ribbon or cord folded in half.

We cover this side with the second part and sew the edges. We push the filler through a small hole and sew the edge. 
According to this scheme, you can make many variations of toys. Look here, there is a machine seam.

And here comes the manual. 


You can combine colors to get a more unusual craft.


Flat toys also look interesting. You need to decorate only one side of the workpiece.

Buttons look interesting on such homemade trees.


I give a diagram of a funny Christmas tree made of two types of felt.


You can even make toys on a leg, in the form of a topiary.


Show your imagination and sew to your heart's content! 

Cones make such a wonderful thing for design and decor.

A few more types of crafts for inspiration.


Not difficult right? I think that it is important to understand the whole process, and only then look at the details that have already been implemented.
How to make a soft angel and New Year's gnomes
At Christmas, it is customary to give angels and, for some reason, gnomes. Well, let's support this idea with our creativity. According to the pattern below, you can make different configurations.

Pattern.

Here's how beautiful it turns out.

Of course, this is a difficult option and requires skill and diligence. But there are also simpler ideas.

Now let's move on to the gnomes. We also cut out two pieces for each part. We sew them together and fill them with cotton wool. There are only three important elements: hat, legs and body.

See how you can decorate your house with a garland for Christmas. The diagram is attached.

Another template for sewing such funny helpers .


Garland idea.
Well, "gingerbread" men for you for inspiration. Of course, they are also made of felt.

You can add wings to them and you will also get very cute angels.
Stencils and schemes for New Year's toys in the form of mittens
No winter is complete without mittens. We always need these helpers. Therefore, you can make a toy in this unpretentious version.

Scheme for crafts with a snowman.


Flat idea of mittens and felt boots.

In general, the scheme of the mitten is very simple, but I will give a couple more. 

Use the one that is more convenient for you.
Simple craft "House"
Of course, fabulous houses, where comfort and festive mood reign! This is also a great craft idea! You can take any template. The basis, of course, is a square and a triangle for the roof.

Houses can be fantasy and fabulous, but we believe in magic and fairy tales.

Yes, contrasting colors harmonize very well with each other.

Use sequins, beads, beads as decoration. 
I give a template by which you can create a whole composition.

And here the fairy houses with rounded corners look very cute.


I think that such a toy will not leave anyone indifferent. Hands just itch. sew something.
New Year's felt toy "Santa Claus" with patterns and patterns
Nowhere without Santa Claus. We have been waiting for him every year since childhood. We are waiting for gifts and embody his image in crafts.
Here is a scheme for such a good man.


And there is a pattern for that.


very easy to do such an old man.

European Santa Claus is also familiar to us.

Idea for kids with glued parts.

Three ideas of Frosts at once. They differ in the shapes of hats and beards.
It’s not a shame to put them under the Christmas tree next to.
Schemes and templates for the New Year felt boots
The idea to put gifts in felt boots, socks and boots came to us from the West. And got very accustomed. Moreover, this symbol of the New Year and Christmas is very bright and funny. You will not meet him every day on store shelves.
Here is a diagram of a gnome boot with cuffs.


And here is a felt boot with Frost.

Step-by-step scheme for making a boot with a snowman.

According to the same scheme, you can make such a boot, only with a different decor.

In general, the direction of thought showed. You only have a flight of fancy and its realization.
Patterns of the symbol of 2019 year of pigs and piglets
I decided to give you a couple of piglet patterns. This is the symbol of 2019. And yes, they are very cute animals. Especially if they are made of fleecy felt.


I thank all the craftsmen and craftswomen who share their work! Thanks to their golden hands, we can create on our own without racking our brains over making templates and stencils.

Who decided that the pig must be pink? And we'll make it green!

Of course, these are not all ideas, but these are the simplest and cutest of all that I have seen.
Master classes "deer" from felt to school
Did you get an assignment at school? Make a craft for the New Year. Of course, someone will run into the forest for cones and branches. And we will take the felt and make it. Let's make it with Santa Claus and a deer. This craft is sure to please teachers.


Well, if you are not afraid to start a real soft toy. I propose as an idea for such a deer.

To decorate a class or group in kindergarten, make such beauties.


Kids will love the smiling crafts with bright accents.


Another Bambi idea.

Many small figures make an excellent garland.


Another detailed pattern with a connection diagram of parts.

we will definitely not pass by such sadness. 
Another deer idea.

In general, animals are also a great theme for New Year's decor. 
You need a lot of perseverance and patience. After all, if you sew the seams manually, then you need to observe the distances between the seams, then the craft will turn out to be neat and decent.
Christmas toys made of felt
Why buy toys when you can decorate the Christmas tree with homemade crafts. Believe me, it will not look old-fashioned, but will only emphasize your individuality. A masterfully made decoration will raise many questions and admiration.

Different types of bells, stars and other ideas will noticeably cheer you up.
Here detailed diagram making a snowman bell. She is very nice to me.


And in general, snowmen are a great and not at all hackneyed decoration idea. 
Penguins, northern bears, they can also be used for a winter theme.

A few more simple ideas. I will not give schemes here, they are all in the article. Yes, and they are drawn easily with their own hands.


A small master class of a Christmas ball with a fox and a deer. All parts are glued together.


Winter hearts are also relevant for suspensions.

More creative ideas.


Many schemes and patterns of New Year's symbols.


The snowflake pattern will decorate any craft.

Buttons and ribbons add personality.

The idea of a glass of champagne is also not for everyone.

Here is a detailed master class for making a colorful Christmas tree ball. I used felt in two colors.


Of course, we will not do without stars and snowflakes. Make substrates and colorful details. Using just one template, you can make an infinite number of crafts.


Flat stars, without filler, can be decorated with beads. It will look very impressive.

You can also play with the shapes of the snowflakes!

Thank you for your attention. My task was to inspire the creation of crafts and show how much interesting you can create, and instill a love for felt in children. After all, this is a wonderful and simple material for creativity.
tweet
Tell VK
Christmas tree, Christmas tree -
Forest fragrance.
She really needs
Nice outfit.
Let this Christmas tree
At the holiday hour
With every needle
Pleases us.
See what original and beautiful Christmas trees can be sewn from felt. It would seem that the same material was used, and which different variants may turn out. Today we present to your attention a selection of Christmas trees for inspiration from different masters.
To make Christmas trees you will need:
- Felt of different colors;
- Sewing threads of different colors;
- needles;
- Sintepon, synthetic winterizer or holofiber for stuffing;
- Chalk, a piece of dry soap, a pencil or a marker for transferring the contours of the pattern to felt;
- A pattern of Christmas trees and small decor printed or redrawn on paper;
- Beads, beads, small buttons, etc. for decorating Christmas trees;
- Large diameter wire for the frame of some Christmas trees;
- Ribbons and cords for hanging some Christmas trees.

Some Christmas trees are based on a cone with a round bottom - cut out of felt, sewn and stuffed with synthetic winterizer or a cone cut out of cardboard, stuffed with newspapers and decorated with felt. Choose any of these two options for making your Christmas tree, in any case, the Christmas tree will look spectacular.

If your Christmas tree is based on a cardboard cone, the decor is glued on it (for example, on Moment Crystal glue). On sewn from a felt cone - the entire decor is sewn in advance (before sewing the cone with the bottom) or glued after sewing and stuffing the cone.

Below is a selection of Christmas trees sewn from two halves of the pattern (front and back), stuffed with padding polyester and planted on a wire or wooden leg. The curlicues on the tops of the Christmas trees look very funny, don't they? The Christmas tree in Santa's hat is amazing.

Below are Christmas trees with loops for hanging. original idea will decorate the living Christmas tree small felt children-Christmas trees. You can also glue a small magnet inside the Christmas tree and place it on the refrigerator.

Wonderful ideas for a Christmas tree with long rope legs and the idea of a Christmas tree holding the number of the coming year in its hands.

Here are some more great ideas:


With the approach of the New Year, we all begin to feel the atmosphere of the holiday: the streets of the city are lit with festive lights, large decorated Christmas trees appear in the squares, and shops sell Christmas decorations, lanterns, tinsel. It remains only to add a little holiday to the house by decorating the interior with New Year's crafts.
One of the main symbols of the New Year is the Christmas tree, and in this article we will tell you how to make a Christmas tree out of felt with your own hands. Working with felt is quite simple, and even beginner needlewomen can create very cute products.
We have collected for you more than 20 master classes on making a felt Christmas tree with your own hands. In addition, in this article you will find patterns and photos of ready-made Christmas trees made of felt.
#1 Mini Christmas tree made of felt squares
Start by cutting out 25 felt squares (five of each size). Now cut out five small circles of felt. Tie a knot at the end of the thread and string circles (this is the trunk of our Christmas tree). Then, in ascending order, string the squares, starting with the largest and ending with the smallest. Decorate the top with an asterisk and the felt Christmas tree is ready!
#2 Herringbone from a star
From a simple star-shaped pattern, you can make an unusual mini Christmas tree, which will be a wonderful decoration or gift. You can download the finished pattern below.

#3 Volumetric Christmas tree

#4 Garland of felt Christmas trees
From felt Christmas trees of various shapes and colors, you can make an excellent New Year's garland. You only need to cut out Christmas trees from felt (the template can be downloaded below) and decorate them with appliqué. At the end, glue the Christmas trees to the thread and you can hang the garland.

You'll like it:
#5 Simple Christmas tree
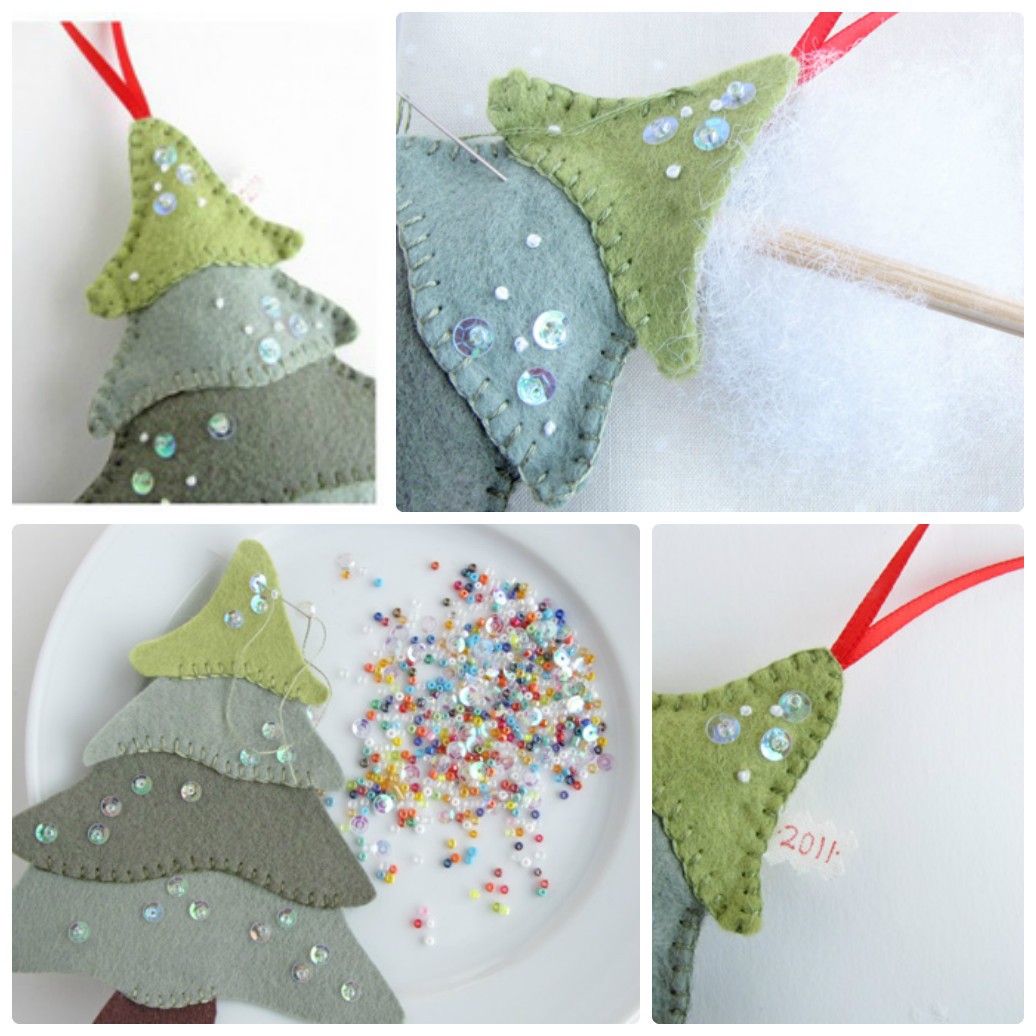
Herringbone in the shape of a triangle, decorated with ribbons, buttons, sequins and embroidery. Such a Christmas tree will be a great addition to a gift or decorate any interior.

#6 Candy holder
You can make such a Christmas tree with a festive candy instead of a trunk in just a few minutes. We cut out a Christmas tree from felt, fold it in half and make 4 cuts. Then we insert a lollipop and decorate the craft.

You will be interested in:
#7 Herringbone from semicircles
We make a paper or cardboard base. Cut the felt into strips. We cut out one side of the felt strips in semicircles, and then glue it to the workpiece.

#8 Herringbone of triangles
To make such a Christmas tree, you will need felt (cut into strips), paper blank in the form of a cone, glue. On one side, cut the strips into triangles, and then glue them to the paper blank.

#9 Herringbone needle bed
Real needlewomen will like this gift: a Christmas tree-pincushion. Cut out blanks from felt, sew them together, then fold and sew. Inside such a Christmas tree, you can insert foam rubber or any other filler, and you can decorate with safety pins.

#10 Herringbone with decorative stitching
And the owners of special sewing machines with a decorative seam will cope with such a decor. However, if there is no machine, but there is enthusiasm, you can embroider snowflakes manually, although it will take much more time.

#11 Christmas tree made of felt triangles
To make such a Christmas tree, you will need: a paper cone, felt triangles, glue. Glue the bottom of the cone with a strip of felt, and then start gluing triangles from the bottom up until the entire cone is filled.

#12 Christmas tree from circles
This master class is very similar to the previous one, only circles are used as constituent elements instead of triangles.

#13 Christmas tree made of circles and pins
And here is another Christmas tree made of felt circles. This master class differs from the previous one in some nuances. First, you will need a special cone-shaped foam or foam blank. Secondly, the circles are attached to the workpiece with safety pins, so you will need a lot of them. Additionally, it is absolutely not necessary to decorate such a Christmas tree, and if you take pins with multi-colored bead heads, then the Christmas tree will look like with toys.

#14 Garland of felt Christmas trees
A very unusual garland will turn out from felt Christmas trees glued to clothespins. Clothespins can be attached to a rope, or you can hang Christmas trees separately in different places. If there are children, you can play a game with them, after hanging the Christmas trees in the most unexpected places in the apartment, tell the baby to find them all.

#15 Herringbone brooch
From felt, you can make a Christmas tree brooch, which will become great gift self made friends and relatives. By the way, with such a brooch it is quite possible to walk until the New Year, as if creating a festive atmosphere for those around you, for example, work colleagues.

#16 Christmas tree decorated with knots
You can decorate a felt Christmas tree with anything. This MK shows how you can decorate crafts with thread knots. It turns out original and stylish.

#17 Christmas tree-rainbow
Remember, a little higher was a master class on how to make a Christmas tree from felt squares? So, this is about the same, only instead of squares you need to cut out circles of different sizes, and then string them on a nick.

#18 Christmas tree decorated with beads and threads
And here is another MK for decorating a Christmas tree made of felt. It uses beads and blue threads. You can create your own combination of colors and pattern. We only help with ideas!

#19 Simple Christmas tree for kids
And another Christmas tree from circles. Only for this craft you will need a base cone. You can make it yourself from plain paper. Then cut out the circles, in the middle of each of them make an X-shaped cut and put on the base. The design is completed with a felt cone. You can decorate with beads, sequins, rhinestones.

#20 Felt Christmas tree
Another version of the mini Christmas tree in red and white. Simple and tasteful.

See more felt ideas:
#21 Herringbone decorated with sequins and beads
You can download a pattern of such a multi-layer Christmas tree below. The product is decorated with sequins and beads. Very simple but effective.
#22 Herringbone with red thread
Cut out two pieces of felt. Poke small holes around the edges of the tree. Now thread the thread through these holes. Before you completely sew up the Christmas tree, put cotton wool or any other soft filler inside and only then sew up the Christmas tree. At the top, tie a bow, cut off the extra threads and the Christmas tree made of felt with your own hands is ready!

#23 Composite Christmas tree
You will need thick felt, from which you need to cut out two parts of the Christmas tree. In one blank, cut a hole approximately to the middle from the top, and in the other from the bottom. Using glue, form small balls (Christmas decorations) from the threads. Drip drops of glue on both blanks and glue the balls. Then turn the blanks over and repeat the procedure. Now you need to wait until it dries completely, and then insert one blank into another. The felt Christmas tree is ready! You can download the pattern below.

#24 Christmas tree made of felt roses
Very beautiful craft get from felt roses. Cut out a circle from the felt, and then cut it in a spiral. Roll the workpiece into a circle and glue it with glue. Now it remains to glue the roses on the cone and the Christmas tree is ready!

#25 Christmas tree bag for sweets
Cut out two triangular blanks from felt and one oval for the bottom. Cut a transverse hole in one of the triangular blanks. Then glue the bottom to both triangles and glue the triangles themselves together. The bag is ready, it remains only to decorate it and put candy inside.

#26 Herringbone from separate parts
To make such a Christmas tree, each composite branch must be sewn separately. And then combine all the Christmas tree paws into a single design. You can download the pattern below.

And more ideas for inspiration


Approaching New Year holidays! Everyone rushes to the shops for gifts, but handmade gifts will bring more joy than store bought ones. In this tutorial, I will show you how to make a decorative felt Christmas tree with step by step photos. Such a Christmas tree can be placed at home on a shelf, at work on a table or in another convenient place. It also makes a great gift for friends and family.
In order to make this decor element we need:
- green felt;
- multi-colored buttons of different sizes;
- filler;
- 2 eggs from kinder surprise;
- cardboard;
- yellow fleece;
- satin red ribbon 3 mm wide;
- decorative braid;
- pink corrugated paper;
- barbecue skewers;
- putty;
- green threads;
- red knitting threads;
- glue gun;
- decorative element - a rosette, you can use any other.
On a piece of paper, draw and cut out the shape of our Christmas tree.

We put the Christmas tree pattern on the green felt, circle and cut out two such details.

Choose from a variety of buttons different buttons both in color and size.

We combine by colors and sew in a chaotic manner to the felt.


The next step is to assemble the Christmas tree. We put the resulting parts on top of each other. For convenience, we cut off with needles.


It is better to start with a rounded top, along the way, you should immediately fill it with filler, it will be much more convenient to do this now.


Now we will make boots for ours. To do this, take two eggs from the Kinder.

The small part should be cut as shown in the photo.

Thus, when the two parts are combined, something similar to a shoe is obtained.

We put the resulting shoes on cardboard and cut out two soles. We wrap the sole corrugated paper and secure with a glue gun. Also, using a gun, we glue the parts of the boot to the sole.
Next, glue a piece of fleece on the boot, where the piece of fleece is rectangular, one side is equal to the side of the sole plus a small allowance, the other side is equal to the height of the boot, plus a little more to fold the fabric inside the boot and secure. We make small folds in front of the boots and fasten them with a needle and thread.


We glue the decorative lace on the bottom of the shoes, fold the remaining fabric on top inward and glue it.


To make the legs of the Christmas tree, we take four barbecue skewers for each leg. For convenience, we take two plugs designed to fasten the radiator fasteners, which are shown in the photo.

We insert skewers into them and wrap the legs with red knitting thread.

We insert the legs into the non-wired Christmas tree connectors, and fasten with a needle and thread.


Using a glue gun, we fasten the legs and boots.

We breed putty and fill the boots of our Christmas tree.
We make small bows from satin ribbon and glue on shoes.

We also glue a decorative element to the top of the Christmas tree.

New Year's decor - a Christmas tree made of felt with your own hands is ready! Happy New Year everyone!

How to do it - see tutorials here.

See how to do it here.


